Restarting a Nintendo Switch is a fairly simple process, but it can be difficult to figure out if you don’t know how. If your Nintendo Switch is having trouble, restarting it can often be a quick and easy fix. In this blog post, we’ll cover how to restart your Nintendo Switch so that you can get back to gaming in no time.
What is a Nintendo Switch
The Nintendo Switch is an incredibly popular gaming console, capable of providing hours of entertainment and fun. Whether you’re playing in handheld mode or with the included Joy-Cons, the Switch offers something for everyone.
The Nintendo Switch is a gaming console that was released around 2017. It is a hybrid console that can be used both at home and on the go, making it one of the most versatile consoles on the market today. The Nintendo Switch has quickly become one of the most popular gaming systems for both adults and children.
The Nintendo Switch comes with a variety of games, including some of Nintendo’s most beloved franchises such as Mario and Zelda. This makes it an excellent choice for anyone looking to get into gaming or just wanting to enjoy some of their favorite classic titles.
Whether you’re playing your favorite game or streaming something from the internet, sometimes you may need to restart your Nintendo Switch. Restarting your system can help to fix any technical issues and ensure your console is running optimally.
Why is it necessary to restart your Nintendo switch?
Restarting your Nintendo Switch is an important part of keeping your console in top condition. Not only does it help reduce the risk of technical issues, but it can also help you enjoy your gaming experience more. There are a few reasons why it’s important to restart your Nintendo Switch on a regular basis.
It helps clear out any memory or data that has been stored in the console’s RAM, which can improve performance and help prevent technical issues.
Restarting your Switch will also help reduce the amount of battery power used while gaming, as it allows the console to enter into a low-power state.
Restarting your Switch can help with game compatibility, as some games may require a restart before they’ll run properly.
How to restart the Nintendo Switch
In restarting a Nintendo Switch, the best way is to properly shut it down and after shutting it down, you then switch it on again. To properly turn off your Nintendo and switch it back again,
Press and hold the power button on the top of the device until the power menu appears.
Now, disconnect your Nintendo from any external power source. The Nintendo Switch can be restarted even when it is not connected to a power source, but disconnecting it will ensure that the device is completely powered off.
Wait a few seconds after disconnecting the Nintendo Switch from all power sources to allow the device to fully shut down.
After the Nintendo Switch has to been powered off and disconnected from all power sources, you can now press and hold the power button again to restart the device.
Wait for the Nintendo Switch to boot up after pressing the power button.
It will take a few moments for the Nintendo Switch to boot up and be ready to use again.
Conclusion
Restarting a Nintendo Switch is a simple process and should be done periodically to help keep your system running smoothly. All you need to do is hold down the power button on the top of the console for 12 seconds or until it shuts down. Then, press the power button again and wait for the console to boot up. This will ensure that any programs or processes that are running are closed properly. Restarting your Nintendo Switch regularly can help resolve any technical issues you may be having with the console.
File sharing affects many activities. Choosing cloud storage is considered to be the best option that best meets the needs of consumers. The use of secure file sharing by a company can significantly speed up the solution of a number of work issues, allowing the company to be more cost-effective and competitively oriented.
However, it is worth keeping in mind that ignorance of the specifics of the software, or using it incorrectly, can lead to unauthorized persons gaining access to the use of files, which becomes a significant problem. Information leakage in many industries can have negative consequences, which can lead to financial losses and even ruined reputations.
File Sharing Security: What You Need to Know
The number of remote employees has increased over the past three years. Due to recent situations in the world, more and more companies are favouring remote work, which allows you to work regardless of the conditions. For this reason, it is more often necessary to look for options to store and share information. A large number of businesses are choosing the option of cloud storage, which has several weighty advantages.
It’s worth considering, though, that this type of data storage and sharing has its own risks. Uploaded information can be subject to hacking or even accidentally fall into the wrong hands. Although data sharing has a lot of advantages, you should not discard the option of losing access, losing control over it, or even hacking. It’s important to use reliable security that will help secure information to avoid facing unexpected situations.
According to statistics, one business can store more than 2,500 files in the cloud and more than 20% of them can be shared with other users.
Corporate files store important information that should not be available to other users.
The Benefits of Cloud Data Transfer
Companies that have good professionals immediately understand the importance of using reliable software that can provide secure data storage. Choosing the best program will help optimize the work and you do not have to worry about data leakage. There are various applications that can help organize the storage and transfer of data in a reliable way.
The main advantages of choosing cloud data transfer are the following:
The possibility to track data;
Control access by selecting participants who will be able to view and edit files.
Sharing access with multiple participants to view and receive data;
Ensuring a high level of data security.
Choosing the right and reliable tool will allow you to adapt to the current realities of the business environment.
Document sharing should be characterized by reliability, and developers must constantly implement changes that will be able to protect against risks.
It is important to remember that the software must meet a number of requirements:
a high level of encryption;
reporting of uploaded data;
authentication of users;
dealing with viruses and possible attacks from hacks.
Anyone wishing to develop his business should pay attention to the choice of a tool that can provide all the functions assigned to it. It is worth remembering that an unreliable source can affect both the reputation of the company and its entire future activities.
What to Pay Special Attention to When Choosing File Sharing Software
It’s no secret that the market offers a large number of different cloud storage options. It can be very difficult to choose the best one among them. For this reason, it is recommended to pay attention to a number of factors that can help make the right choice:
It is important to choose clear software that will not require a long study. All characteristics should adjust to the user, creating a comfortable environment for him.
Data transfer speed. Unloading a large file, the last thing you want is to spend a lot of time on it. It is important to pay attention to the speed, so as not to face difficulties and discomfort later.
Response to failures in work. Developers should promptly resolve any arising nuances and create all conditions to minimize disruptions in software operation.
It is important to get statistics on unloading to understand what goes in and what does not.
Of course, we should not forget that the most important factor is security. Data storage requires complete confidentiality, which will help give access to files only to certain users.
Considering these factors, you can not worry about working with cloud data transfer and be sure that all information will be securely encrypted.
The reputation and activities of secure document sharing software depend largely on the security of data and the ability of businesses to adjust to new realities. You should not be afraid of implementing new features, the main thing is to learn all the information well and start using modern methods of file sharing.
Many people are looking for a way to view the list of blocked numbers. Fortunately, it’s easy to check which numbers are blocked on an iPhone. This article will take a look at how to check blocked numbers on an iPhone. With just a few taps, you’ll be able to view the list of numbers you’ve blocked and manage them if necessary.
What does it mean to block a phone number on an iPhone
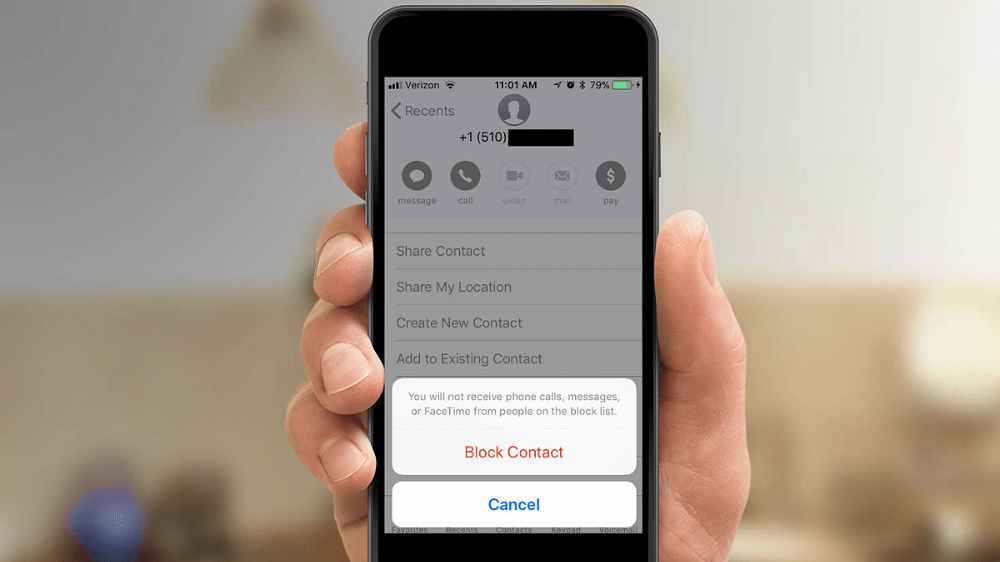
When it comes to controlling who can and cannot contact you on your iPhone, blocking certain phone numbers is a great way to do that. Blocking a number prevents that person from calling or messaging you on your iPhone. But what does it mean to block a phone number on an iPhone, and how can you check which numbers are blocked?
Blocking numbers is an important way to protect yourself and your privacy. Knowing how to check which numbers are currently blocked on your iPhone can help you keep track of who can and cannot contact you.
Why will someone want to block a number on his iPhone?
For many iPhone users, blocking a number is a way of protecting themselves from unwanted or malicious callers. Whether it be someone who is constantly trying to call you or someone who sends you inappropriate texts, blocking the number can provide a sense of relief and security. Blocking numbers is also useful for preventing telemarketers and other automated calls from reaching your device.
When a number is blocked, calls from that number will no longer ring on your device, and any text messages sent from that number will be blocked. Additionally, if the caller leaves a voicemail, the voicemail will not show up in your voicemail box. This makes it easier to avoid the person and prevents them from being able to contact you in any way.
Blocking numbers on an iPhone can be beneficial for many reasons, but it’s important to remember that once a number has been blocked, it can be difficult to determine if it was actually blocked. Fortunately, there are ways to check which numbers have been blocked on an iPhone.
Methods for checking blocked numbers on an iPhone depending on iOS version
Checking which numbers have been blocked on an iPhone can be a tricky process, as the steps depend on the iOS version of your device. If you are using an older version of iOS, the process may be slightly different than what is described below.
Here are the methods for checking blocked numbers on an iPhone depending on the iOS version:
Check blocked numbers on an iPhone running iOS 14 or later
Open the settings app on your iPhone.
Scroll down and tap on the “Phone” option.
Tap on the “Blocked Contacts” option to view a list of all the numbers you have blocked on your iPhone.
Check blocked numbers on an iPhone running iOS 13 or earlier
Open the Settings app on your iPhone.
Scroll down and tap on the “Phone” option.
Tap on the “Call Blocking and Identification” option to view a list of all the numbers you have blocked on your iPhone.
NB: Once you have followed these steps, you will be able to see all the numbers that have been blocked on your device. This can be a useful way to keep track of which numbers have been blocked, so that you don’t accidentally call someone that has been blocked.
Conclusion
At this point, you should have a better understanding of how to check blocked numbers on your iPhone. While it may seem like a difficult process at first, all of the steps involved are relatively straightforward and should take only a few minutes to complete.
With this knowledge in hand, you can now easily determine which numbers have been blocked and which ones haven’t, giving you control over who is able to contact you.
If you have ever had an Excel spreadsheet that was password-protected, you know how frustrating it can be trying to access the data. It’s even more frustrating when you can’t remember the password or don’t know who set the password. In this article, we’ll show you how to remove the password from an Excel spreadsheet quickly and easily.
What is a password protected spreadsheet
A password protected Excel spreadsheet is a document that has been secured with a password so that only those who know the correct password can access the information stored in it. This type of security measure is often used to protect sensitive information such as financial data, personnel records, and confidential business documents.
In order to ensure the security of your data, it’s important to protect your Excel spreadsheets with a strong password. However, if you find yourself needing to open a spreadsheet that’s been protected with a password, you may be wondering how to remove the password from the file.
Why will someone want to remove password from spreadsheet?
Removing a password from an Excel spreadsheet can be a helpful tool for many different purposes.
It can be used to allow others to view or edit the contents of a spreadsheet without having to enter a password. It can also be used to remove any restrictions that have been placed on the spreadsheet, such as preventing data from being changed or deleted.
One common reasons why someone would want to remove a password from a spreadsheet is because it has been forgotten. This can happen when passwords are changed frequently, or if the user is not familiar with the application. In these cases, it can be very difficult to figure out the correct password and thus accessing the spreadsheet may not be possible.
Another reason why someone might want to remove a password from a spreadsheet is if they want to share the spreadsheet with others but don’t want them to have access to certain information. Removing the password will make it easier to share the spreadsheet while still protecting certain elements of the data.
Lastly, removing a password from an Excel spreadsheet can also make it easier to troubleshoot issues that may arise. If there is an issue with formatting or incorrect data, then it will be easier to debug the issue without having to remember the password first.
What is the risk and drawbacks in removing a password from an Excel spreadsheet
Removing a password from an Excel spreadsheet can provide an increased level of convenience for the user, but it is important to recognize the risks and drawbacks associated with this action.
First and foremost, removing a password from an Excel spreadsheet can make it much easier for unauthorized users to gain access to your data. While the use of strong passwords is recommended for protecting confidential information, without a password in place, any user can open the spreadsheet without authentication. This could lead to malicious individuals making unwanted changes to your data or stealing sensitive information.
Another risk is that, removing the password can expose your data to errors or corruption. If the spreadsheet contains formulas or macros, they could be corrupted if a user makes changes or edits them without authorization. Similarly, if the spreadsheet is edited by multiple users, removing the password means there is no way to prevent data entry errors, which can also cause problems.
Lastly, if you need to share the spreadsheet with other users, they will not be able to access it unless they know the file name and where it is located. Without a password, anyone with access to the file can easily view or modify its contents.
NB: Removing a password from an Excel spreadsheet can be convenient, but it is important to recognize the risks and drawbacks associated with this action. It’s best to use strong passwords to protect your data from unauthorized access and to ensure that changes are not made without authorization.
How to remove a password from an Excel spreadsheet
1. Using the built-in password removal feature
Removing a password from an Excel spreadsheet can be a difficult task. Fortunately, there are several methods to do it, and some of them are surprisingly easy. In this article, we’ll look at how to use the built-in password removal feature in Excel to quickly and easily remove a password from a spreadsheet.
Open the Excel spreadsheet in Microsoft Office Excel.
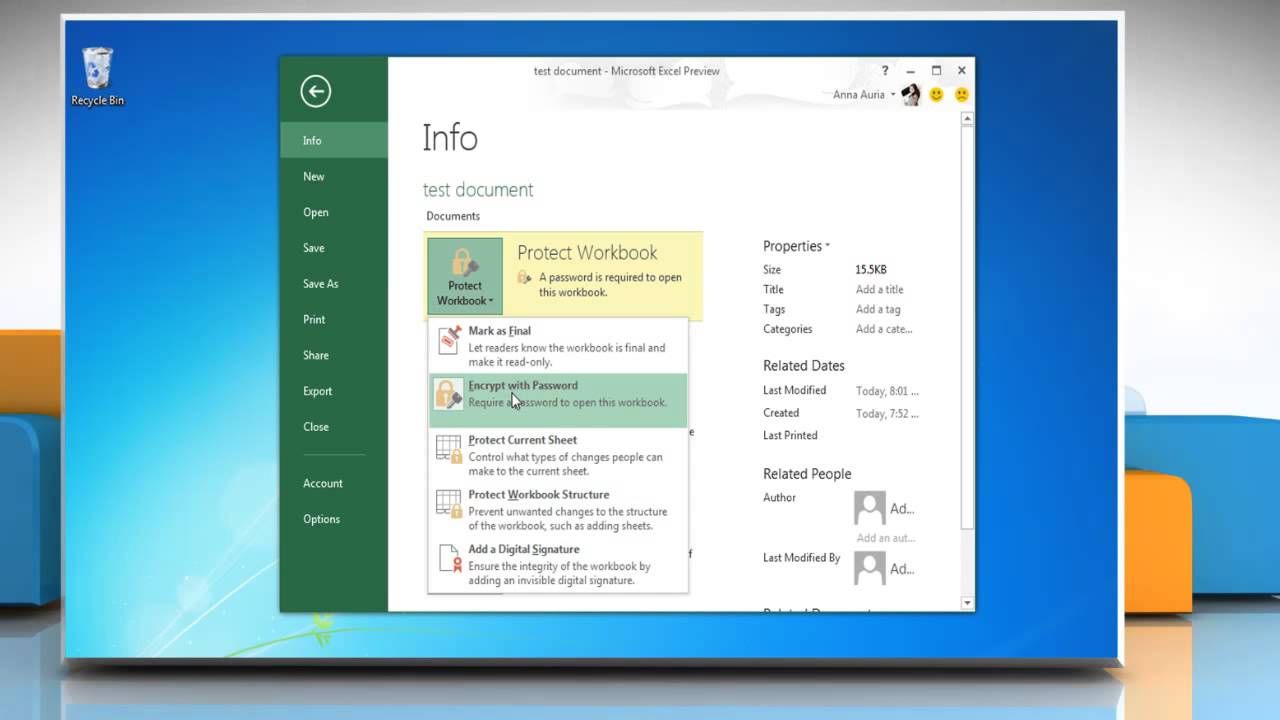
Once the file is opened, select the “File tab” in the top left corner of the window and then select “Info” from the list of options that appears.
On the Info page, click on the “Protect Workbook” button and then select “Encrypt with Password” from the menu that appears.
In the Encrypt with Password window, enter the current password for the spreadsheet and then click OK.
Next, a new window will appear with a message saying that you can now remove the password.
Click on the Remove Password button and then enter the same password again. Finally, click OK to remove the password from the spreadsheet.
That’s it! You have now successfully removed the password from the Excel spreadsheet.
NB: It’s important to remember that this method only works if you know the current password of the spreadsheet. If you don’t know the password, you will need to use one other methods.
2. Using a third party tool such as password cracking software to remove password from spreadsheet
Have you ever had a problem where you needed to remove the password from an Excel spreadsheet but couldn’t figure out how to do it? We will show you how to use a third-party tool such as password cracking software to easily remove the password from your Excel spreadsheet.
First, you will need to find a reliable password cracking software that can help you remove the password from your Excel spreadsheet.
There are many password cracking software options out there, so you should take some time to research the different options and pick one that meets your needs.
Once you’ve chosen a software solution, download and install it on your computer.
Once you’ve installed the password cracking software, open the Excel spreadsheet that contains the password and select Open with Password Cracking Software from the File menu.
Enter your desired username and password, then click OK.
The software will attempt to crack the password and if it is successful, it will display the unlocked Excel file on your computer.
Once you have successfully removed the password from your Excel spreadsheet, you can now make any changes or edits to it without having to worry about it being locked again.
Remember to always keep a backup of your original spreadsheet so you don’t accidentally make changes to it that you didn’t intend to.
Some recommended spreadsheet password software are; Passper for Excel, Excel Password Recovery Master, Straxx Excel Password Remover, Password-find.
3. Remove a password from spreadsheet by modifying the file
By modifying the underlying code of the spreadsheet, you can remove the password from your Excel document and regain full access to the contents. This method is relatively easy, and only requires a few simple steps.
Open up your spreadsheet in Microsoft Excel.
Once it’s open, click on File in the top left corner and then select Save As.
Choose the Save As Type dropdown and select Excel 97-2003 Workbook (.xls) and hit save.
Next, right-click on the newly saved file and select Open with….
From the list that appears, select Notepad or any other text editor.
This will open up the spreadsheet in raw code format.
Scroll down to the bottom of the sheet until you find the words Password= followed by a string of letters and numbers. This is the code for your password.
Delete it and save your file.
Finally, open up your Excel spreadsheet again and the password will be gone!
You now have access to all of your data in the spreadsheet without having to reset or enter a new password.
Conclusion
Removing a password from an Excel spreadsheet can be done quickly and easily. All you need to do is open the spreadsheet, click the Review tab at the top of the Excel window, and select Unprotect Sheet. You may be asked to enter the current password in order to complete the process, so make sure you have it available.
Once this is done, the password will be removed and you can start making changes to your spreadsheet as you please. If you are ever in need of setting a password for your spreadsheet again, you can simply go back through the same steps to add one.
Text messages are an important part of our lives, but it can be hard to keep track of them all. If you have an Android device, you can easily print out your text messages so that you can save them for future reference.
Sometimes you might need to print out your text messages. You can save them to your phone or back them up to Google Drive. However, there may be a time when you need a hard copy. you might need a printed copy of text messages for legal or medical reasons. Whether you have a wireless printer that connects to your Wi-Fi network, or an older printer attached by a cable, you can print out texts.
This article will guide you through the process of printing text messages from your Android device.
What is a text message?
A text message is an electronic communication sent between two or more devices. It is typically done using cellular networks and can be sent from any smartphone or tablet running the Android operating system. The messages can be composed of text, images, video, and audio files.
Importance of text message
In the modern world, text messages have become a powerful and important way of communicating with friends, family, coworkers, and customers. They are often used for business communication and customer service, as well as for personal conversations.
Why is it important to print out text messages?
Printing text messages from your Android device is important for many reasons. For example, if you need to prove that a conversation took place, or show a business partner or customer what was discussed in a meeting, printing your text messages is the best way to do so. Furthermore, if you need to archive text conversations for legal reasons, or just keep them for sentimental value, printing them is a must. Additionally, if you’re having trouble with your phone or the texting app, printing your messages can be a good backup plan in case they are lost.
In short, printing text messages from an Android device can be an invaluable tool for keeping track of your conversations and archiving important documents. With the right software and a few simple steps, you can easily print any text messages you need to preserve.
How to print text messages from an Android device
There are some apps that can also help you print out text message conversations from Android. All you have to do is to visit Playstore and search them out.
SMS Backup+
SMS Backup+allows you to back up SMS, MMS, and call history using separate tags in Gmail and Google Calendar. So you can use it to transfer messages from Android to Gmail, then download the files from Gmail and print them. Besides, the software is free, so you can complete the process at no cost.
SMS to Text
SMS to Text is an SMS backup and recovery application that allows you to export SMS messages and convert them to Plain Text and CSV file formats. Except for the free version, SMS to Text also allows you to export SMS messages, convert them to Excel and HTML file formats, and send them to your email as attachments! After that, you can download the files and print them with ease.
Text to Email
Text to Email is a backup tool for converting text/messages to Text/PDF/CSV and/or as email body for later use. After you used this app to have your Android messages on email, you can download their files or copy the files to word for printing with ease.
Steps to print out your SMS using any of the apps above
Visit the google play store on your android device
In the search bar, type in SMS Backup+ and hit search
When the app pops up, download the app and register using your email address and other required credentials.
Enter your dashboard and setup a backup
You will be asked to allow permission for the app to access your SMS. Click allow to all.
Now, back up all SMS you want to print.
After a successful backup, you can save the backup as a PDF on your phone or tablet.
Open the PDF file on your phone and connect your printer to the WIFI
Click on share and click on PRINT on your device
Initiate printing and allow all backup SMS to print out.
How to print out your SMS using screenshot
Open the Messages app on your Android phone, and open a conversation that you want to print. Then you might start to take a screenshot of the message conversation one by one for printing. To capture a screenshot on your device in most android devices, press the down volume and the switch all at the same time and your screen will be captured. After taking your screenshot,
Connect your device to your printer and open the image from the gallery
Click on the three dots mostly at the top right corner of your device
Click share and hit on PRINT
Your screenshot image will b printed out to be used.
Conclusion
Printing text messages from your Android device can be a great way to save important conversations or print off funny texts for memories. It is a fairly simple process, though it does require a few steps to get the job done.
The first step is to back up your text messages. This will allow you to access them on another device, like a computer. Once you’ve backed up your text messages, you can then access them from the computer and use a program or website to print them out.
Lastly, you can choose to save the printed text messages in either physical or digital form. If you want to save them physically, you can take them to a store that offers printing services and have them printed out for you. If you prefer digital storage, you can save the printed messages on a USB drive or other external storage device.
No matter how you decide to print your text messages, you now have a way to keep the conversations that are important to you close at hand. With these steps, printing text messages from an Android device is quick and easy.
If you have recently purchased a Wii console, then you may be wondering how to connect/pair the Wii Remote to the console. Pairing the Wii Remote with your Wii console is an easy process that can be completed in a few simple steps. In this article, we will discuss the step-by-step process of connecting/pairing your Wii Remote with your Wii console.
What is a Wii remote
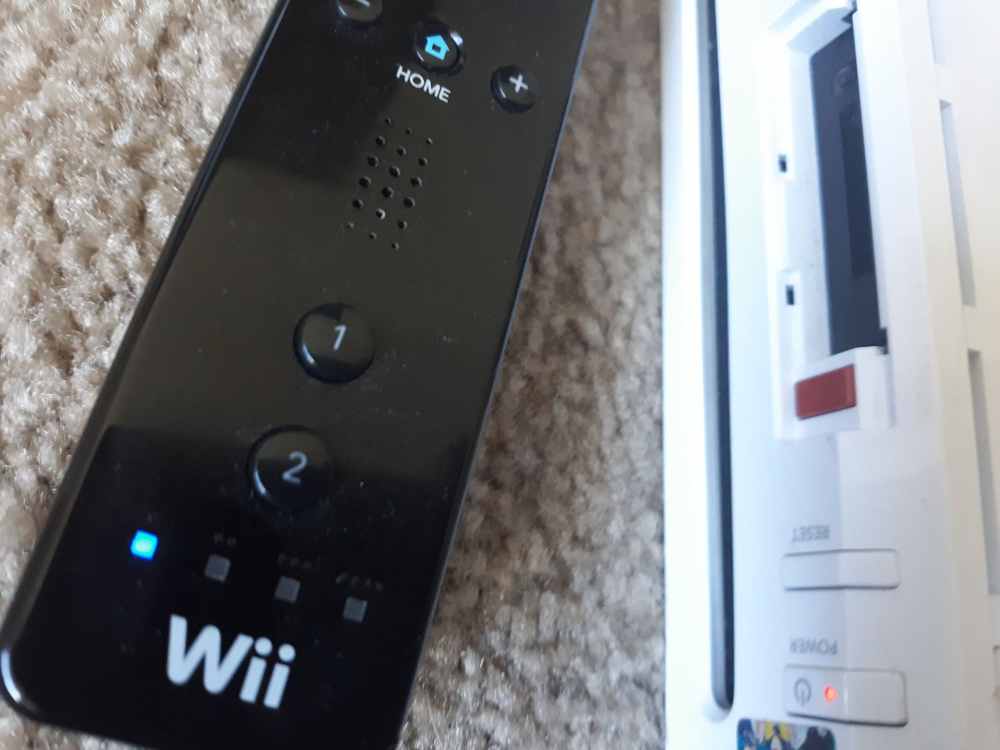
A Wii Remote is a wireless controller that was originally developed by Nintendo for their popular Wii console. The Wii Remote, commonly known as the Wiimote, is one of the most recognizable pieces of gaming hardware ever released. It is a lightweight and easy to use controller that makes playing video games more intuitive and fun.
The Wii Remote features two main buttons – the A button and the B button – as well as a directional pad, Home button, and power button. It also has accelerometers that detect motion and allow users to control games with gestures or movements of their hands and arms. This technology was revolutionary when the Wii was first released and continues to be used in many modern gaming systems.
In order to use the Wii Remote with your console, you must first connect it using a process known as pairing. Pairing allows the Wii Remote to sync up with the Wii Console and recognize all of the buttons and inputs available. Connecting a Wii Remote is easy and can be done in just a few simple steps.
Why will someone want to connect to Wii console
The Nintendo Wii is an incredibly popular gaming console and has been for over a decade. With the Wii, gamers can experience a wide variety of games that feature unique motion controls and more. Whether you’re playing your favorite sports game or Mario Kart, connecting a Wii Remote is essential for a great gaming experience.
Connecting a Wii Remote to your Wii console is a simple and straightforward process. Not only does it allow you to use the remote for gaming, but it also allows you to use the remote for other applications such as the Internet Channel and Netflix.
So why would someone want to connect a Wii Remote to their Wii console? Well, it’s pretty simple: it provides a better gaming experience. By connecting the Wii Remote, you’ll be able to play with friends using up to four remotes. You’ll also be able to use motion control in order to make your gaming experience even more immersive.
In addition, connecting your Wii Remote will also allow you to access new features and applications that you may not have had access to before. For example, if you connect your Wii Remote, you’ll be able to download classic titles from the Virtual Console. All in all, connecting a Wii Remote to your Wii console is essential for any gamer who wants to get the most out of their gaming experience.
With the ability to play with up to four players, use motion controls, and access new features and applications, there are plenty of reasons why someone might want to connect a Wii Remote to their Wii console.
Items and equipments needed to connect a Wii remote
Connecting a Wii remote to your console is a relatively easy process that can be completed in just a few simple steps. Before you can get started, however, there are a few items and equipment you will need to have on hand.
A Wii Remote
A Wii Console
Wii Sensor Bar
Batteries for the Wii Remote
Cables
The first item you will need is the Wii remote. This should come with the original package, but if not, it can be purchased separately. You will also need two AA batteries to power the remote.
You will also need the Wii sensor bar, which is a small device that connects to the console and detects the Wii remote’s movements. The sensor bar should come with the console, but if not, it can be purchased separately.
You will need to connect the Wii remote to the console. You can do this by plugging in the Wii Remote’s sync cable into the back of the console.
Once you have all of these items and equipment ready, you’re ready to begin connecting your Wii remote to your console.
How to connect/pair a Wii remote
Turn on the Wii console and make sure it is in range of the Wii remote.
Open the battery compartment on the Wii remote and insert the batteries.
Press the “Sync” button on the Wii console and the Wii remote at the same time.
Wait for the Wii remote to connect to the Wii console, which will be indicated by a flashing light on the remote.
Test the Wii remote by pressing buttons and moving it to ensure it is functioning properly.
Once you have successfully synced your remote, you’re ready to start playing.
Conclusion
Now you know how to connect/pair a Wii remote to your gaming system. This simple process can enhance your gaming experience and make it much more enjoyable. With the help of the steps above, you can easily connect your Wii remote and start gaming right away. It is worth giving it a try if you haven’t.
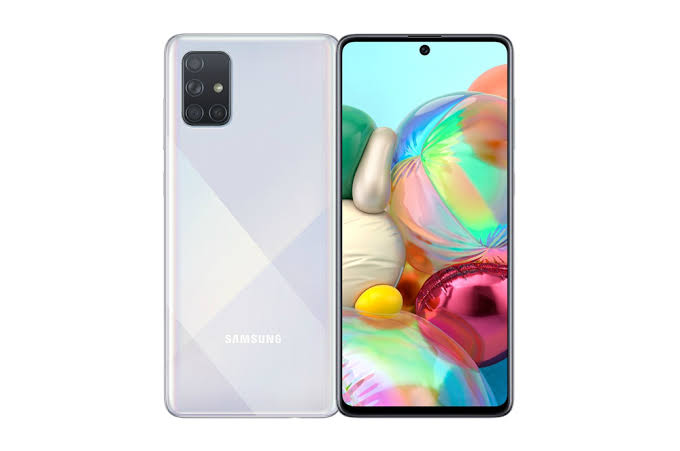
Are you looking for a powerful and stylish phone? The Samsung A71 could be the perfect choice for you. This premium mid-range device comes packed with features, including a stunning 6.7-inch Super AMOLED Plus display, a powerful octa-core processor, and a long-lasting 4500 mAh battery.
It looks stylish with a sleek design and eye-catching colors. In this blog post, we’ll be taking a look at the Samsung A71, reviewing its features, discussing its price, and telling you where to buy it in Ghana.
The Samsung A71 is one of the latest additions to the popular Galaxy A series from Samsung. It’s a mid-range device that boasts some powerful specs and features. The phone has a 6.7-inch Super AMOLED display, a powerful octa-core processor, and 8GB of RAM. It also features an impressive quad-camera setup on the back and a 4500mAh battery for long-lasting performance.
The Samsung A71 comes with a sleek, modern design that has a comfortable, ergonomic feel. Its large 6.7-inch display is perfect for streaming movies or playing games, and it has an aspect ratio of 20:9 that offers plenty of space for multitasking. The phone is powered by a Qualcomm Snapdragon 730 processor and 8GB of RAM, which make it great for handling demanding tasks and multitasking.
The Samsung A71 also has an impressive quad-camera setup on the back, featuring a 64MP main camera, 12MP ultrawide lens, 5MP depth sensor, and 5MP macro lens. On the front, you’ll find a 32MP selfie camera, which is great for taking selfies and recording videos. The Samsung A71 has a 4500mAh battery, which can last up to 24 hours of usage on a single charge. It also supports 25W fast charging, so you can quickly charge your phone when it’s running low.
Features
Design and Display
The Samsung A71 is a premium mid-range smartphone that offers an impressive design and display. It features a large 6.7-inch Super AMOLED Infinity-O Display with a resolution of 1080 x 2400 pixels and a density of 393 PPI. The display has an aspect ratio of 20:9 and features an Infinity-O notch for the 32MP selfie camera. The bezels around the display are quite slim and it is protected by Corning Gorilla Glass 3.
The back of the phone has a premium glossy finish and is home to a rectangular camera module with four cameras, flash and sensors. The Samsung A71 has an aluminum frame with chamfered edges, giving it a modern look and feel. It is available in Prism Crush Black, Prism Crush Silver, and Prism Crush Blue color options.
Performance
The Samsung A71 is a mid-range device that offers great performance and features. With an octa-core processor, 8GB RAM, and 128GB of internal storage, the A71 is sure to provide a smooth and responsive experience. The device also comes with a huge 6.7 Super AMOLED Plus Infinity-O display, delivering a vibrant and immersive visual experience.
In terms of graphics performance, the A71 is powered by the Adreno 612 GPU, ensuring smooth gaming performance. Additionally, the device supports Dolby Atmos sound for a powerful audio experience. All of these components combine to deliver a high-performance experience no matter what task you’re doing.
The Samsung A71 also runs on Android 10, which provides access to a range of features and apps for an even more tailored experience. With Google Assistant, Bixby Vision, and Samsung Pay, the A71 makes life easier than ever. Plus, with the long-lasting 4500 mAh battery, you won’t have to worry about running out of power throughout your day.
Battery Life
The Samsung A71 is equipped with a 4500 mAh battery that promises to keep you powered up throughout the day. With the 25W Super-Fast Charging capabilities of this device, you can quickly and easily recharge your phone without having to wait around. This device also has support for a wireless charger, which allows you to charge up without ever having to plug it in.
The Samsung A71’s battery life is solid and provides plenty of power to get through an entire day’s worth of activities. Whether you’re playing games, watching videos, or simply checking emails, you won’t have to worry about running out of power. And when you do need to recharge, you can do so quickly and easily.
Cameras
The Samsung A71 is a smartphone designed to offer users an excellent photographic experience. Featuring a quad-camera setup, the A71 sports a 64MP main lens, 12MP ultrawide lens, 5MP depth sensor, and 5MP macro lens, allowing you to capture stunning images with plenty of detail and clarity. The A71 also offers a 32MP front camera for taking beautiful selfies or videos.
In addition to its cameras, the A71 is powered by an octa-core processor and 8GB of RAM, making it a fast and responsive device. The device is equipped with 128GB of internal storage, which can be expanded up to 512GB via a microSD card slot. The A71 also comes with a large 6.7-inch FHD+ Super AMOLED Infinity-O Display with an in-display fingerprint scanner.
The Samsung A71 runs on the Android 10 operating system and features an 4500mAh battery with 25W Super Fast Charging support. The device is available in various colors, such as Prism Crush Black, Silver, Blue and Pink.
Audio
The Samsung A71 comes equipped with an impressive audio experience. Its dual stereo speakers, combined with Dolby Atmos, provide users with a powerful and immersive listening experience. The dual-stereo system produces clear, crisp audio that can be heard in any environment, whether you’re listening to music, watching a movie, or playing games. The A71 also features a 3.5mm headphone jack for those who prefer to plug in their headphones.
In addition to providing great sound quality, the A71 also has a few useful audio-enhancing features. For instance, Adapt Sound lets users personalize the sound settings to suit their individual listening preferences.
The A71 also has Samsung’s Pro-Mode feature which allows users to adjust the sound settings based on the type of content they are viewing or listening to. This makes it easier to get the best possible audio experience no matter what type of content you’re consuming.
Connectivity
When it comes to staying connected, the Samsung A71 has you covered. It supports both Wi-Fi 802.11 a/b/g/n/ac and Bluetooth 5.0 for seamless connectivity. You can also connect to your TV with MirrorLink or use the Samsung DeX platform to use your phone as a computer. This makes it easy to transfer data, share documents, and keep up with your daily tasks. Plus, the Samsung A71 is dual-SIM compatible, allowing you to use two different SIM cards at the same time.
Price and where to buy
The phone can be purchased from various online retailers and physical stores in Ghana between GHS 1,450 and GHS 2,200 in Ghana. It can also be purchased on online storeslike Jumia, Jiji Ghana, OLX, Ghanabuysell, Tonaton, etc. Prices varies depending on situation, seasons and where you buy them.
Conclusion
The Samsung A71 is a fantastic mid-range smartphone that offers users an excellent combination of features, performance, and value. It packs in powerful hardware, great display, long battery life, and a stylish design that makes it stand out among other phones in its price range. With its affordable price tag, the Samsung A71 is the perfect device for anyone looking for a reliable and powerful smartphone in Ghana.
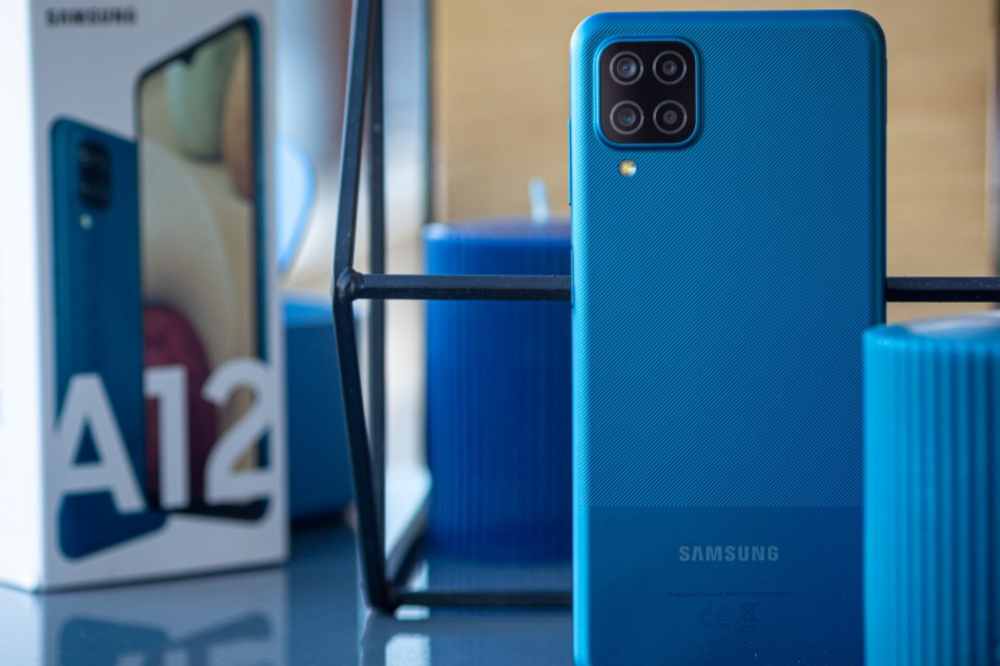
Are you looking for a new smartphone with great features and a competitive price? If so, you should definitely consider the Samsung A12. This phone offers a combination of amazing features, quality performance, and an attractive price tag, making it a great choice for anyone looking for a great new phone. Samsung is one of the world’s most well-known and trusted electronics companies.
It is a South Korean multinational conglomerate, which produces many different products, from mobile phones and tablets to home appliances and televisions. The Samsung A12 is another addition to the company’s range of Android smartphones. It has been designed with both affordability and performance in mind, making it a great option for those who want a good quality device without spending too much money.
Samsung A12
Samsung A 12 mobile phone specification
NETWORK
Technology
GSM / HSPA / LTE
LAUNCH
Announced
2020, November 24
Status
Available. Released 2020, December 21
BODY
Dimensions
164 x 75.8 x 8.9 mm (6.46 x 2.98 x 0.35 in)
Weight
205 g (7.23 oz)
Build
Glass front, plastic back, plastic frame
Sim
Single SIM (Nano-SIM) or Dual SIM (Nano-SIM, dual stand-by)
The Samsung A12 is a budget-friendly smartphone that offers great features at an affordable price. It boasts a 6.5-inch HD+ Infinity-V display with a 720 x 1560 resolution, providing sharp and clear visuals. The device is powered by an Octa-core processor with 2GB of RAM and 32GB of internal storage, which can be expanded up to 512GB with a microSD card.
The A12 runs on the Android 10 operating system and comes equipped with a dual-camera setup, consisting of a 13MP primary camera and 5MP ultra-wide lens. For selfies and video calling, it has an 8MP front camera. Other features include an accelerometer, ambient light sensor, gyroscope, and proximity sensor.
The Samsung A12 packs a 5,000 mAh battery that supports 15W fast charging and is available in four different colors – Black, White, Blue, and Red.
Features
Display
The Samsung A12 is equipped with a large 6.5-inch HD+ Infinity-V display, allowing for an immersive viewing experience. The vibrant colors and crisp visuals make the A12 perfect for streaming movies, playing games, and browsing the web.
Its 19.5:9 aspect ratio makes it great for multitasking, while its adjustable brightness settings allow you to adjust the screen depending on your environment. The display also features eye protection technology, so you can watch without worry of straining your eyes.
Design
The Samsung A12 is a stylish and sleek device that fits perfectly in your hand. It has a slim profile, making it easy to carry around and convenient for everyday use. The device has a 6.5-inch HD+ Infinity-V Display with a punch-hole cutout at the top for the 8MP selfie camera.
The rear of the device is equally as stunning with its triple-camera setup that consists of a 13MP main camera, a 5MP ultra-wide-angle camera, and a 2MP depth sensor. The back also sports a fingerprint sensor, providing an extra layer of security and convenience.
The Samsung A12 comes in a variety of colors including Midnight Blue, Red, and White. With its durable construction and striking design, the A12 is sure to turn heads.
Battery life
The battery life of the Samsung A12 is one of its best features. The phone is powered by a 5,000mAh battery, which provides excellent battery life for those who are constantly on the go. In fact, the Samsung A12 can last up to 16 hours of video playback and up to 26 hours of talk time on a single charge. This makes it a great choice for those who need a long-lasting phone that won’t leave them stranded without power. Additionally, the A12 supports fast charging, so you can top up your battery in no time.
Software
The Samsung A12 comes with the latest version of Android 10, giving users a smooth and intuitive experience. It is powered by the MediaTek Helio G35 octa-core processor and comes with 3GB of RAM and 32GB of storage.
With this combination, you can expect excellent performance from the device, allowing you to run multiple apps simultaneously without any lag or slowdowns. Additionally, the Samsung A12 comes with a rear-mounted fingerprint scanner which makes it easy to unlock your phone in no time.
Performance
The Samsung A12 is a mid-range smartphone that packs a lot of punch for its price. It runs on a Mediatek MT6762D chipset, has 3GB of RAM and 32GB of onboard storage. The phone also features an 8MP rear camera, a 5MP front-facing camera, and a 5,000 mAh battery.
As far as performance goes, the Samsung A12 offers good value for money. The Mediatek MT6762D chipset provides a decent level of performance when running basic tasks and the phone runs smoothly even when multitasking. Gaming performance is also quite good, and even relatively demanding games can be played with ease.
Camera
The Samsung A12 is one of the most impressive mid-range smartphones on the market, with an impressive array of features for an affordable price. It comes equipped with a triple camera setup, featuring a 48 MP primary sensor, 8 MP ultra-wide-angle lens and a 5 MP depth sensor. This means that you can take stunning pictures and videos, perfect for capturing your favorite moments.
The A12’s camera also includes various features that enhance your photography experience. It has night mode for capturing great photos even in low light situations and a portrait mode that helps you capture sharp and detailed images. The AI scene detection feature helps you get the best shot by automatically adjusting the settings for different scenes. The front camera is a 16 MP unit, perfect for taking selfies. There are also several beauty modes to help you look your best in selfies.
How much does Samsung Galaxy A12 cost in Ghana?
The price of Samsung Galaxy A12 in Ghana starts from GHS 1,029.00 to GH₵1,550.00. When shopping for the Samsung A12 in Ghana, it’s important to pay attention to the price. Prices will vary depending on the store or online shop, as well as availability. Be sure to check out multiple sources to find the best deal.
Where to buy in Ghana
If you’re looking for the latest Samsung A12 in Ghana, then you have various options. There are various authorized Samsung retailers located in Accra and other major cities that carry the device. You can also find the phone online at trusted e-commerce sites like Jumia, Jiji Ghana, OLX, Tonaton, etc.
Conclusion
The Samsung A12 is an impressive smartphone with a great range of features and a competitive price tag. With its modern design, powerful hardware, long battery life, and great camera quality, it’s clear that the Samsung A12 is a great choice for those looking for a mid-range device that won’t break the bank.
Are you looking for ways to become more efficient while using your computer? Using keyboard shortcuts is an efficient way to quickly perform tasks on your computer. Knowing a few keyboard shortcuts can be one of the best ways to boost your productivity.
In this article, we will provide you with a list of 50 keyboard shortcut keys that you can use to speed up your workflow and get more done in less time. From the most commonly used shortcuts to those you may not know about.
What are keyboard shortcuts keys
Shortcut keys are combinations of two or more keys that, when pressed simultaneously, can be used to perform a variety of functions in different programs. Using shortcut keys can help you to increase productivity and save time while working on your computer.
Not only that, but learning and remembering shortcut keys can also make you look like a tech guru in front of your colleagues.
Benefits of using keyboard shortcuts
Keyboard shortcuts are essential tools for working faster on your computer and can save you a great deal of time. With just a few keystrokes, you can quickly access the tools and functions you need.
Using keyboard shortcuts is a great way to streamline your workflow and quickly complete tasks.
It allows you to move around the system without having to use a mouse or other input device.
Keyboard shortcuts are available in almost all programs and applications, so you can benefit from their usage in a variety of ways.
Not only can using keyboard shortcuts save you time, but they also allow you to quickly make changes to documents, adjust settings, and execute commands.
If you are in a hurry and need to quickly find an application, a specific file, or a tool, keyboard shortcuts can get you there faster than ever before.
50 keyboard shortcuts keys and their functions
Windows Shortcut
FUNCTIONS
CTRL+A
Select all the items in the current window
CTRL+C
Copy
CTRL+X
Cut
CTRL+V
Paste
CTRL+Z
Undo
CTRL+F
search on the current page
CTRL+P
Prints the current page
Windows KEY+L
Lock the computer
ALT+TAB
Switch between the running programs
F2
Rename an object
SHIFT+DELETE
Deletes an item immediately (permanently) without moving it into the Recycle Bin.
Windows KEY+E
Opens Windows Explorer
Windows KEY+D
Minimizes all open windows and displays the desktop & vice versa
ALT+F4
Quit the current program
ALT+F4 on Desktop
Shows an option to Restart, Shutdown or Signout
ALT+ SHIFT+TAB
Switch between the running programs in the reverse order
CTRL+TAB
Switch to the next child window (tab) of a current program, such as the tabs in our web browser
CTRL+ SHIFT+TAB
will move through tabs in reverse order.
CTRL+ drag a file
To make a copy
CTRL+SHIFT + drag a file
To Create shortcuts
BACKSPACE
Switch to the parent folder
CTRL+ click on the link
To open the link in new tab
CTRL+L
Select the current path of the file on Windows Explorer or on Browser
CTRL+F4 or CTRL+W
Closes the current window (tab) of a current program
CTRL+T
Open a new Tab in Browser
CTRL + SHIFT+T
To restore previous tabs in the browser
Type domain name and PRESS CTRL+ENTER
Completion of .com address in browser Eg: Type youtube and CTRL+ENTER will load YouTube website.
CTRL+SHIFT+ESC
Open Windows Task Manager
CTRL+ALT+DELETE
show the menu of Lock, Switch User, Sign Out, Task Manager
CTRL+ plus (+)
Expands (Zoom IN).
CTRL+ minus (-)
Collapses (Zoom Out).
ALT+ENTER
Open the properties for the selected object
Windows KEY+BREAK
System Properties dialog box
CTRL+L
Select the current path of the file on Windows Explorer or on Browser
CTRL+SHIFT+ESC
Open Windows Task Manager
CTRL+ALT+DELETE
show the menu of Lock, Switch User, Sign Out, Task Manager
ALT or F10 THEN UNDERLINED Letter In Menu
Opens the particular menu
Windows KEY+M
Minimize all
Windows Key+ SHIFT+ M
Undo minimize all
Windows Key+ P
Projection Screen (PROJECT)
Windows Key+ Arrow key
To manage a number of the window in the screen (to divide screen)
Alt + Space Bar
Opens menu which moves, minimize, maximize, close the current windows.
F4 on Window Explorer
Selects the Go To A Different Folder box and moves down the entries in the box
Left ALT+left SHIFT+NUM LOCK
Toggles MouseKeys on and off on Numeric Keypad
Windows KEY+R (Run dialog box) & type cmd
command prompt
Windows KEY+R (Run dialog box) & type “OSK“
On-screen Keyboard
Windows KEY+R (Run dialog box) & type mstsc
RemoteDesktop Connection
Windows KEY+R (Run dialog box) & type “appwiz.cpl”
Open “Uninstall” or “Change a program“
Windows KEY+A
Opens Action Center on Right of the screen on Windows10
Windows KEY+W
Opens Window Ink Work-space on Right of the screen on Windows10
Windows KEY+I
Opens Windows Setting on Windows10
Conclusion
Using keyboard shortcuts is a great way to save time and increase your productivity. We hope that this list of 50 keyboard shortcut keys has given you some ideas of how you can use them to your advantage.
With so many combinations available, there is sure to be a shortcut key for almost any task. It may take some time to get used to using these keyboard shortcuts, but the time and effort invested will be worth it in the end.
Are you looking for an easy and reliable way to track your EMS package from the Ghana Post Office? It can be tricky to keep track of your package, especially when you are dealing with international shipping.
In this article, we will talk about how you can easily track your EMS package from the Ghana Post Office so you can be rest assured your package is safe. We will also talk about how you can get your package to get to your destination quickly.
What is an EMS package?
Express Mail Service (EMS), is the Ghana Post Office international mail service. It is a quick and secure way to send packages and documents overseas, and provides its customers with tracking services so they can stay up to date with the progress of their shipments.
Things needed to track an EMS package
Tracking your EMS package from Ghana Post Office can be a straightforward process, provided you have the necessary information. To track your package,
You will need to know the EMS tracking number.
The recipient address.
The EMS tracking number is a unique code assigned to each shipment by the Ghana Post Office. This number is typically printed on the airway bill or shipping label of your package. If you don’t have the number, then you need to contact the sender for it.
Aside the tracking number, you will also need the recipient address in order to locate the package. This information is required to accurately locate the package and ensure that it reaches its destination.
How to track your EMS package
Tracking your EMS package is simple and straight forward.
First, you will need to get the tracking number for your package. This number can be found on the receipt for your shipment or on the EMS label.
Once you have the tracking number, you go the Ghana Post Office website at ghanapost.com.gh.
At the bottom part of the website, locate “track” and tap on it.
Choose your tracking type and fill in the captcha to prove you are human.
Insert your tracking number into the tracking and delivery inquiry field.
You will be shown where your package is in its journey and its estimated delivery time.
Why you should track your EMS package
Tracking your package is important because it helps you keep tab of your package until it arrives safely and on time.
Knowing the whereabout of your package allows you to better prepare for its arrival, as well as take necessary steps to correct any delays or issue with delivery.
When to expect your EMS package
Entering the tracking number into the EMS tracking website will provide you with updates on where your package is currently and when it is expected to arrive. How long your package will take depends on the country it is coming from.
Accra, Tema and their environs will be delivered on the same day. For Takoradi, Cape Coast, Ho and Tamale from Accra, it can take up to 3days for delivery.
Conclusion
It is important to note that tracking your package with the Ghana Post Office EMS can be simple and easy process. With the right tracking number, you can easily find out where your package is and when it will arrive. Following the steps in this article, you can easily track your EMS packages with the Ghana Post Office.