If your MacBook is running slow or an application isn’t responding, it might be time to force quit the program. Force quitting an application is an easy process and can help you get back on track quickly.
Knowing how to force quit on a MacBook can help you save time and frustration when dealing with a stuck program. In this article, we will provide a step-by-step guide to force quit on your MacBook. By following these steps, you’ll be able to quickly and easily exit any program that isn’t responding.
What is force quit on MacBook?
Force quitting an application on a MacBook is a way to stop the application from running without having to shut down your computer. This is useful if an application stops responding, becomes unresponsive, or is otherwise not functioning properly. Knowing how to force quit on a MacBook can help you get back to working quickly and efficiently.
Why is my MacBook frozen?
Sometimes that can happen because you’re running a lot of software or a particularly demanding app. Other times, it can be caused by badly coded software or even malware. Stopping apps that are taking up a lot of processing power can help to stop your Mac from freezing.
How to force quit on MacBook from the Apple menu
First, identify the app that is unresponsive. If you have multiple apps open, the simplest way to indicate the unresponsive app is to look at the cursor. If the cursor looks normal, the app is still responsive. If the cursor resembles the rainbow spinning wheel, the app is unresponsive.
Once you’ve identified the unresponsive app, locate the taskbar at the top of your screen. In the far left, select the Apple logo to access the dropdown menu.
In the dropdown menu, select “Force Quit”
A new window will pop up with all the applications you have open on your Mac.
Select the application you wish to force quit. If you want to force quit more than one application, use the Command to select multiple.
Next, select Force Quit
How to force quit on MacBook with a keyboard shortcut
With the keyboard short code, you will not need to manually locate any apple icon and taskbar.
The menu automatically opens for you and then you select the unresponsive application and you click on force quit.
To access the menu, use the keyboard shortcut Option + Command + Esc.
How to force quit on MacBook using Activity Monitor
A Mac’s Activity Monitor is an easy way to locate troublesome applications, see how much energy or CPU power they are using, and force them to quit.
First, launch Activity Monitor. You can do this by using the Spotlight feature (Command + Space) or by going to Finder > Applications > Activity Monitor.
Once Activity Monitor is open, find and select the app you want to force quit.
After you’ve selected the app, select the stop icon (resembling an octagon with an “X” in the middle).
A pop-up window will ask if you are sure you want to quit this process. Select “Force Quit” from the list of options. The app will then close.
What to do if force quit isn’t working on a MacBook
The force quit feature is the simplest way to shut down faulty applications, but sometimes you can’t even do that. If force quit isn’t an option and your screen is completely frozen, restart your Mac.
Conclusion
Force quitting on a MacBook is an essential skill to have in order to keep your computer running smoothly. Whether you’re dealing with a stubborn program or an application that’s consuming too much of your system’s resources, force quitting will give you the opportunity to quickly and easily end the process.
Do you want to add a sleek, modern look to your MAC? The dark mode is the perfect way to transform the appearance of your laptop or computer. Dark mode allows you to switch your device’s interface to a darker color palette and can help reduce eye strain. If you’re looking for a way to update your MAC and make it more stylish, dark mode is the way to go.
This article will guide you through the steps of how to turn your MAC into dark mode. With these simple steps, you can easily give your MAC a stylish new look.
How to turn your MAC into Dark Mode
Enable Dark Mode using the control center
For a super-fast way to enable Dark Mode, head to the Control Center on your Mac.
Select Display and then click Dark Mode.
You can turn off Dark Mode anytime from your Control Center the same way.
Enable dark mode using Siri
If you’re used to using Siri on your Mac, that’s another way to enable Dark Mode. Instruct Siri to “Enable” or “Turn on dark mode.”
Enable dark mode using system preferences
Another way to turn on Dark Mode is in your System Preferences.
Click the System Preferences icon in your Dock
You can also click on the Apple icon and then click on System Preferences from your menu bar.
Select General and then choose dark next to appear at the very top.
You can turn off dark mode in your system preferences by following the same steps and selecting light next to appearance.
Enable Dark Mode automatically
In addition to Light and Dark, you’ll notice that an Auto option is in the General section of System Preferences. This allows you to enable Dark Mode on a convenient schedule automatically. If you select Auto, you can then set the schedule for Dark Mode in the Night Shift settings.
Go to System Preferences
Click on Displays
Click the Night Shift tab at the top.
Use the drop-down box next to Schedule to turn it on from Sunset to Sunrise or set up a Custom schedule.
How to switch between Light and Dark Modes
You can quickly switch between Light Mode and Dark Mode on your Mac by opening the Control Center in the top-right corner of your screen.
Click Display and select Dark Mode or Light Mode.
Open the Control Center on your Mac.
Click the icon that looks like two slider buttons stacked on top of each other.
You will see this icon in the top-right corner of your screen so that you switch between dark and light anytime you want to.
NB: If you have not updated your computer to macOS Big Sur, you may not see the Control Center icon on your screen which means, you might not be able to use this method.
Why you should use dark mode on MacBook?
Dark Mode on macOS gives you an easy way to eliminate the brightness of apps, menus, the Dock, and other elements on your computer, whether you prefer only to use it when the sun goes down or all the time.
Conclusion
Turning on dark mode is easy. It reduces eye strain and makes it easier to work late into the night. Additionally, it reduces the amount of energy used by your device, which helps preserve battery life. The dark colors help improve the overall appearance of your device, making it look stylish and modern.
Printing documents from a phone can be incredibly convenient, whether you’re in the office or on the go. If you own an iPhone, you can print directly from it without having to transfer your documents to a computer.
This article will provide step-by-step instructions on how to print directly from your iPhone. With just a few taps, you’ll be able to easily print documents, photos, emails, and more.
How to print from an iPhone with AirPrint
Most current printers with wireless capabilities have the AirPrint feature, which allows the printer to easily sync up with an iPhone and print directly. To add a printer to your iPhone with AirPrint;
Open the document, image, or webpage you wish to print. This can be located in your email, web browser, Photos app, Files app, or elsewhere.
Locate and hit the Share button, which is the square with an arrow aiming upward out of its center. If you don’t see this button, depending on the app you’re using, you may need to select the icon of three horizontal dots or the icon of an arrow pointing to the left.
In the pop-up, scroll down until you see an icon of a printer next to the word Print.
Tap Printer, and on the next screen, then select the desired printer from the list.
Hit on Print written in blue in the top-right corner of the screen.
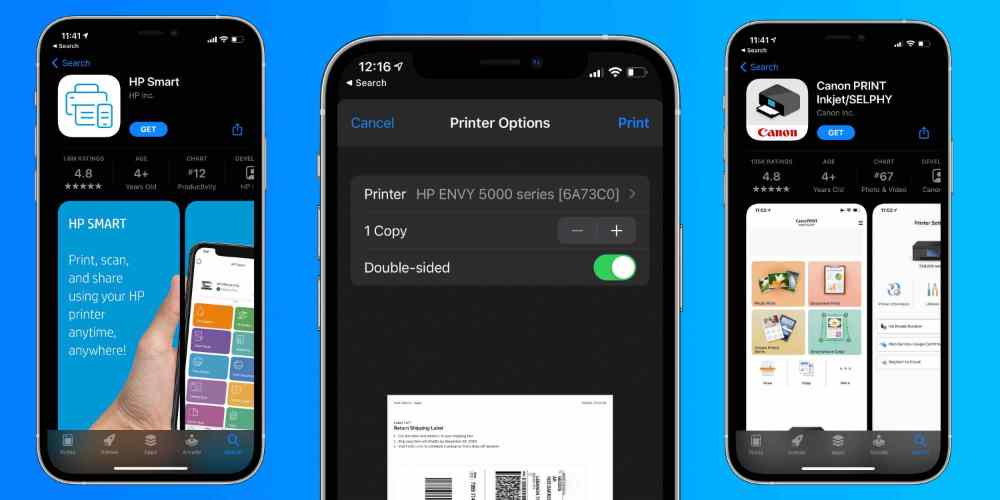
How to print from an iPhone without AirPrint
Some printers do not have the AirPrint features. But hey, you can still print whatever you want to print so far as the printer has a WIFI connectivity. You just have to download a print app for the printer to your iPhone and there you go. To set up a printer on your iPhone without AirPrint;
Open your printer’s app on your device.
Turn on your printer’s Wi-Fi.
Go into your phone or tablet’s Settings and hit Wi-Fi.
Locate your printer under other networks and tap on it.
Pull up the document, image, or webpage you want to print, then hit the Share icon.
You should now be able to connect the printer through the app and print.
How to print from an iPhone with a USB cable
Your printer has neither AirPrint nor WIFI and you still wished you can use it for your printing works from your phone. Well, there is still an option for you if it supports a USB cable insertion which I am sure this time around, it does. All you have to do is to get a USB cable and a USB OTG (on-the-go) adapter that connects your iPhone to the USB cable. To print from an iPhone with a USB cable,
Turn on your printer and connect one end of the USB cord to your printer and the other end to the USB OTG cord. Plug the other end of the USB OTG cord into your iPhone.
A pop-up should appear on your iPhone
Tap OK.
On your iPhone, go to the document you wish to print and tap the Share button.
In the Share menu, select the Print option.
The connected printer should appear next to the Printer on the Printer Options page.
Tap Print in the upper-right corner.
Can I plug my iPhone directly into a printer?
Connecting your iPhone to your printer is possible when you have at least a USB cable and an OTG adapter.
Difference between printer and AirPrint
AirPrint is an IOS or macOS feature that enables easy printing with a printer that supports an AirPrint feature. A normal printer does not support the AirPrint feature which means you will need to connect to WIFI to be able to download. Another option for a normal printer is by using a USB cable and OTG adapter.
How do I manually connect my iPhone to my printer?
To manually connect your iPhone to a printer,
Open Settings
Locate Hardware
Select Printers
Create Printer Station and give it a name.
Tap Printer then selects a printer.
Click Connect AirPrint printer and choose your printer.
If the printer does not support AirPrint, on your WIFI and search for the printer connectivity name and connect.
Conclusion
You don’t need to stress about how you can print a file or image on your iPhone, it has now been made easier and simple. Follow the steps above and you will have yourself in a convenient position.
Robux is an incredibly popular virtual currency that is used in many of today’s most popular online games and virtual worlds. It can be used to purchase a variety of items, from in-game goodies to real-world products. With Robux, gamers have the power to customize their gaming experience and enjoy a wide range of rewards and bonuses.
Unfortunately, not everyone has the money to buy Robux. Fortunately, there are a number of ways to get free Robux. This article will provide you with some tips on how to get your hands on free Robux so that you can enjoy all the benefits of this virtual currency.
First, there are a few websites that offer Robux giveaways and contests. These websites usually require you to register with them and participate in various activities such as surveys and quizzes in order to win Robux.
Another way to get free Robux is by taking part in specific activities such as playing certain video games or watching certain videos. These activities typically offer Robux as rewards for completing them.
There are also several websites that offer Robux for sale at discounted prices. If you have some spare cash, these sites can be great sources for cheap Robux. Just remember to do your research before purchasing any Robux from these sites.
Finally, if you have friends who already have Robux, you can also ask them if they would be willing to give you some of their spare Robux. You may even be able to trade other items for Robux if your friends are willing to accept them.
With these tips, you should now have no trouble getting your hands on some free Robux. So go ahead and start enjoying all the benefits that come with having this virtual currency.
What is Robux
Robux is an incredibly popular online game, with millions of players around the world. It is a sandbox game where you can create and customize your own virtual world and character, as well as engage in a variety of mini-games and activities.
Is Robux free?
Unfortunately, unlike a lot of free-to-play games, there aren’t any available codes to grant you free Robux. There are ways you can get Robux for free but even for that, you would have to do something as payment. There are a lot of potential scams providing free Robux codes so be wary of such advertisements when searching for ways to get free Robux in Roblox.
Free Robux generators and hacks
When you search for anything related to getting free Robux, you’ll often see websites and ads that claim they have free generators that will automatically create unlimited Robux codes for you for free. There is no such thing as a Robux Generator. If a person, website, or experience tries to tell you there is one, this is a scam and should be reported.
Best ways to earn free Robux
The Roblox referral system
This program allows players to get free Robux in exchange for games and library items. The player will first need to go to the Affiliate Program section and sign up. They will then receive a personal link that can be shared with friends. Every time a new user signs up using this link, the player will get 5% of the Robux the new player uses. It’s a great way to get more Robux passively.
Robuxmania
This is a website where players can earn Robux by completing surveys and installing games. This is one of the many Robux Generators online that has received praise across the board from other players. The Robux is then sent to the player’s email as a Roblox login is not required.
Create your own Roblox game
One way to get free Robox is to create your own game. Roblox has a free and immersive creation engine that you can use to create games. You can release these games to smartphones, tablets, desktops, consoles, and virtual reality devices.
Complete Surveys
You can find a variety of surveys online that reward you with Robux currency when you complete them. While they may take time to complete, they are a great way to accumulate a substantial amount of free Robux currency quickly.
Promotional Offers
Many websites offer promotional offers where you can get free Robux currency by signing up for their services or purchasing their products. Be sure to read the fine print before you sign up for anything, as some promotional offers require you to pay a fee or provide personal information.
Contests and Giveaways
Occasionally, Robux will hold special contests or giveaways that award players with free Robux currency if they win. Keep an eye out for any upcoming contests or giveaways on the Robux website or social media pages.
Conclusion
You now know how to get free Robux. There are many different ways to get them, so be sure to try out all of them. Whether you want to complete surveys or download apps, there is sure to be an option that works for you.
Are you looking to cancel your Paramount Plus subscription? Whether you’re no longer interested in the streaming service or simply can’t afford it anymore, canceling is a simple process. In this article, we’ll walk you through the steps you need to take to cancel your Paramount Plus subscription, so you’ll no longer be charged for the service.
What is Paramount Plus?
Paramount Plus is a streaming service that gives subscribers access to a wide variety of TV shows and movies, including original programming. It offers content from major networks like CBS, Paramount Network, Nickelodeon, BET, Comedy Central, and more.
The subscription also gives users the ability to watch live sports, news, and exclusive events. Paramount Plus allows viewers to customize their viewing experience by providing them with personalized recommendations and allowing them to create up to six profiles.
How do I cancel my Paramount Plus subscription?
The method of canceling your Paramount Plus subscription depends on the method you used for subscribing since it’s different for all devices. Generally, you need to go to “subscriptions” from within the account you subscribed with, click on Paramount+, and cancel from there.
How to cancel a Paramount Plus subscription on the web
Open Paramount Plus in a web browser and sign into the account if you’re not already logged in.
Move your mouse over your account name at the top right and then click Account in the dropdown menu.
In the Subscription & Billing section, click Cancel Subscription, then click Yes, Cancel.
How to cancel a Paramount Plus subscription on an iPhone or iPad
Open the settings app from your phone menu.
Tap your name at the top corner of your device.
Tap Subscriptions.
In the Active section, tap Paramount+.
Tap Cancel Subscription and then tap Confirm.
How to cancel a Paramount Plus subscription on Android
On your Android device, start the Google Play app.
Tap your account icon at the top right.
Tap Payment & subscriptions.
Tap Paramount+.
Tap Cancel subscription and follow the directions to cancel your service.
How to cancel a Paramount Plus subscription on an Apple TV
On your Apple TV, start the Settings app.
Tap Users & Accounts, then choose your account.
Tap Subscriptions.
In the Active section, tap Paramount+.
Tap Cancel Subscription and then tap Confirm.
How to cancel a Paramount Plus subscription on a Roku
Using the remote control, go to the home screen.
Select the Paramount Plus channel icon and then press the Star button.
Select Manage Subscriptions.
Choose Cancel Subscription and confirm you want to do this.
How to cancel a Paramount Plus subscription on Amazon Fire TV
Go to Amazon.com in a web browser.
In the top-right corner, bring up the dropdown menu by hovering over your name and Accounts & Lists, and select Memberships & Subscriptions.
Select Manage Subscription next to Paramount+.
Click the link under Manage Your Prime Video Channels.
Under the Prime Video Channels section, find Paramount+.
Select Cancel Channel and confirm.
Can I re-subscribe to Paramount Plus if I cancel my subscription?
Yes, you can re-subscribe at any time, but you will need to go through the billing and payment process all over again.
How to change your Paramount Plus subscription plan
If you want to keep Paramount+ but wish to save some extra money, you can adjust your plan accordingly.
From the Account page on the web, click the Edit Plan link next to your active plan.
You can then select a new plan and click Switch Plan to confirm.
Conclusion
Canceling your Paramount Plus subscription is a relatively simple process. If you’ve decided that you no longer need the streaming service or want to save some money, you can easily cancel your subscription in just a few steps. You can either do it directly on the Paramount Plus website or through your Google Play or iTunes account.
When canceling, it’s important to remember that you’ll have immediate access to all of the content you’ve purchased until the end of your billing cycle. However, after that date, you won’t be able to stream any more content from Paramount Plus.
In this article, we’ll explain how to delete contacts from your iPhone so you can keep your address book clutter-free. Deleting contacts on an iPhone is a straightforward process, and can be completed in just a few simple steps.
Keeping your contact list organized and up-to-date is important, and sometimes that means deleting contacts you no longer need. The iPhone’s user-friendly interface makes it easy to remove contacts you no longer need.
Whether you’re trying to free up storage space or just want to get rid of some outdated contacts, this guide will show you how to delete contacts on an iPhone in just a few steps.
How to delete contacts on iPhone
Deleting individual contacts
Open the Contacts app on your iPhone and tap the Contacts tab at the bottom of the screen.
Scroll to the contact you want to delete and tap on their name.
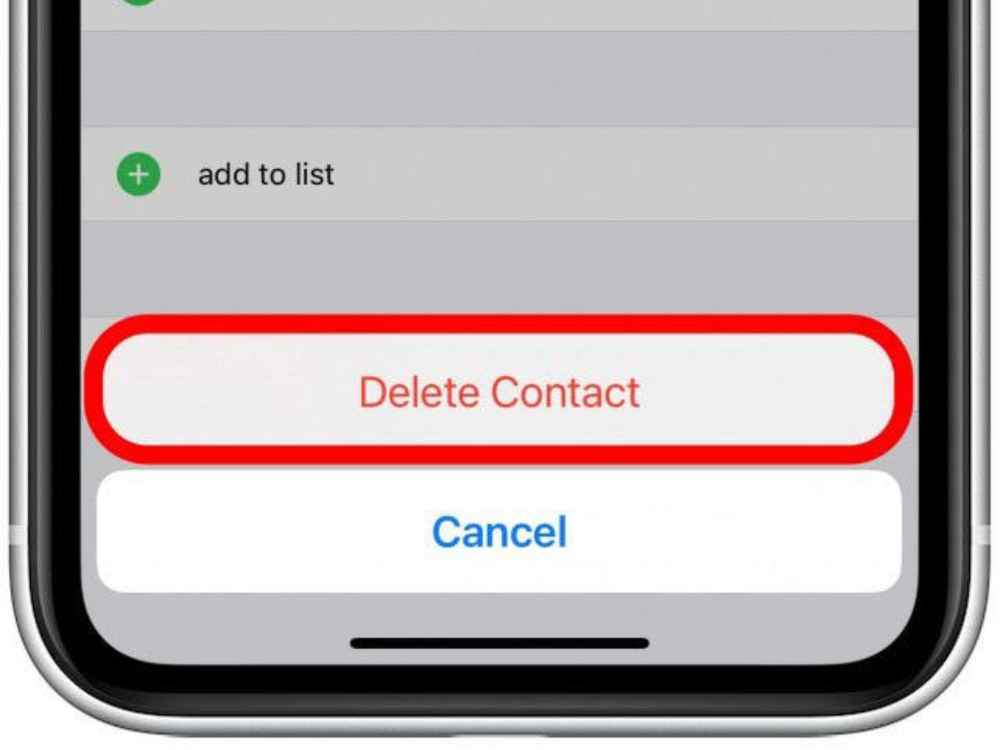
Tap Edit at the top-right corner of the contact’s information page.
Scroll to the very bottom of the page and hit on Delete Contact to confirm your choice.
Deleting multiple contacts
You will need to have a computer to do this and your iCloud account set to save contacts beforehand. To do this,
Head to the iCloud website and sign into your account. You might need to enter a code sent to your iPhone.
Click Contacts.
On the iCloud site, you can also access your saved Photos, Notes, and more.
Find the contacts you want to delete and select them all at once. The way to do this will differ depending on whether you’re using a Mac or PC.
On a Mac, hold Command as you click each contact you want to delete.
On a PC, hold Ctrl as you click each contact you want to delete.
Once you have them all selected, click the gear icon in the bottom-left of the screen, and then Delete.
You’ll be asked to confirm that you want to delete the contacts. Click Delete.
Deleting all contacts at once
If you want to get rid of every contact at once, you’ll also need to use your iCloud account.
Open your iPhone’s Settings app and tap your name at the top to open the Apple ID menu.
Tap iCloud.
On the page that opens, check to see if the toggle switch next to Contacts is enabled. If it is, tap it to turn it off.
You’ll be asked what you want to do with your contacts. Select Delete from My iPhone.
How to block a contact so they can’t call you
There is this number disturbing you and calling you to the extent that, you get so much annoyed. If you just delete it, this number will keep disturbing you. Now, the best way is to block the contact for a peaceful mind You want to block the number but you don’t know how. Well, it is as easy as you may not seem. To block a contact on your iPhone,
Open the Contacts or Phone app and tap the contact you want to block.
Scroll to the bottom of their information page and select Block this Caller.
Tap Block Contact to confirm your choice.
Benefits of deleting contacts from your phone
The ability to delete contacts on your iPhone is a key component of keeping your device organized and running smoothly. By deleting unwanted contacts, you can ensure that the people you really want to keep in touch with are easily accessible and that your device isn’t bogged down by redundant entries.
Here are some of the key benefits of deleting contacts from your iPhone.
Free up storage space
One of the biggest benefits of deleting contacts from your iPhone is that it can help to free up storage space on your device. Over time, contact lists can get crowded with outdated information, which takes up precious memory. By deleting those contacts, you can reclaim some of the storage space that would otherwise be taken up by those entries.
Easier navigation
Removing unwanted contacts can also make it easier to navigate your contact list. With fewer entries cluttering up the list, it will be much easier to locate the contacts you need when you need them.
Increased security
Deleting contacts from your iPhone can help to keep your personal information more secure. When you delete a contact, all of their information is removed from your device, which means that it won’t be accessible to anyone else if your phone is lost or stolen.
Conclusion
Now that you know how to delete contacts on your iPhone, it’s time to put it into practice. Removing unwanted contacts from your iPhone will help you stay organized and make sure you’re connecting with the right people.
Taking a screenshot is a great way to save and share information quickly and easily. Whether you are trying to troubleshoot a problem or just want to remember something for later.
Taking a screenshot on a Chromebook is a good way to capture images or information from your computer screen quickly and easily. Whether you are looking to capture something for personal use or for a school or work project, it is easy to learn how to take screenshots on a Chromebook.
In this article, we will walk you through the steps of how to take a screenshot on a Chromebook, as well as how to save and share those screenshots.
What is Chromebook
A Chromebook is a laptop computer, running the Google Chrome operating system. It is designed for people who use the internet for most of their computing needs, such as web browsing, streaming music and videos, and more.
How to screenshot on a Chromebook
Using a keyboard shortcut
On your Chromebook, press the Shift+Ctrl+F5
A menu will appear at the bottom of your screen.
Select screenshot.
Choose the type of screenshot you want. Whether full screenshot, partial screenshot or windows screenshot and click on it.
The screenshot will be automatically taken.
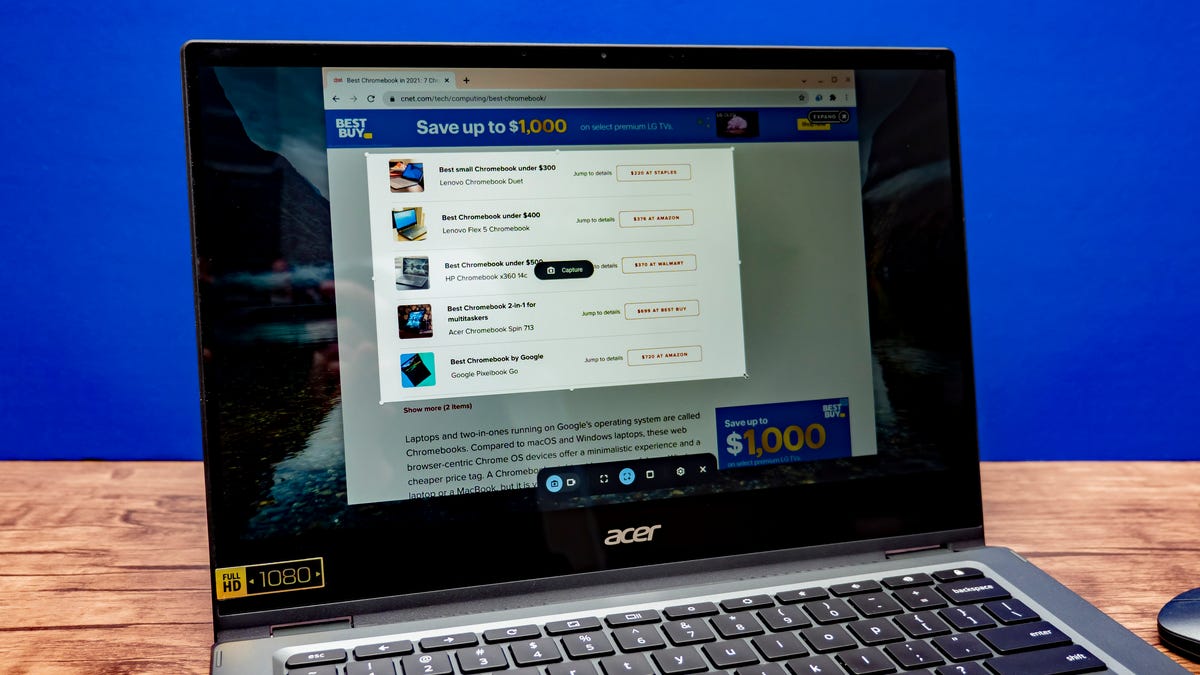
Using quick settings
Go to quick settings on the bottom right corner of your screen and select Screen Capture.
Open the screen you want to capture.
Go back to the Screen capture tool and select the type of capture you want.
Click on it to snap the screen.
Where are screenshots saved on Chromebook?
When you take a screenshot or recording it’s immediately accessible from the Clipboard, which stores the last five things you saved to it. To view what’s available, simply press the Search key button +V.
Screenshots can also be found in your files. Just open the Files app on your Chromebook and you’ll find your screenshots in the Images folder.
How to edit your screenshots
If you want to edit the screenshots you take on your Chromebook, there are several tools available.
Using Chrome OS screenshot tool
It is located in the status area of your screen. You can access it by pressing the Ctrl+Shift+Window Switcher keys at the same time. The tool can be used to capture the whole screen, a particular window, or just a portion of the screen. You can also use it to draw on and annotate your screenshots.
Using online editors such as Pixlr or Sumo Paint
Both offer a variety of tools for editing and manipulating images, including cropping, resizing, and adding text or graphics. These editors are great for quickly tweaking screenshots or making more complex edits.
Using an image-editing program such as GIMP or Adobe Photoshop
if you want to make more in-depth edits, then this tool is the best for you. No matter what tool you use, it’s easy to make your screenshots look great with just a few simple tweaks.
How do I take a screenshot on a Chromebook without a Windows key?
Using Physical Buttons. If you own a convertible, tablet-style, or 2-in-1 Chromebook, you can take a screenshot just like you do on a smartphone. That is, press the Power + Volume down buttons at the same time to take a full-screen screenshot.
Why can’t I take screenshots on my Chromebook?
All you need to do is press the Ctrl and Show windows keys simultaneously. Unfortunately, your Chromebook may sometimes fail to save your screenshots. When this issue occurs, you will see an alert on your screen saying, “An error occurred, failed to save screenshot.” At this point, restarting your laptop may help you fix the issue.
Conclusion
Taking a screenshot on a Chromebook is easy and convenient. With just a few clicks of your keyboard, you can quickly capture an image of whatever is on your screen. By using these simple steps, you can now quickly and easily take screenshots on a Chromebook whenever you need them.
Screenshots can be incredibly useful for making tutorials, capturing errors, or simply saving a moment in time. Whether you’re a student, a professional, or just someone who wants to have a record of their work, taking screenshots on a Chromebook is an easy and convenient way to do it.
Android is one of the most popular mobile operating systems around the world, and it’s been around for a while. With new versions of the operating system being released almost 7every year, it can be hard to keep track of all the different Android versions and their names. In this article, we will provide a comprehensive list of all the Android versions and their associated names, from the earliest version to the latest.
What is android
Android is an operating system developed by Google for mobile devices such as smartphones and tablets. It is based on the Linux kernel and its first version, Android 1.0, was released in 2008. Since then, Google has released numerous updates to the Android operating system, each with a different code name. These code names are used to identify the version of Android that is running on the device.
List of all android versions and their names
Android 1.0 – Petit Four
Android 1.0, also known as Petit Four, was the first commercial version of the Android mobile operating system, released on September 23, 2008. This version of Android included a full-featured web browser, support for third-party applications, and Google Maps.
At the time of its launch, Android 1.0 had the most advanced feature set of any smartphone OS, including the ability to upload photos to online services and access calendar events from multiple sources. Additionally, it featured an improved user interface, with on-screen keyboards and an icon-based home screen for organizing applications.
Android 1.1 – Banoffee Pie
Android 1.1, also known as Banoffee Pie, was the first major update to the original Android operating system. It was released in February 2009, and it included a number of improvements over the initial version. The main changes in Android 1.1 were a few bug fixes and minor feature enhancements, including the addition of an onscreen keyboard, improved camera support, and support for third-party applications.
Additionally, the update introduced several new applications, such as an enhanced music player, a photo viewer, and a web browser. However, the most important improvement was that Android 1.1 allowed for the installation of third-party applications from outside sources. This opened up the platform to a much larger range of developers and made it much easier for users to customize their phones with useful applications.
Android 1.5 – Cupcake
Android 1.5, Cupcake, was an upgrade to the first update of the Operating System. This version of Android was released in April 2009 and brought a variety of new features, including on-screen keyboards, home screen folders, third-party application support, improved Bluetooth support, and voice search.
The user interface of Android 1.5 was much more polished than earlier versions, making it easier to use. Additionally, new widgets were introduced, giving users the ability to customize their home screens. Other improvements included the ability to upload photos and videos to Picasa and YouTube directly from the phone.
Android 1.6 – Donut
Android 1.6, also known as Donut, was a major update to the Android operating system released in 2009. It included several new features and improved performance for users. The most notable new feature was the addition of support for CDMA networks, allowing phones to use multiple carriers at once.
Other changes included the ability to access text-to-speech engines from the settings menu, an updated Google Maps experience with better search capabilities, and a new battery usage indicator. Donut also introduced quick search box, allowing users to quickly find contacts, applications, and bookmarks on their device.
Android 2.0 – Eclair
Android 2.0, code named Eclair, was a significant update to the Android platform, introducing many new features and improvements. The most notable changes included improved browser performance, improved responsiveness and speed of user interface elements, support for larger screen sizes and resolutions, and the addition of the Bluetooth 2.1 specification. Released on October 26, 2009.
Additionally, Android 2.0 saw a major upgrade to the Android Market, which enabled automatic downloads of updates for installed applications, along with access to an expanding selection of free and paid applications.
Android 2.2 – Froyo
Android 2.2, code named Froyo, was released in May 2010. This version of Android was notable for its speed and performance improvements, including the introduction of the Just-in-Time (JIT) compiler which allowed apps to run up to five times faster than with earlier versions. It also introduced native support for Adobe Flash, allowing users to play Flash content directly on their device.
Other features included an improved keyboard and text selection, support for Wi-Fi Direct, improved Bluetooth support, full HTML5 support, and many other new features. Froyo was the first version of Android to allow users to install apps on their SD cards, giving them more control over where their data was stored. Froyo also brought a number of security improvements, including better protection against malicious software.
Android 2.3 – Gingerbread
Android 2.3, code named Gingerbread, was released in December 2010 and was the second major version of the Android OS. Gingerbread brought a number of significant changes to the Android platform, including a redesigned user interface, improved text input, better gaming support, support for near field communication (NFC) technology, and improved power management.
It also added a range of new features, such as support for extra-large screen sizes and resolutions, gyroscope and barometer sensors, multi-core processors, and improved speech recognition.
Android 3.0 – Honeycomb
Android 3.0 Honeycomb was the first version of Android designed specifically for tablets. It was released in February 2011 and brought several new features to the operating system, including a redesigned UI optimized for larger screens, an improved virtual keyboard, and the ability to run apps on multiple cores.
The main feature of Android Honeycomb was the new interface, which featured a customizable app launcher, a holographic visual design, and an improved notifications system. The user could now interact with the OS using gestures, such as tapping and swiping.
For developers, Honeycomb brought a number of improvements including a new NDK (Native Development Kit) for developing apps for multiple platforms, support for more device types, and better security.
Android 4.0 – Ice Cream Sandwich
Android 4.0, also known as Ice Cream Sandwich, was a major update to the Android platform. It was released in October of 2011 and brought with it a host of new features and improvements.
Android 4.0 introduced several user interface changes including a refined look and feel, an improved home screen experience, new widgets and more powerful multitasking. The overall visual style of the system was given an overhaul, with a much more modern look.
The lock screen was also enhanced, allowing users to quickly access their favorite apps and quickly launch the camera. In addition, a new font was added that made reading text on the device easier on the eyes.
Android 4.1 – Jelly Bean
Android 4.1, also known as Jelly Bean, was released in July 2012 and is one of the most popular versions of the Android operating system. It introduced several new features, including Project Butter, which improved the user experience by making animations smoother, expandable notifications, Google Now, and improved voice search.
Jelly Bean also brought a host of bug fixes and stability improvements. Project Butter introduced triple buffering, which eliminated stuttering and lag when transitioning between screens. It also incorporated vsync to reduce screen tearing, and made the user interface more responsive.
Android 4.4 – KitKat
One of the most notable new features of Android 4.4 KitKat was the introduction of the OK Google voice search function. This allowed users to speak commands directly into their device in order to launch apps, search the web, or perform other actions. Released on September 3, 2013.
In terms of performance improvements, Android 4.4 KitKat included several tweaks that made the operating system faster and smoother than ever before. The new Project Svelte initiative aimed to reduce memory usage, making it possible to run apps on devices with as little as 512MB of RAM.
Android 5.0 – Lollipop
Android 5.0 Lollipop was a major release of the Android operating system. It was first unveiled in June 2014, with an official release in November 2014. Android 5.0 Lollipop brought with it many new features and enhancements over its predecessor, Android 4.4 KitKat.
Lollipop introduced several new features such as better control over app permissions, native support for multiple users on one device, and a redesigned Recent Apps menu. The new Material Design look and feel was also implemented across Google’s other products and services, such as Chrome OS and Google Now. This gave Android users a more consistent experience when using different Google services across devices.
The last version of Lollipop, 5.1.1, was released in April 2015. In total, there were five versions of Lollipop (5.0, 5.0.1, 5.0.2, 5.1, and 5.1.1).
Android 6.0 – Marshmallow
Android 6.0 Marshmallow was released in October 2015 and marked the sixth major version of the Android operating system. Marshmallow included a variety of new features that focused on improving the overall user experience.
This included Doze which helps to improve battery life by putting the device into a low-power state when not in use, as well as Now on Tap which provides contextual information based on what is on screen. It also introduced official support for fingerprint scanners and USB Type-C.
Android 7.0 – Nougat
Android 7.0 Nougat was the seventh major version of the Android operating system. It was first released as a developer preview in March 2016 and officially released in August 2016.
Nougat introduced several new features, such as split-screen multitasking, improved notifications, enhanced Doze power management, and more. Additionally, it included support for Vulkan, a new 3D rendering API that would allow apps to better utilize modern graphics hardware.
Android 8.0 – Oreo
The main focus of Oreo is on improving battery life, allowing devices to last longer while still providing the same level of performance. In addition to this, Oreo also includes improved power management capabilities, helping to keep device temperatures low and reduce overall energy consumption. It was released on July 24, 2017.
In terms of security, Oreo has added a number of measures designed to protect users from malicious apps and threats. Google Play Protect is a new feature that scans for potentially dangerous apps and removes them from your device, keeping you safe from malicious software.
Android 9.0 – Pie
Android 9.0 Pie is the latest version of Google’s mobile operating system. It was released on August 6, 2018 and has a number of new features, including adaptive battery and display, gesture navigation, improved security, better accessibility tools, and more.
The most important feature of Android 9.0 Pie is its ability to learn from the user’s habits and preferences. Through machine learning, the operating system can adjust the settings according to the user’s usage patterns, such as making suggestions on how to extend battery life.
Android 10
Released on September 3, 2019. With its 10th version, Android stopped the trend of naming its OS after dessert items. Simply named Android 10. The OS offered improved touch gestures, a floating setting panel, and support for biometric authentication.
Android 11
Android 11 came with big privacy updates, which allowed users to grant permissions related to camera, microphone, and location to apps. It was released on September 8, 2020. You choose to grant access to apps only while they are in use, only once, or outright deny it. Android 11 also made it hard for apps to request location data while working in the background. Permissions were automatically removed from dormant apps.
Android 12
Released on October 4, 2021, Android 12 is the latest Android iteration and will be replaced by Android 13 later this year. Integrating ‘Material You’ into its UI, the Android 12 reimagined how the OS looks on the surface. With Material You, users can set the colour theme for their phone and design it according to their taste.
Android 13
Android 13 is the thirteenth major release of the Android mobile operating system, developed by Google, released for the public on August 15, 2022. Android 13 helps ensure your devices feel unique to you on your terms.
It comes jam-packed with new capabilities for your phone and tablet, like extending app color theming to even more apps, language settings that can be set on an app level, improved privacy controls and even the ability to copy text and media from one Android device and paste it to another with just a click.
Android 14
Android 14 will be the fourteen major versions of the Android operating system. It will arrive as the successor to Android 13. Android 14 will be called Upside Down Cake. According to XDA Developers, the dessert name of Android 14 has been spotted in the Android Gerrit, and the new version is code-named Upside Down Cake.
Conclusion
Android is one of the most popular mobile operating systems in the world. It is a constantly evolving platform, with new versions and features being released regularly. In this post, we have compiled a list of all the Android versions and their names. This list provides a helpful overview of the different versions and helps you understand the evolution of the Android platform over the years.
Do you have a Mac computer and Airpods, but you don’t know how to connect them together? Don’t worry, it’s easier than you think! Connecting your Airpods to your Mac is a simple process that can be completed in just a few easy steps. In this article, we will guide you through the process of connecting your Airpods to your Mac, so you can enjoy all the benefits of listening to music or talking on the phone with your Airpods.
What is an Airpod
Airpods are Apple’s popular wireless earbuds that provide an easy and convenient way to listen to music, podcasts, and more. They use Bluetooth technology to connect to your iPhone, iPad, Apple Watch, or Mac, allowing you to listen to audio without being connected by a wire.
Airpods have become a popular accessory for anyone who wants to enjoy their music and audio with ease. However, many people may be unfamiliar with how to connect their Airpods to their Mac computer. This guide will walk you through the steps on how to quickly and easily pair your Airpods with your Mac.
Once you’ve set up your Airpods with your iPhone or iPad, they will automatically be available to use with your Mac. Just make sure that your Mac is running macOS Catalina 10.15 or later and that it’s signed in with the same Apple ID as your other devices.
How to connect Airpods to MAC for the first time
If your AirPods aren’t already connected to your iPhone, you can connect them directly to your Mac.
With the AirPods in their charging case, open the lid and keep the AirPods inside.
Press and hold the button on the back of the case until the status light starts to flash.
On your Mac, click the Apple icon in the menu bar at the top to open the Apple menu.
Click System Preferences.
In the System Preferences window, click Bluetooth.
In the list of devices, find the AirPods you want to pair the Mac with, and click Connect.
After the connection is complete, the AirPods will appear at the top of the Devices list, ready to be used.
How to connect your AirPods to your Mac if you already use them on your iPhone
Your AirPods are designed to connect to your Mac automatically if you are using the same Apple ID on your Mac and iPhone.
Open your AirPods case.
On your Mac, click the Volume icon in the menu bar at the top of your screen.
In the Output Device section of this menu, select your AirPods.
What to do if you are having trouble connecting your Airpods to MAC
Make sure your Mac is logged into the same Apple ID as your iPhone.
In the System Preferences window click Apple ID to make sure you’re signed in and using the same ID.
Make sure Handoff is turned on.
In the System Preferences window, click General, and make sure there is a check mark next to Allow Handoff between this Mac and your iCloud devices.
Make sure you can see the volume icon in the menu bar.
If you don’t see it, you need to turn it on. In the System Preferences window, click Sound and then click the checkbox next to Show volume in menu bar.
Reasons why your Airpods are refusing to connect to your MAC
If you are having trouble connecting your AirPods to a Mac, there are a few things you can do:
Have you charged your Airpods?
Place the AirPods in their case, plug a USB cable that’s connected to power into the case, and charge them for 1-2 hours.
Is your MAC updated?
You need macOS Sierra or later to install the first-generation AirPods, and macOS 10.14.4 or later for second-generation AirPods.
Have you paired the AirPods to the MAC?
Find the AirPods in the Bluetooth list on your Mac and click the X button on the right. Then, repeat the pairing process.
Reset the AirPods
and hold the button on the back of the AirPods case for at least 15 seconds. Let go of the button when the status light starts to flash amber.
Reeboot your MAC computer
Iyour Mac’s Bluetooth connection has run into a problem, restarting your Mac can reset it and hopefully get it working properly again.
Conclusion
Connecting your Airpods to your Mac is an easy process. Once connected, you can easily access audio from any device connected to your Mac, such as music players, video players, or online streaming services.
Do you want to unpair and reset your Apple Watch? Unpairing and resetting your Apple Watch can be a daunting task for many, but it doesn’t have to be. In this article, we will provide step-by-step instructions on how to easily unpair and reset your Apple Watch. By following our instructions, you’ll be able to safely unpair and reset your Apple Watch so you can start using it as you normally would.
What is an Apple Watch
Apple Watch is a revolutionary device that provides a unique and personal way to stay connected with the world. It allows users to access notifications, communicate with friends and family, track their fitness activities, and much more. Apple Watch offers a wide range of features and benefits that can help you stay organized and on top of your daily tasks.
How to unpair and erase your Apple Watch
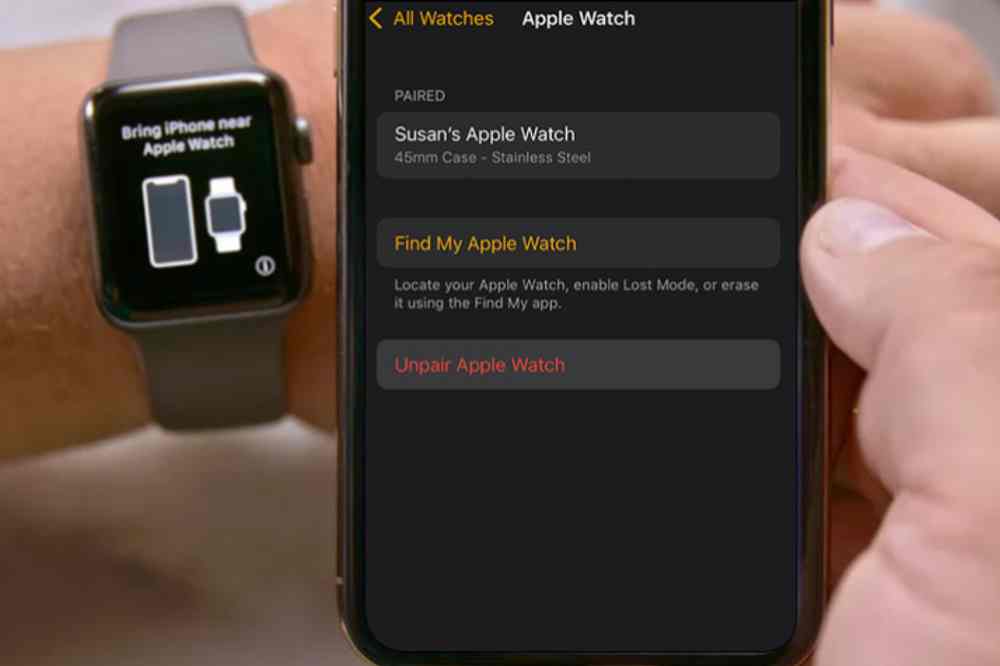
Keep your Apple Watch and iPhone close together as you unpair them.
Open the Apple Watch app on your iPhone.
Go to the My Watch tab and tap All Watches.
Tap the info button next to the watch that you want to unpair.
Tap Unpair Apple Watch
Tap Unpair [your Apple Watch name].
For GPS + Cellular models, choose whether to keep or remove your cellular plan.
Type your Apple ID password to activate disabled link, then tap Unpair.
How to reset your Apple Watch
On your Apple Watch, tap Settings > General > Reset > Erase All Content and Settings.
Type your password if prompted.
For GPS + Cellular models, choose to keep or remove your cellular plan.
If you want to pair your Apple Watch and iPhone again, keep your plan.
If you don’t want to pair your Apple Watch and iPhone again, remove your plan.
Tap Erase All to confirm. This resets your Apple Watch to the factory settings.
Conclusion
Congratulations! You now know how to unpair and reset your Apple Watch. Unpairing and resetting your Apple Watch is an important task that ensures that it remains in optimal working condition.