It’s always great to stay connected with your friends and family, and one of the best ways to do that is by using the popular social media app like Snapchat. This app allows you to share photos, videos, and messages with your contacts, and even pin important conversations to the top of your list.
When using Snapchat, you might want to pin someone important on you list for regular conversation but don’t know hpw to do it. If you are in such position, then tis article is for you. We will be discussing everything you need to know about pinning a person on Snapchat, including the steps involved and some helpful tips.
What does “Pin Conversation” mean on Snapchat
Pin conversation on Snapchat is a feature that allows you to pin a conversation with one or more of your contacts. This means that, when you open the chat window in Snapchat, you will see the pinned conversation at the top of your chats list. Pinning a conversation allows you to easily keep track of important conversations without having to scroll through your entire list of chats.
How to pin a conversation with someone on Snapchat
Method 1
Open Snapchat and swipe right on the camera screen to open the Chat or Friends screen.
Select the conversation or group chat you want to pin.
Tap your friend’s name or profile picture to open their profile.
Tap the menu icon in the top-right corner of the profile page and tap Chat Settings.
Select Pin Conversation on the pop-up menu.
Method 2
Open Snapchat.
Swipe to the chats page on the left side of the camera screen.
Press and hold the chat of the person you want to pin.
Click ‘Chat settings.’
Tap ‘Pin conversation.’
NB: After pinning your conversation, it will stick at the top of your chats making it easy to locate the particular chat anytime you open your Snapchat.
How to unpin people on Snapchat
Unpinning people on Snapchat is just as easy as pinning them:
Open Snapchat.
Swipe to the chats page on the left side of the camera screen.
Press and hold the chat of the person you want to unpin.
Click ‘Chat settings.’
Tap ‘Unpin conversation.’
Can I access the Snapchat Pin feature both on android and iOS ?
The pin feature is currently available on both iOS making only iPhone users to access it. Works are been done to make android users access it but at the moment, it is only available on iPhones.
Conclusion
Pinning someone to your Snapchat story is a great way to stay in touch with them. By pinning someone, you can ensure that their stories always appear at the top of your Friends screen and that they never get lost in the shuffle. Pinning conversations is also a great way to show your appreciation for those closest to you and let them know you’re thinking about them.
Hacking is the term for the improper use of technologies like computers, smartphones, and networks to damage or destroy operating systems, track user behavior, extract data and documents, or interfere with data-related operations. It is the process of locating and then taking advantage of vulnerabilities in a computer system or network, generally to get access to confidential information about an individual or an organization. Though not always malevolent, the term “hacking” carries a lot of negative meanings because of its connection to online crime.
Nowadays, the majority of references to hacking and hackers refer to them as engaging in illegal conduct online, whether for monetary gain, social protest, information collection (spying), or even just for the “joy” of the task. Cybersecurity software and teams are unable to detect the increasingly sophisticated covert attack techniques used by hackers to bypass their defenses.
You can learn more about Cyber Hacking by getting yourself enrolled in the Hacking Training program.
Benefits of Cyber Hacking
Understanding the Hacker Mentality – The primary advantage of hacking is its capacity to enhance a business organization’s network and fully protect it from online dangers. The primary danger to network security is always a hacker, thus it’s critical to understand how they function. One should always put themselves in the hacker’s position in order to carry out their task as a hacker because it is impossible to entirely remove all dangers from a system.
Quality Control and Development – The idea of hacking has sparked the creation of several technologies to eliminate well-known and widespread vulnerabilities. A well-trained hacker may provide a team a big boost by assisting them in conducting security testing effectively and quickly rather than depending on internal procedures that take more time and effort.
Control Of Cyberattacks Against Organizations – Due to the numerous data thefts and misuse of personal information that occur every day throughout the world, security is now a valued need. The core principle of ethical hacking is that in order to capture a hacker, one must possess the mindset of a hacker. To safeguard a company’s computer and network systems, ethical hackers usually always cooperate with the company’s permission.
Future Security Threats can be Anticipated – More news reports concerning hacking have recently been published than ever before. Hackers are becoming more knowledgeable and skilled at obtaining their goals, whether the target is an election or anything else. The only thing preventing potentially huge data breaches is our capacity to foresee dangers and move ahead of them. The more information we have on hacking, the more equipped we are to defend our systems from these ongoing security risks. Being able to identify a build’s flaws before they become a problem is really valuable.
What are the different types of hacking?
Website Hacking
A web application is a program that users may access over a network, such as the Internet. Webmail, online storefronts for buying and selling, wikis, and many more features are examples of common web applications. When an application is exploited through HTTP, this is referred to as website hacking. This can be done by altering the program’s graphical web interface, altering the Uniform Resource Identifier, or changing HTTP components that aren’t part of the URI. SQL Injection assaults, Cross-Site Request Forgeries, Cross Site Scripting (XSS), etc. are techniques that may be used to get into web systems.
Network Hacking
Making a network behave in a way that isn’t intended to involve the entire concept of network hacking. Or, to put it more simply, to misuse it for one’s personal gain or the detriment of its rightful owner. Network hacking is the process of obtaining data from computers and networks through the internet. Hacking a network doesn’t necessarily require the hacker to be there.
Email Hacking
The term “email hacking” refers to a type of hacking in which a person’s email is accessed by an unauthorized party. Most often, the attacker will send a link or file to one or more of their contacts, and if they click on it or open it, it may download malware that will corrupt their machine. Hacking activities include signing in as the victim, retrieving the victim’s address book, and occasionally spreading a cyberattack to the contacts in the victim’s address book. After then, the attacker discreetly keeps track of every correspondence between the customer and the supplier and exploits it for nefarious ends.
Password Hacking
The process of retrieving passwords from data sent across a network or kept on a computer is known as password hacking, sometimes known as password cracking. An authorized user who forgets their password can get it back by using password hacking. Passwords are hacked by unauthorized users to obtain access to secure systems. Password Hacking may be done for a variety of purposes, but the most dangerous one is to get unrestricted computer access without the owner’s knowledge. As a result, one sort of cybercrime that occurs is the hacking of passwords in order to get financial details.
Computer Hacking
Modifying computer hardware and software to achieve results that are unrelated to the task for which they were originally designed is known as computer hacking. On the one hand, computer hacking refers to the practices used by people, groups, and governments to obtain illegal access to a computer and technology-dependent systems. These actions might entail changing the software and hardware of the system to carry out tasks that were neither intended by the developer nor consistent with those objectives when it was first built.
How do Ethical Hackers Differ from Malicious Hackers?
It has never been clear-cut what is meant exactly by the word “hacker.” The term “hacker” can refer to both a person who illegally gains access to a system without authorization with malicious intent or to a person who does so just to indulge a strong interest in computer technology. Both an ethical hacker and an unethical hacker will perform comparable jobs, however, the ethical hacker is hired by the government, a private company, or a private citizen to find and exploit flaws. The term “attacker” is frequently used to distinguish between the two sorts of hackers, and it is a suitable way to refer to a malicious hacker. The phrase “security analysts” or those who perform hacking for administrative reasons is referred to as the “White Hats,” whereas the attackers are typically referred to as “Black Hats” in general usage.
The White Hats, often known as “Ethical Hackers,” are IT security specialists who primarily concentrate on defending and safeguarding IT systems. “Ethical hacking” is the practice of targeting or breaking into a specific security system in order to find weaknesses that may be exploited by the system owners. The primary distinction is that an ethical hacker is compensated for finding vulnerabilities so that the customer may prevent an unethical hacker from making use of them. The Malicious hacker, on the other hand, penetrates network systems and uses vulnerabilities in various ways in order to inflict harm or loss to the company or individual.
Skills & Certifications Required for Ethical Hackers
The following basic skills are needed in order to become an ethical hacker:
Networking Skills – For ethical hackers, networking skills are crucial since they help them find and seal network vulnerabilities and gaps. Network topologies like the Bus topology, Star topology, and Mesh topology must be understood by an ethical hacker.
Programming Skills – An ethical hacker should be familiar with the programming languages JAVA, JAVASCRIPT, C, C++, PYTHON, .NET, HTML, and PHP since there may be a flaw or defect in the code.
Hardware basics – An ethical hacker should understand how devices operate, including how the motherboard functions, how USBs carry data, and how CMOS and BIOS interact.
Database Skills – A method for building and managing databases is called a DBMS. You may check for data integrity on systems by using your knowledge of DBMS.
Cryptography Skills – An ethical hacker must be familiar with cryptography, which combines keys (factors) and algorithms (logic) for data protection.
Other than that following certification is also required for a flourishing career as an Ethical hacker:
Certified Ethical Hacker
Global Information Assurance Certification Penetration Tester
Certified Information Systems Security Professional (CISSP®)
Offensive Security Certified Professional (OSCP)
Certified Information Security Manager (CISM®)
Conclusion
As technology advances, security risks also rise, creating numerous opportunities for hackers to break in anytime they choose. Although hacking is frequently linked to illegal conduct, this isn’t always the case. This is due to the fact that some hackers utilize their abilities to get into businesses’ security systems and steal valuable data. Of course, doing such is against the law, but there are hackers—also known as ethical hackers—who are employed to find systemic flaws.
The ethical hacking industry is expanding quickly as businesses increase their investment in defending against cyber security risks. If you have a strong interest in cyber security, certified Hacking Training is the appropriate choice for you.
In Jan 2023, SES HD PLUS Ghana will increase the price of all HD+ subscription packages so they can continue to deliver world-class TV viewing experiences to their subscribers. In the past two years, the company has absorbed most of the cost for subscribers while offering great services.
The new prices became inevitable due to increasing inflation and the addition of new offerings such as the PVR function on the HD+ Decoder; the ability to watch TV on the go with free data every month; control to catch up on shows aired in the last 48 hours on the My HD PLUS mobile app; the first 4K channel in Ghana; the introduction of a multi-feed function to allow HD+ Subscribers to choose between two live video feeds on a single HD+ channel as well as a new sports channel, Scooore TV which will join the list of HD+ channels in January 2023.
With the new prices outlined in the table below, HD+ will continue to offer better service whiles offering the most affordable subscription packages when compared with other TV services on the market.
HD+ Subscription Packages
Current Price
Price from 10 Jan 2022
Weekly
GHS 7
GHS 12
Monthly
GHS 25
GHS 35
Quarterly
GHS 60
GHS 85
Annual
GHS 201
GHS 290
About HD+
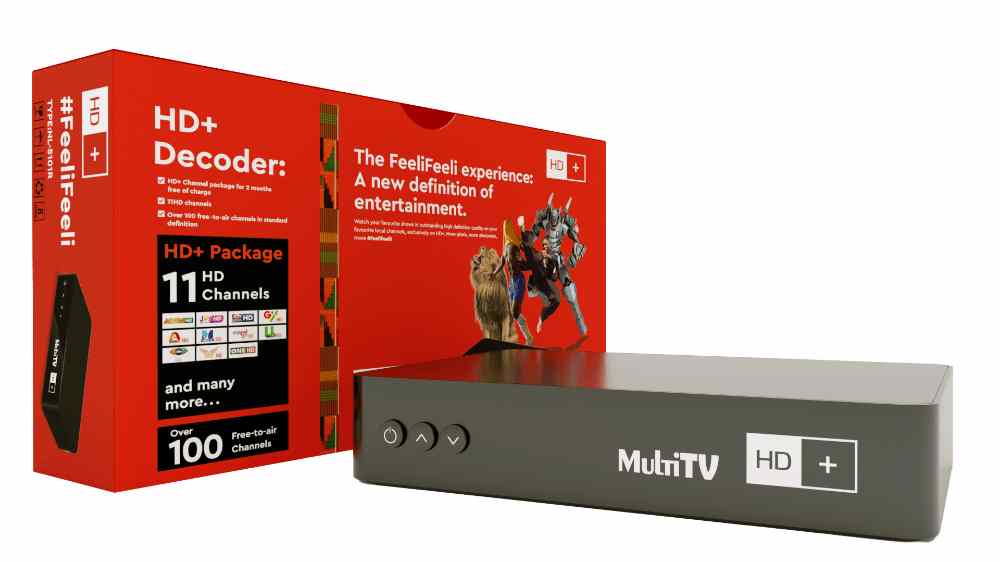
HD+ is a satellite TV subscription service that delivers your favourite channels in 5 times clearer picture quality when compared with their Standard Definition (SD) TV versions on other free-to-air TV platforms. With HD+ you can enjoy about 20 channels in razor-sharp, brighter and more colourful TV picture quality for an immersive viewing experience.
The service can be accessed via an HD+ receiver, available at the nearest authorized HD+ dealer outlet or any Electroland showroom nationwide. Existing homes on the MultiTV platform do not require a new satellite dish as they are compatible with the HD+ service. All that is required is a an HD+ Device to enjoy the service. A one-time activation will unlock a free subscription period of 2 months.
Joining the HD+ family
You can join the HD+ family via three types of HD+ Devices:
HD+ Decoder: This can be purchased from any Electroland showroom nationwide or authorized dealer store. There is always a corresponding HD+ logo on an HD+ Decoder so make sure you watch out on that when making a purchase.
Samsung UHD/ QLED TV set (models released from 2020 to date) which has the My HD PLUS Operator app downloaded on it from the Samsung app store.
NASCO TVs set with HD+ Module inserted in the TV’s CI+ CAM interface slot
Why is HD+ the best TV service in Ghana?
Enjoy world class TV viewing on your favourite channels and some exclusive channels which can be found only on HD+: Adom TV HD, Joy Prime HD, GTV HD, UTV HD, Joy News HD, GhOne HD, Metro TV HD, TVXYZ HD, Citi TV HD, OneHD, Aljazeera HD, ETV HD, BID TV HD, KOOL HD, GTV Sports+ HD, GNTV Junior HD, 4Syte TV HD and recently AfroSini HD.
HD+ offers a 1 week, 1 month subscription, 3 months subscription and 12 months subscription, at the most affordable prices so every Ghanaian can be able to afford quality HD viewing in their homes. A one-time activation via their USSD short code is required to unlock a free trial period of 2 months on all newly activated HD+ Devices.
In addition to the HD channels, you also have access to over 100 standard definition free-to-air channels even when your subscription has expired
More than 60% of Ghanaian households are already on the MultiTV satellite dish. When you join the HD+ family, you do not require a new satellite dish as they are compatible with the HD+ service. All that is required is a new HD+ Decoder or compatible HD+ Device to enjoy “The FeeliFeeli Experience”.
Personally, I have enjoyed using the My HD PLUS mobile app to watch shows on my phone while also using the recording function on the HD+ Decoder to record morning shows and watch later in the evening.
How to properly set up an HD+ Decoder
We recommend that you contact an authorized installer to assist you with the installation of your HD+ Decoder.
You will need an HD TV set to enjoy The FeeliFeeli Experience.
Ensure the dish is properly aligned to the MultiTV platform satellite position on Astra-2F at 28.2° East. The dish must be at least 60cm.
Check that the F-Connectors at the end of the cable are properly fixed and protected with a high-quality insulation tape. The cable must not be longer than 100 ft or 30m.
Check that the signal strength and quality are at the highest level possible (ideally, over 80%). This should be done using a signal meter (satellite finder).
Finally, check that the satellite cable is connected to the back of the HD+ Decoder and connected using an HDMI cable to your HD TV set.
Now turn on the HD+ Decoder and watch the progress on the TV screen. The HD+ Decoder will make an automatic scan of all available channels and build the HD+ Channel List.
As part of the scan, the HD+ Decoder will also check for software updates. It is recommended to always maintain the newest software on the STB.
This installation process can take up to 10 minutes and needs no action unless prompted by messages on the screen
Conclusion
HD+ is the gateway for a high-quality TV experience in Ghana. If you want a high-definition view on your TV, then it’s worth joining the HD+ family. The good thing is, you enjoy the best affordable monthly subscription with amazing TV channels compared to other digiboxes.
“Yesterday, I was blocked from my brand new iPhone 13 after my daughter used the wrong password. I’m not able to use it until now. How can I unlock it? I would appreciate your help regarding this problem. Thank you in advance!”
If you entered or forgot the iPhone password, the only way you can get back inside is to remove the locking mechanism on your iPhone. However, conventional methods will not be effective on an iPhone such as iPhone 12 or 13. So then, how to remove iPhone password?
It is generally possible to use applications like iTunes and iCloud to unlock the iPhone screen, but there are some limitations with these applications.
So, what’s the alternative?
Today, we’ll look at TunesKit iPhone Unlocker, where you can connect your device to bypass the lock screen without hassle of complicated steps!
The Intro
In terms of unlocking iPhones, TunesKit iPhone Unlocker is an effective iOS unlocking tool that works effortlessly in all circumstances, including unlocking iPhones locked due to incorrect passwords, locked due to a broken screen, and unlocking second-hand phones. We will provide all the details about this tool, including how to use it to unlock your iPhone.
TunesKit Studio, a professional and reputable iOS software maker, recently updated its software called TunesKit iPhone Unlocker to a more advanced level. With an update to the software, the program will fully enable the unlocking of Apple ID, bypassing screen time passcodes and eliminating MDM limitations.
TunesKit iPhone Unlocker provides four features for users who want to unlock iPhone screen. In the latest update, users can eliminate all types of passcodes from their devices, including 4-digit passcodes, 6-digit passcode, alphanumeric passcode, Touch ID, and Face ID on Apple iPhones, iPad, and iPods that they lost due to various situations.
If you want to unlock Apple ID, remove iPhone password, disable screen time, eliminate MDM restriction or reset the iPhone/iPad/iPod touch, TunesKit iPhone Unlocker will fulfill their requirements efficiently.
The Features
Unlock iPhone Passcode in different situations:
Forgot your passcode
iPhone is locked or disabled
Multiple failed attempts
Broken iPhone screen
Screen of the iPhone is not responsive
Second-hand iPhone
No Face IDs recognized
Touch ID does not work
Other users changed the passcode unintentionally
Eliminate all screen locks from iOS devices, including:
Passcodes with 4-digit or 6-digit numbers
Custom numeric code
Passcodes that are custom alphanumeric
Touch ID
Face ID
Factory reset iPhone without iTunes
Compatible with all the iOS models and iOS versions
Bypass the iPhone passcode in just 3 simple steps
Unlock any screen lock with the most chance of success
Simple design makes the unlocking process a breeze
Free lifetime software updates
iPhone 12/iPhone 13 Pro Max unlocked with TunesKit iPhone Unlocker
We’ll introduce the steps you must follow to use TunesKit iPhone Unlocker. Before you begin, take note of these tips:
All iPhone data will be deleted when you use TunesKit to access your screen with a passcode.
The most recent iOS version is installed onto your iDevice.
It is essential to make sure that you keep your device running throughout the entire process and remain connected to the PC.
If you don’t have any issues with these terms, Let’s look at how touse this tool:
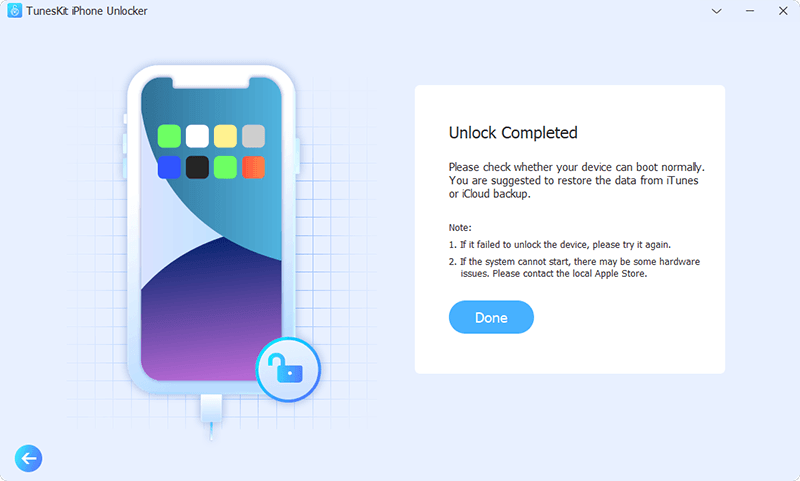
The first thing is to install TunesKit iPhone Unlocker and then launch it. Next, Connect your iPhone via a USB cable. After that, press the “Start” icon.
Suppose your iPhone/iPad/iPod touch is not recognized. In that case, you will need to manually set it in DFU Mode or Recovery mode. You can set your device in DFU mode using the instructions in the TunesKit interface.
After that, you must ensure that you download the firmware in the event it is required.
It may take some time for the firmware download to complete. After that, the device will be unlocked when you press “Unlock.”
Why choose TunesKit iPhone Unlocker?
TunesKit iPhone Unlocker is the ideal iPhone passcode unlocker for unlocking Apple ID without a passcode and for fixing and unlocking locked or disabled iOS devices.
How to bypass lock screen on iPhone 12 Pro Max? Is it possible?
It is possible to gain access to it using The TunesKit iPhone Unlocker. In addition, the program allows users to immediately remove all the “Touch” locks.
Is TunesKit iPhone Unlocker secure?
It is 100% secure to utilize this application since we know that TunesKit is a well-known brand that offers a variety of top iPhone suites of software. Thus, you don’t need to be concerned about the security of this application.
Are there any fees for using TunesKit iPhone Unlocker?
Of course, you’ll need to pay a little to access premium features. But that’s nothing to be concerned about, as they provide a free trial period for all users to test it out and decide if they want to purchase this item. So first, let’s examine the price:
If you only want to buy this iPhone unlocker for one month, you can opt for their one-month subscription for approximately $24.95. In this plan, you receive 5 iDevice/1 PC support and five days of money-back assurance.
It is also possible to sign up for their annual plan, which costs approximately $39.95 with 30 days of money-back assurance.
You can also purchase the program for life at $49.95 with 30-day money-back guarantee.
Conclusion
With an easy-to-operate layout and clean buttons, this user-friendly tool ensures that everyone can use it without any difficulty and with no technical expertise needed. In addition, TunesKit iPhone Unlocker is exceptionally speedy and efficient in unlocking iOS devices. From the time we started the application on our PC until we could access the iPhone, it took only a matter of minutes.
TunesKit iPhone Unlocker is a handy tool when you want to remove iPhone password because you forgot the passcode or the device is not responding. The process is simple and requires a user to follow the steps displayed on the interface. Therefore, anyone can use it and unlock their iPhone with no complicated steps involved!
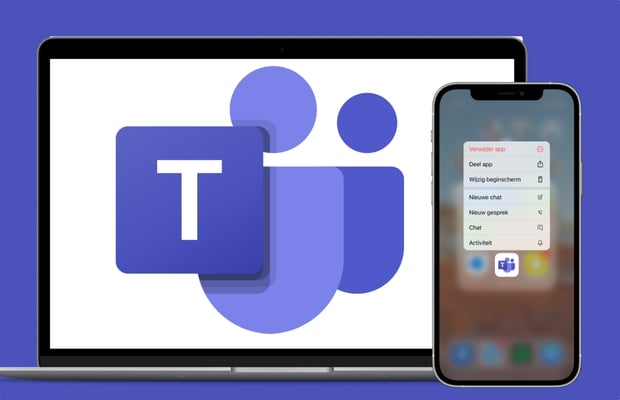
Microsoft Teams is an online workspace that allows individuals and teams to collaborate, share information, and communicate in real-time. It is available for use on multiple devices, including Windows, Mac, iOS, and Android. Teams allows users to quickly and easily share files, work together on projects, chat with colleagues, and access applications from within the platform.
Microsoft Teams is a great tool for keeping everyone connected, no matter where they are located. With its range of features, it can make collaboration easier and more efficient for teams of all sizes. This article will be talking about how to change your background when you are on Microsoft teams.
Why you might want to change your background on Microsoft teams
If you use Microsoft Teams on a regular basis, you may want to change the background of your screen. Customizing the background can be a great way to give your workspace a personal touch, add a sense of creativity, or simply keep things looking fresh.
In addition to just being aesthetically pleasing, changing the background of your Teams can also help you focus on tasks by reducing distractions from the outside environment. There are multiple ways to customize the background of your Teams, from using images to custom video backgrounds. You can also add blur and animation effects for a more dynamic look.
How to change your background on teams
Changing your background on Microsoft teams can be done in two ways. One is when you are about to enter your teams meeting and the other is when you are already on the teams meeting.
Changing your background on Microsoft Teams before your meeting for PC
Before entering your teams, you already know your readines. If it is one that does not deserve to be on a teams meeting, then its best to change it before you start. When you set up your video and audio preferences before joining a meeting,
Select the Background filters button. You can find this button below the video preview image.
A selection of background options will display on the right-hand side of your screen. Choose the background that works best for you.
You can choose to blur your background if you are not sure of which background color to use.
After setting your background, you can then enter your meeting with it.
If you want to remove your background choice, you go back to the settings to turn it off.
Changing your background on Microsoft Teams during meeting for PC
Sometimes, your decision to change background on teams meeting will be when you are already in the meeting. That is also a possibility to do so without any hassle.
Navigate to your meeting controls panel in the meeting and select the three dotted lines you will see (More option).
Select Show background effects for the pop-up menu.
Now you will be presented with a choice of background options that you can pick from.
You can either choose to blur your background or choose any colour of your choice.
When you are happy with your background, select Apply.
Now your new background is in action.
Changing your Teams Meeting background before meeting for mobile device
Select the Settings button while you are getting ready for the meeting.
Tap on Background effects.
A range of background options will appear below your image.
Select the option you like the most.
Press Done.
Changing your background on Microsoft Teams during meeting for mobile device
Go to your meeting controls buttons and tap on the three dots (more options).
Tap on the Background effects button.
Choose the background you like.
Tap Done.
Now your background has been changed.
How to add your own backgroun on Microsoft Teams meeting
You might not want to use custom background colours for the teams meeting. Don’t worry because it is also possialso to use your own preferred picture as the cover. It in a way can help promote something you want to promote during the meeting.
Start by creating your own background image. Save this in a .JPG, .PNG, or .BMP file on your device.
When changing your background, navigate to the background effects options and then select “Add new”.
Now you can choose the background image file from your device and use this as your background.
The file will save into your selected background options, so you can use it again if you ever need to change to a custom background.
Conclusion
Changing the background of Microsoft Teams is a great way to customize your workspace and make it more personal. It’s also a great way to create a sense of unity and collaboration when working with teams and colleagues. Whether you’re using your own images, a picture provided by Microsoft Teams or a pattern, you can easily change your background to reflect your team’s work style and culture. With a few simple clicks, you can quickly and easily customize your workspace with the perfect background
Creating a table of contents in Google Docs can help you organize and structure your document in a clear and concise way. A table of contents allows readers to quickly find and navigate to the section of the document they are looking for.
In this article, we will walk you through the simple steps for creating a table of contents in Google Docs. With these tips, you will be able to create a professional-looking table of contents that will make your documents easier to read.
What is Google docs
Google Docs is a free online word-processing service from Google. It allows you to create and share documents with other people. With Google Docs, you can create, collaborate, and store documents in one place. You can also format text, add images and tables, and even collaborate on the same document with multiple people. Google Docs is a great tool for both personal and professional use. It’s easy to use, secure, and available for free.
How important is the table of content in Google docs?
Having a table of contents makes it much easier for readers to find the information they are looking for in your document. Instead of having to search through the entire document, readers can just look at the table of contents and quickly jump to the section that interests them.
A properly formatted table of contents can really enhance the visual presentation of your document. It gives your document an organized look and feel, which will make it more appealing to readers.
A table of contents also serves as a navigational tool. It allows readers to quickly move from one part of the document to another by simply clicking on the relevant section. This makes it much easier for readers to review and scan through large documents.
If you ever need to add new sections to your document, it’s easy to update your table of contents by simply inserting a new entry or re-arranging existing entries. This is much faster than having to manually update all the page numbers associated with each section.
How to create a table of contents in Google Docs
Using a computer
Navigate to docs.google.com and open the document if you want to add a table of contents to.
Select a document with multiple sections, each set apart by header text.
In the top options menu, beneath the title of the document, select “Insert.”
Scroll to the bottom to select “Table of contents” and select if you prefer page numbers, which is best for a document that will be printed, or blue links, ideal for an online-based piece
After clicking on the table of contents, your table of contents will appear on the page.
Using a mobile device
Open Google Docs and create a new document or open an existing document with multiple sections, each set apart by header text.
Tap the three dots in the top-right corner, and make sure that “Print layout” is enabled.
Tap the edit button (the blue pen icon in the lower right) to open editing options at the top of your iPhone or iPad screen.
Tap the “Insert” button, or plus sign icon, and scroll to the bottom of the options menu to select “Table of contents.
Your table of contents will appear at the top of the page.
What to do if your table of content does not appear after inserting it
In some instances, your table of contents will not appear even if you follow the steps above and click on it. If such cases show, it means there is an error in your google docs and you need to format it before you can proceed to create your table of content.
Conclusion
Creating a table of contents in Google Docs can be a great way to organize your work and make it easier for readers to navigate. It’s a quick and simple process, allowing you to customize the appearance and structure of your table of contents with ease.
Most individuals play games for fun, fulfilling objectives, progressing through new levels, and earning various amounts of points. You can earn money while playing, though, if we’re being realistic. All you need to do is figure out which game you like to play the most and research ways to monetize it. It’s intriguing to learn that online games, especially those that are well-liked, have a lot of potential for making money. Therefore, WOW Carry is a game by which users can earn money easily.
The Best Way to Make Money from WOW Carry
The type of game you choose most likely depends on your interest in the various game genres. Many people enjoy playing MMORPG games (like World of Warcraft), and they are very supportive of those who do the same. However, you can also play different games, such MOBAs or others. WOW Carry is a fantastic game that you can play and earn money from. then why?
Many people have been making money from this game for more than ten years, and it has had players for a number of years. You can employ a variety of techniques. You can earn a lot of money from your career if you know it well. You can read about ways to make money from the WOW Carry game in the sections that follow.
The ways are described below;
Create Content on YouTube:
You can create a YouTube video about WOW Carry if you don’t feel comfortable streaming and playing live. You can create a video tutorial about the game, discuss game news, or display some gameplay snippets. You can include advertisements in your videos, and the more people who watch them, the more money you can make. In light of this, YouTube is undoubtedly an excellent way to monetize World of Warcraft.
Increase the Character’s Level:
Many gamers of the WOW Carry do not want to invest their time in a character who is struggling. They will therefore pay for the improvement of their character. Consequently, rolling up other players’ characters is a simple way to earn money. To speed it up, you can even concentrate on PVP or other aspects.
Sell Account:
The best part of creating an account in World of Warcraft (WOW) is that there are no limitations on selling accounts. So, it is a means of earning money. The opportunity of making money from it exists since many people still play and like WOW Carry, despite the fact that it takes a long time for characters to roll (WOW).
Streaming on the Platform Twitch:
WOW Carry may be very successfully monetized with the use of Twitch. The wonderful thing about WOW Carry is that despite its advanced age, there are still a lot of people who play it, and they are continuously discovering new ways to have fun with it. Twitch fans are able to show their appreciation for your enthusiasm, charisma, and gameplay through the platform’s subscription and doughnut system, also known as financial support. Therefore, monetizing this game through Twitch is an excellent idea.
Gold Farm:
Once you’ve mastered the WOW Carry, you may concentrate on the gold farm. Because gold is the game’s currency, it plays a vital part in the game. Of course, if you’re careful, you can make some money by selling it. The trick is to devote several hours per day to this. This could nearly be considered a job for you. If you want to make money playing, WOW Carry is a good place to start. If the popularity of this game declines in the future, you may switch to another game whenever you like.
Having trouble getting your money’s worth from your data plan? There are plenty of ways to get the most out of your data, and we will be walking you through them in this article. We will be talking about activating a GHS 5 plan on Vodafone Ghana network that will get you 5GB of data valid for 7 days.
Before you can start using your Vodafone GHS 5, however, you will have to set up your internet on your phone or laptop depending on the data service you are using.
How to activate Vodafone GHS 5 for 5GB for 7 days
The Vodafone GHS 5 for 5GB for 7 days bundle offer mostly comes under the made4u or the BOSSU weekend. Also, the mad4u offer is not stable and keeps changing as time goes on.
To activate using the made4u offer,
Dial *530#
The available offers will show up on your screen
Look through and locate the GHS 5 for 5GB for 7 days
Choose the option and activate the offer.
NB: You have to have the GHS 5- GHS 6 in your Vodafone balance before you can activate because you can’t use Vodafone cash for this offer. If the 5GB for 7 days offer is not available at the time of wanting to activate, there will surely be an enticing offer to choose from.
To activate using the BOSSU weekend offer,
Dial *5588#
Choose option 3 (Bossu weekend)
Press option 1
Choose your payment option (Airtime or Vodafone cash)
Your selected service will be successfully activated
NB: This service is only available for your weekend thrills. You will enjoy 5GB of data from Vodafone throughout the weekend.
How do I get unlimited data on Vodafone?
Customers who prefer to go for unlimited data on Vodafone can dial *900# and choose from the options that will be shown.
How do I get free data on Vodafone?
Upgrade to Vodafone 4G and receive free 4GB data. To do so, visit any Vodafone office for a new 4G SIM. On activation, you will be credited with free data to surf the internet.
Conclusion
With how hard it is to get a deserving data worth your money, this Vodafone 5GB for GHS 5 is worth the amount. Follow the steps and activate and enjoy. Note that, the fee could change based of the currency rate in the country.
If you are having trouble typing on your iPhone, resetting your keyboard can help you get back on track. Resetting your iPhone keyboard can help you resolve many of the common issues that can occur with your keyboard, such as freezing, lagging, auto-correct mistakes, and incorrect autocorrect predictions. By resetting the keyboard dictionary, you can clear all stored words and phrases, which can help improve the performance of the keyboard.
Resetting the keyboard will also give you a fresh start if you have recently switched to a new language or added a new text replacement phrase. Resetting your iPhone keyboard can also be beneficial when troubleshooting an issue with your device or if you want to make sure it is clean and optimized for use.
In this blog post, we’ll explain how to reset your keyboard on an iPhone and why it’s important to do so. With a few simple steps, you’ll be able to quickly and easily reset your keyboard and get back to typing on your iPhone
How to reset your iPhone keyboard
Open the Settings app on your iPhone.
Tap the General option from the menu.
Scroll down to the bottom of the screen and tap the Transfer or Reset iPhone option.
On the bottom of the following screen, tap the Reset option.
Now, tap the Reset Keyboard Dictionary option from the menu that appears at the bottom.
Enter your phone passcode and tap the Done button in the upper-right corner.
Tap the Reset Dictionary verification message, and you’re ready to go.
The process will restore the keyboard dictionary on your iPhone or iPad.
You cannot undo this process. Once you tap Reset Dictionary, it will permanently delete your keyboard history.
After the reset, the keyboard dictionary will slowly learn your habits and store new words. If you want to prevent your iPhone.
Can I see my iPhone keyboard history?
As you use your phone, the keyboard dictionary learns and stores words which later gives to your keyboard as auto-correct and predictive words. However, there is no way you can see your keyboard history which contains a list of all words you have typed using your phone’s keyboard. You can reset when you start seeing unwanted text and your keyboard start responding slowly.
How Do I Delete My iPhone Keyboard History?
You can only delete your iPhone keyboard history by resetting it. Make sure you are ready to reset before doing so because if you reset, you can’t undo the action.
Conclusion
Resetting the keyboard on your iPhone can be a great way to start fresh with your typing experience. This process is easy and quick, and it will restore your keyboard’s settings to their default values. By resetting your keyboard, you will be able to type messages, emails, and more, as well as help ensure your privacy is better protected.
Learning how to copy and paste on a Chromebook doesn’t have to be a difficult task. With just a few simple steps, you can be on your way to copying and pasting. When you copy and paste, you can easily move text, images, and other data from one place to another without having to re-type everything from scratch.
This means that you don’t have to spend time creating new content or researching again when you can simply copy and paste from something that already exists. Having the ability to copy and paste on a Chromebook also makes collaboration easier.
You can easily copy and paste information from one person’s document to another, allowing you to quickly and easily share information. This is especially helpful in team projects where multiple people are working on the same project.
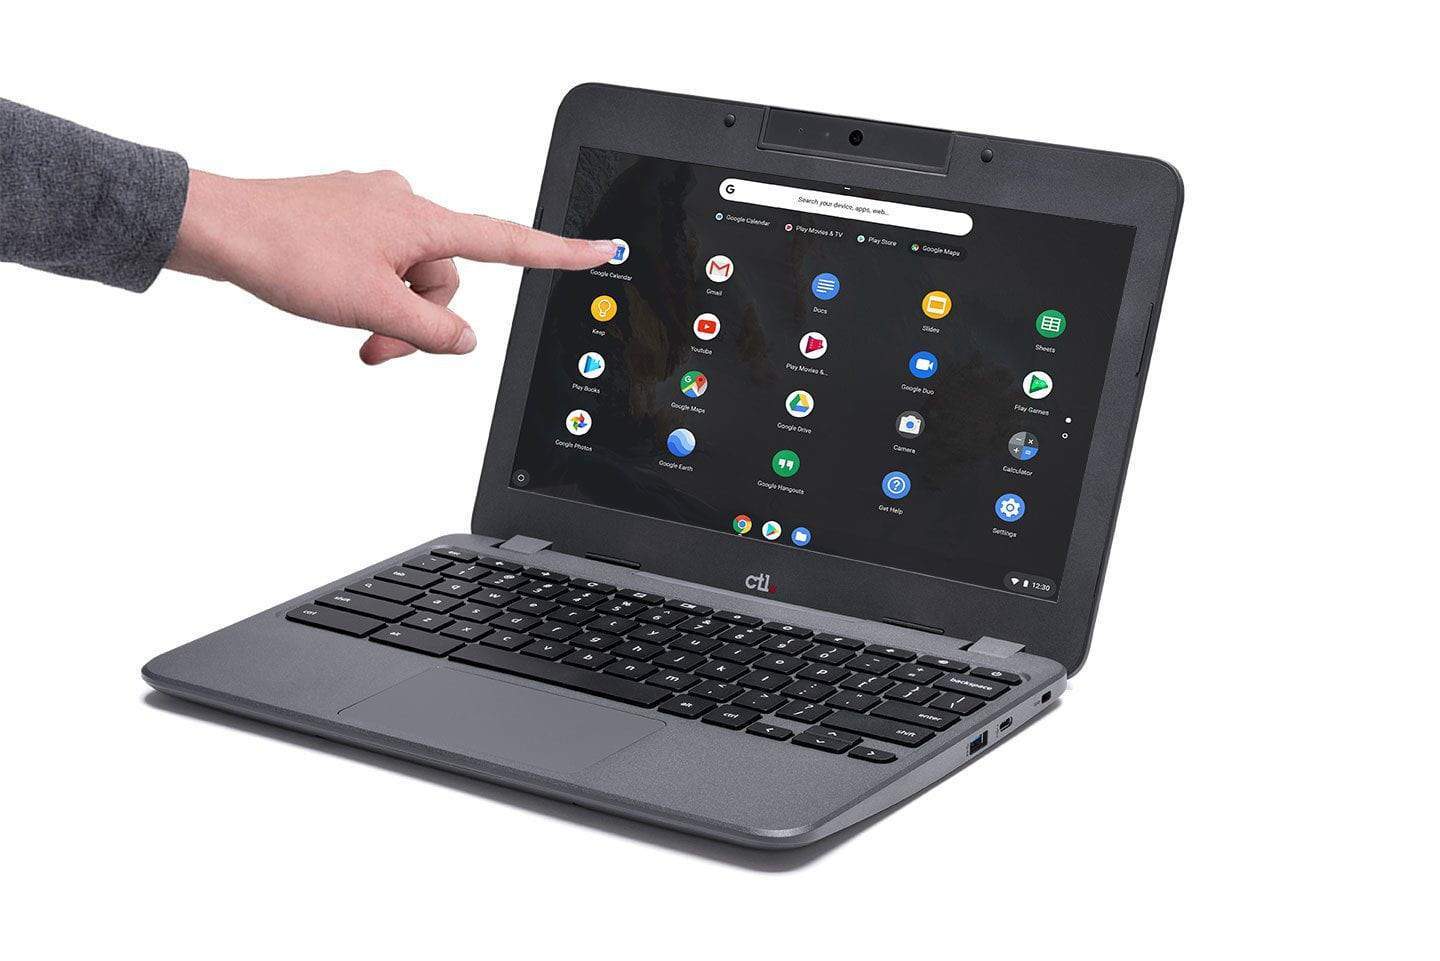
What is a Chromebook
A Chromebook is a laptop or tablet powered by the Google Chrome operating system. This operating system uses the same basic technology as Chrome web browsers, but it is designed specifically to run a laptop or tablet device. Chromebooks are primarily used to access the internet and to run web-based applications. They are popular for their portability and ease of use, making them ideal for students and people who work on the go.
What is copy and paste
Copy and paste is an essential function on any computer or laptop. It allows you to quickly and easily duplicate text, images, or any other kind of data from one place to another. Copy and paste is a great time-saving tool that allows you to quickly duplicate and move data around your device. When you copy something, the information is stored in the device’s memory and can be pasted wherever needed.
How important is copy and paste on Chromebook?
Copy and paste can save you time. When you need to transfer text or images between applications, copy and paste can do it quickly and easily.
Copy and paste allows you to easily move information from one place to another. This can help with note-taking, organizing files, and creating documents quickly.
With copy and paste, you can copy text from a website or document and use it in a new document without having to retype it.
You can also use copy and paste to quickly add formatting elements like headers and footers to documents or email messages.
Copy and paste can be used to share links and other information between applications or websites quickly and easily.
How to copy and paste on a Chromebook using keyboard shortcuts
Press control and the “A” key to highlight all of the text on a page.
Press and hold the control button (which is generally located in the left corner of your keyboard) and press “C” to copy or “V” to paste.
Press and hold “CTRL,” as well as the shift key (located just above the control key) and press “V” to paste.
Your copied text will be pasted without any formatting.
How to copy and paste using mouse right click
Move the mouse cursor to the text you want to copy.
Click and hold the left pad of the mouse and drag to highlight the text you want to copy or paste over.
After you are done highlighting, Leave the left pad and right click on the mouse.
Select “Copy”
Move to the space you want to paste the copied text,
Right click on any empty space and click on Paste.
Conclusion
With copy and paste on Chromebook, it makes your work easier, now you will not have to type every text you see from start to finish. All you have to do is to do copy and paste and you are done.