Category: Apple

  • How To See Blocked Numbers On an iPhone

    How To See Blocked Numbers On an iPhone

    Have you ever been frustrated by a blocked number on your iPhone? Do you want to know how to see the caller’s identity and why they are calling? You’re in luck! In this article, we’ll discuss how to view blocked numbers on an iPhone.

    If you can’t identify who is calling and think it might be important, there are several steps you can take to find out who it is. We’ll show you some quick tips and tricks that will help you uncover those pesky blocked callers. From using third-party apps to trying carrier settings, there are multiple methods that may work for you.

    Today, smartphones have become an integral part of our lives — but when the wrong person calls or texts us, it can make them feel like more of a burden than a blessing. Don’t let yourself get caught up in the frustration; read on and find out how easy it is to figure out who was behind those mysterious blocked calls!

    Settings Options

    In order to see blocked numbers on an iPhone, it’s important to understand the call blocking settings. To access these settings, open the ‘Settings’ app and navigate to ‘Phone > Call Blocking & Identification.’ This will provide a list of all numbers that have been blocked from calling you.

    To unblock a number, select ‘Edit’ in the top right corner of the page and then hit the red circle next to any contact or phone number you wish to remove from your block list. Keep in mind that if a caller has blocked their Caller ID, they may still be able to get through even if you’ve put them on a block list. You can also restrict third-party apps like WhatsApp or FaceTime by tapping ‘Block Contact…’ at the bottom of this menu.

    It’s essential to familiarize yourself with these various call blocking settings so you are aware of what is being blocked and how. Understanding call blocking allows users to manage who can reach them more effectively.

    Understanding Call Blocking

    Call blocking is an important tool for managing who can reach you on your iPhone. It allows users to block certain numbers, contacts, or even third-party apps like WhatsApp and FaceTime from contacting them. With call blocking enabled, any calls coming in from these blocked sources will be automatically rejected and sent straight to voicemail when they try calling.

    However, this feature isn’t foolproof – a caller with their Caller ID blocked may still be able to get through the call blocking settings if they know the right steps. To ensure your phone stays secure, here are five key tips to remember while using the call blocking feature:
    •\tBlock calls from unknown numbers
    •\tAdd frequently contacted numbers to contacts list so it doesn’t inadvertently get blocked
    •\tCheck regularly for unwanted calls that have been accidentally blocked
    •\tAvoid using ‘block all’ features unless absolutely necessary as it could lead to missing legitimate calls
    •\tWatch out for spoofed numbers which appear very similar but have slight differences such as an extra digit at the end of the number
    By following these steps and understanding how call blocking works, users can better control who has access to their personal information and protect themselves against malicious activity. Additionally, unblocking caller IDs from recent incoming numbers gives additional peace of mind that no one’s trying to contact without being noticed.

    Unblocking From Recent Calls

    Unblocking numbers from recent calls on an iPhone can be done quickly and easily. To unblock a number that has been blocked, simply open the Recent Calls page in your Phone app and tap the ‘i’ icon next to the contact. This will bring up their details page where you can select ‘Unblock this Caller’ to remove them from your block list.

    If you’ve accidentally blocked someone’s incoming call or message, it’s important to remember that they may still be able to reach you if their caller ID is hidden – so keep an eye out for any suspicious activity coming through! Additionally, if you’re unsure of who’s calling, don’t hesitate to ask before unblocking a caller.

    Once a number has been successfully unblocked, all future incoming communications should arrive as usual – no more missed calls or messages! With these simple steps, users can ensure they never miss another important call again while having full control over whom they accept calls from. Moving forward, users now have everything they need to confidently manage their call blocking settings on their iPhones.

    Unblocking From Contacts App

    Another way to unblock numbers on an iPhone is through the Contacts app. This method can be useful for users who have accidentally blocked a contact, as well as those looking to view their list of blocked callers. To begin, open up the contacts app and locate the desired caller in your address book. Once you’ve found them, tap ‘Edit’ located at the top right corner of your screen. From here, scroll down until you see ‘Block this Caller’, which should now appear unchecked – indicating that they are no longer being blocked from calling or messaging you!

    To view all of your currently blocked numbers, select ‘Settings’ followed by ‘Phone’. Here you will find a full list of contacts whom you have chosen to block from contacting you via phone calls or messages. If needed, individual entries can also be removed quickly and easily by simply tapping the ‘Unblock’ button next to each entry.

    By keeping these steps in mind, users will be able to confidently manage their call blocking settings within both the Phone and Contacts apps on their iPhones.

    Unblocking From Phone App

    Unblocking numbers from the Phone app on an iPhone is just as simple and straightforward. This method can be especially useful for users who have accidentally blocked a contact, or those wishing to check their list of blocked contacts at any time. To start off, open up the ‘Phone’ app and select ‘Recents’ in order to view your call history. From there, tap the ‘i’ icon next to each entry that you wish to unblock and then toggle off the switch located next to ‘Block this Caller’. In a matter of moments, your chosen caller will no longer be restricted from calling or messaging you!

    If desired, all currently blocked numbers can also be found within the Phone app by selecting ‘Settings’ followed by ‘Blocked Contacts’. Here one can find a full list of individuals whom they’ve previously opted not to receive calls from – which can then be individually removed with ease through tapping the ‘Edit’ button located at the top right corner of their screen and then hitting ‘Unblock’ next to every single desired number.

    Through using both these methods, anyone with an iPhone will easily be able to manage their phone settings without missing a beat. With that said, it’s now time move onto viewing individual caller ID information when receiving incoming blocked calls…

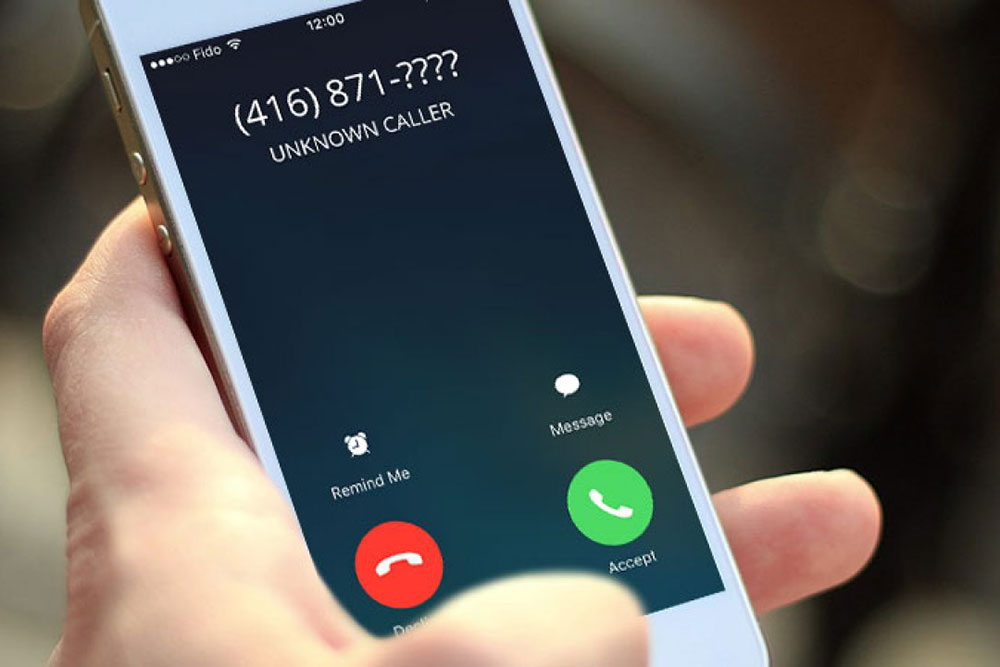
    Viewing Blocked Caller Id

    Sometimes, it can be difficult to keep track of blocked phone numbers – even if they have already been unblocked. Fortunately, there is an easy solution for viewing the caller ID information of incoming restricted calls on your iPhone. Simply open up the ‘Phone’ app and select ‘Recents’ in order to view your list of recent callers. If a number appears as ‘Blocked’, tap the ‘i’ icon next to that entry in order to reveal their caller-ID details. This will allow you to easily identify who called without having unblock them first!

    TIP: Take screenshots or take notes from these call logs so that you can refer back to them later if desired. That way, you won’t need to worry about remembering each specific blocked caller’s name when looking through your records.

    Another great tool for managing both blocked and non-blocked contacts alike is by making use of third-party apps such as Truecaller or Hiya Caller ID & Block which offer convenient features like automatic blocking and reverse lookup capabilities. With this type of software installed, users are able to quickly identify unknown numbers while also being able to maintain control over whom they choose not receive calls from at any given time.

    With all these options available, anyone with an iPhone will now have complete access over their personal settings regarding incoming calls and messages – allowing them some much needed peace of mind in today’s world. Up next we’ll discuss how best utilize such applications in order stay informed…

    Caller Id Apps

    Caller ID apps are an incredibly useful tool for managing incoming calls on your iPhone. These programs can be used to both block and unblock caller-ID information, depending on the user’s needs. For example, if you wish to permanently block someone from calling or messaging you, then you can use a caller-ID software like Truecaller or Hiya Caller ID & Block to do so with just a few taps. On the other hand, if you want to temporarily unblock someone who has been restricted by accident or otherwise, then these same apps will provide an easy way of doing this as well.

    Moreover, many of these third-party applications even offer handy features such as reverse lookup capabilities – which allow users to quickly search for any unknown contact info associated with a particular phone number. This is especially helpful when trying to track down those pesky telemarketers that call at all hours of the day! In addition, some apps also offer automatic blocking options so that specific contacts never have access to your line in the first place.

    Overall, using one of these types of programs makes it much easier for anyone with an iPhone to take control over their own personal settings regarding incoming calls and messages – providing them with peace of mind knowing that they’re always in charge of deciding who does (and doesn’t) get through.

    Third-Party Apps

    Figuring out how to see blocked numbers on an iPhone can be a tricky endeavor, especially when it comes to unblocking them. Fortunately, there’s a way around this issue – and it involves the use of third-party apps. These programs are specifically designed to help users manage their incoming calls and messages in more streamlined ways than what is available through Apple’s native features.

    Here are 3 key benefits of using such caller-ID apps for identifying or unblocking contacts:
    1) Easily trace unknown numbers from any region
    2) Quickly block or unblock specific calls
    3) Instantly view contact info associated with a number

    In other words, these types of applications make managing your call settings much simpler than ever before – allowing you to take control over who does (and doesn’t) have access to your line at any given time. And if you’re curious as to how exactly one would go about unblocking a number manually? Well… that’s where we’ll head next!

    Unblocking A Number Manually

    If you’re looking to manually unblock a number, the process can be surprisingly straightforward. To start off, simply open up your phone’s settings menu and select “Phone” from the list of available options. From here, scroll down until you find an option labeled “Blocked Contacts” or something similar – this is where all blocked numbers are stored for easy reference.

    Now that you’ve located the correct section within your phone’s settings menu, it’s time to begin unblocking the desired caller. Simply tap on their name (or number) in order to access additional info about them – then hit the “Unblock Contact” button to immediately unblock them. After doing so, they should have full access to contact you once again via text message or call!

    Of course, if things don’t go as planned after attempting a manual unblock of a number, there may still be some hope left yet. The next step in our journey will be devoted towards troubleshooting these types of issues should one arise during the process of trying to re-establish communication with someone who was previously blocked.

    Troubleshooting

    Unblocking a number can sometimes be like trying to find the right key for a lock; you may have all the right pieces but still fail to unlock what’s inside. Such is often the case when dealing with call-blocking issues on an iPhone – no matter how many times you try, it just won’t work! Thankfully though, there are some troubleshooting steps that can help alleviate these block number errors and unblock numbers without any additional hassle.

    First off, if you’re having trouble making calls or sending messages after unblocking someone, make sure caller ID is enabled in your settings menu. This should allow the phone to recognize incoming calls from blocked numbers as long as they’ve been successfully unblocked previously – otherwise nothing will happen even after hitting ‘unblock’! Additionally, another common issue that arises during this process is failure of the device to properly identify which contacts have actually been blocked; this can lead to confusion and frustration until its resolved. To fix this problem quickly and easily, simply check the list of blocked contacts on your device periodically so that all numbers are up-to-date before attempting further action.

    Finally, don’t forget about resetting your network connection if none of these solutions seem to solve your blocking problems. In most cases this should do the trick in terms of allowing new numbers through while resolving any lingering issues with existing ones – leaving you free once again to communicate as desired with whoever you need to talk/text!

    Conclusion

    In conclusion, there are several ways to unblock a phone number on an iPhone. With the settings options, you can understand and manage who is blocked from calling you or messaging you. You can also unblock numbers from recent calls, contacts app, and the phone app. There are even apps available that show caller ID information for unknown numbers.

    Third-party apps are another way to view blocked numbers as well. And if all else fails, you can manually enter in a blocked number yourself to see it appear on your device’s screen like a beacon of hope—like a lighthouse guiding lost ships back home.

    If any issues arise while attempting to unblock a phone number on an iPhone, troubleshooting steps should be taken right away so users don’t get stuck with faulty service. In the end, learning how to see blocked numbers on an iPhone is not only simple but empowering too! It’s like having complete control over who gets access to your personal communication line.

  • How To Turn Off Safesearch On iPhone

    How To Turn Off Safesearch On iPhone

    Are you an iPhone user who’s looking for a way to turn off safe search? Well, look no further! In this article, I’ll be walking you through the steps necessary in order to make sure your online searches are unrestricted. It may sound intimidating at first, but trust me – it’s actually easier than you think!

    Whether you’re looking to access adult websites or just want more control over what results show up when searching online, here’s how you can take back full control of your Safari browser and switch off safesearch on your iPhone. Let’s get started!

    Overview Of Safesearch

    Are you fed up with the nanny state of your iPhone’s SafeSearch settings? Do you feel like Big Brother is watching over your internet activity? Well, no need to worry! That’s what this guide is here for! We’ll give you an overview of what SafeSearch is — and how to adjust its settings on your iPhone.

    So, what exactly is SafeSearch? It’s a feature designed by Apple to help block out inappropriate content from search results. This means that when you use Safari or any other browser on your device, only age-appropriate websites will show up in the list of results. The filter works both ways: it prevents minors from accessing explicit material, as well as protecting adults from seeing offensive webpages they don’t want to see.

    But there are additional benefits to using SafeSearch too. Besides blocking out adult-oriented sites, it also filters out hate speech, violent images, and other potentially dangerous content. So if you’re worried about accidentally stumbling across something disturbing while browsing online, then having this feature active can really come in handy. Plus, it helps keep kids safe when they’re using the internet — allowing parents some peace of mind while their children explore the digital world without fear of being exposed to anything troubling.

    How To Adjust Settings On Iphone

    Adjusting the SafeSearch settings on your iPhone is actually a fairly simple process. Here’s what you need to do:

    1. Go to Settings > Safari and select ‘Content Blockers’.
    2. You should see an option for enabling or disabling the filter – simply switch it off if desired.
    3. To further refine the filter, choose ‘Advanced’ from the same menu. This will allow you to customize which types of content are blocked and displayed in search results.
    4. Finally, scroll down and toggle on “Limit Adult Websites” if you want to restrict access to any explicit material as well.

    Once these steps have been completed, all that’s left is to test them out! So go ahead and try searching for something with either Safari or another browser — if everything looks good then your new settings are working properly. And don’t worry if they’re not perfect right away; you can always tweak things later until you get just the right balance of safety vs convenience.

    But before we move onto disabling SafeSearch in other search engines, let’s take a closer look at how this feature works within Apple devices specifically.

    Disabling Safesearch In Search Engines

    Now that we’ve covered how to disable SafeSearch within Apple devices, let’s take a look at other search engines. Disabling safesearch in these platforms is also relatively easy – all you need to do is locate the appropriate settings page and switch off the filter. While this process may vary slightly between different browsers and operating systems, it generally follows the same basic steps:

    First, open up your browser of choice and navigate to the ‘Settings’ section. Here you should be able to find an option for enabling or disabling safesearch. Simply toggle this off and save your changes. Some browsers will even allow you to customize which types of content are blocked from appearing in search results — so if you want more control over what appears in searches then this could be worth looking into as well.

    Once everything has been configured properly, just give it a quick test run by searching for something on Google or another search engine – if all goes according to plan then your new settings should now be working! From here it’s simply a matter of maintaining these preferences going forward; while there’s no guarantee they won’t change again eventually, keeping them turned off can help ensure greater privacy and safety when browsing online.

    Alternative Ways To Disable Safesearch

    It’s not just about the settings page – there are also alternative methods for disabling SafeSearch. For instance, if you’re using a different search engine than those listed above, then it’s likely that they will have their own options and settings pages – so be sure to take a look at these as well. You may even find some useful tools or features that can help adjust your safesearch preferences more quickly and easily.

    Additionally, many websites offer their own customization options which allow users to turn off safesearch in various ways. If you come across one of these sites then make sure to check out what kind of control they offer over content filtering; this could save you time when trying to get your searches set up properly.

    Ultimately, while the process might seem daunting at first, with enough patience and research it’s possible to figure out how to turn safesearch off on any platform or device. All it takes is the willingness to explore all available search engine options, tweak your settings accordingly, and ensure that everything remains turned off until you decide otherwise!

    Conclusion

    In the end, it’s important to remember that SafeSearch is only one way parents can protect their children and teens from inappropriate content. In fact, a recent survey found that over two-thirds of parents in the US feel as though online safety has become an increasingly difficult issue for them to manage.

    That said, there are alternative ways to ensure your child or teen’s safe web browsing experience without having to rely solely on SafeSearch. You could use parental control apps such as Net Nanny or Qustodio to customize filtering settings according to age group and device type. Additionally, you could teach digital literacy skills such as researching responsibly, using strong passwords, and being aware of potential cyberbullying tactics.

    By taking these steps – along with adjusting settings on any iOS devices – you’ll be able to give yourself peace of mind knowing that your loved ones are staying safer while they explore the internet. I hope this article has been helpful in showing how you can turn off Safesearch on iPhone so you can find better balance between protection and freedom when it comes to your family’s online activity.

  • How To Find Lost Airpods That Are Offline

    How To Find Lost Airpods That Are Offline

    Lost AirPods often feel like a tragedy. You’ve spent hundreds of dollars on these little pieces of technology – not to mention the hours you’ve spent listening to your favorite tunes with them! But when they go missing, it can be hard to find those tiny things again. Don’t give up hope yet though: I’m here to help you get those precious earbuds back in no time. In this article, I’ll teach you how to find lost AirPods even if they’re offline.

    We’ve all been there before: frantically searching for our missing AirPods, but with no luck. It’s frustrating and discouraging when we don’t know where that one single pod is hiding or why it won’t connect anymore. If this sounds familiar, then keep reading—there are still ways to track down your beloved tech even if it’s out of range or has run out of battery power.

    Don’t let lost AirPods make you lose hope; there are plenty of tricks up my sleeve (and yours) that can help reclaim what was once thought lost forever. With just a few simple steps and some clever detective work, you can have your earbuds back in no time! So read on to learn some tips and tricks that will help you locate those rogue pods without breaking a sweat.

    What are Airpods? (In case you have not been on earth)

    Airpods have become a popular choice of headphones for many people. Not only are they convenient and easy to use, but they also offer superior sound quality compared to other types of headphones. Apple’s Airpods are wireless earphones that provide users with noise-cancelling capabilities and the ability to connect via Bluetooth to any device. They come in two sizes (regular and pro) so there is something for everyone. Unlike traditional wired earbuds, you don’t have to worry about getting tangled up or having to carry around cumbersome cables.

    The convenience of Airpods has made them a go-to accessory for busy people who need their music on the go. Whether you’re commuting, working out at the gym, or just listening while walking around town – it’s all possible with these innovative headphones from Apple. The best part about Airpods is that they’re incredibly lightweight, making them ideal for anyone looking for an effortless way to listen to music without compromising sound quality.

    These days more than ever, it seems like we could all use some peace and quiet – this is where noise cancelling technology comes in handy! With noise cancellation enabled on your Airpod Pro model, background noises won’t stand a chance against your favorite tunes. So if you’re looking for an excellent pair of wireless earphones that can give you great audio quality as well as some much needed silence when necessary, then Apple’s Airpods might be just what you need!

    Locating Your Airpods When Online

    It’s every headphone user’s worst nightmare – you take out your Airpods to use them, but suddenly they’re nowhere to be found. Whether it was a careless moment of carelessness or an accidental misplacement, locating lost Airpods can seem like mission impossible. Thankfully, there are a few ways that you can track down those missing earbuds so that you don’t have to deal with the hassle and expense of buying a new pair. Here are some strategies for finding your misplaced Airpods:

    • Locate Airpods When Online:
    If your Airpods are online (connected to one of your devices), then you can easily locate them via Apple’s “Find My” app on iOS or iCloud website on Mac/PC. This will allow you to view their last known location as well as give you options such as playing a sound through the headphones in case they were simply misplaced nearby. You can also choose to put them into Lost Mode which will lock them remotely and prevent anyone else from using them until they are returned to you.

    • Track Airpods When Offline:
    In cases where the headphones aren’t connected to any device, this is when more creative methods may need to be employed. For instance, if you know approximately where the headphones were left behind, consider using another Bluetooth enabled device (like a smartphone) in conjunction with apps such as Find My Headphones or Tile Finder which search for Bluetooth signals within range. Additionally, if all else fails, try retracing your steps from around the time that the headphones went missing – sometimes old-fashioned detective work pays off!

    The good news is that no matter what situation arises when trying to find misplaced headphones, there is likely always going to be something that can help get back on track and reunite with those treasured pieces of audio equipment once again!

    Strategies For Finding Lost Airpods That Are Offline

    Let’s face it, losing your Airpods can be a major inconvenience – and in some cases, an expensive one if you have to replace them. But if the headphones are offline (not connected to any of your devices), all hope is not lost! There are strategies for tracking down those misplaced earbuds that don’t involve shelling out more money for a new pair. Here’s what to do when trying to find lost Airpods that are offline:

    First, consider using another Bluetooth enabled device such as a smartphone or laptop with apps like Find My Headphones or Tile Finder to search for nearby signals from the missing headphones. It may take some patience and trial-and-error but these types of programs can be quite effective at locating items within range.

    Second, retrace your steps around the time the Airpods went missing. Sometimes this classic detective work pays off – try searching through areas where they may have been placed before being forgotten about. If you still aren’t having any luck then reach out to friends who were around during that time and ask if they remember seeing them anywhere.

    Finally, while finding lost Airpods can seem daunting, there’s no need to give up just yet! With a bit of ingenuity and effort it might be possible to locate those beloved headphones once again without needing to buy replacements.

    Concluding Steps

    With a few strategies in hand, it’s time to finalize your search for the missing Airpods. There are still some steps that need to be taken after you’ve exhausted all possible locations and found nothing – don’t give up just yet! Here’s what to do next:

    1) Review any lost-and-found listings near where the headphones were last seen. It may be worth asking around or checking online resources like Craigslist and Facebook Marketplace if they haven’t been turned into an official space yet.

    2) If no luck there either, try contacting Apple support. They can provide helpful advice on how to go about finding them or even offer replacement options under warranty depending on when they were purchased.

    3) Once located (or replaced), make sure to reinstate the connection between your device and the Airpods so that they sync properly again. This involves turning off Bluetooth on one device before connecting with another via the settings menu of both devices.

    4) Finally, take extra precautions against losing them in the future by regularly cleaning out their case and investing in a tracking accessory such as Tile Finder for added peace of mind.
    By following these post-search steps, you should have some success in recovering those lost Airpods quickly and easily — hopefully without too much stress along the way!

    Conclusion

    The search for lost Airpods is a common problem, and it can be incredibly frustrating when they become offline. Fortunately, there are a few steps you can take to help locate them. With patience and determination, your missing Airpods may soon be reunited with their owner.

    Locating your Airpods starts with understanding how they work–knowing their range and any Bluetooth-enabled devices that could have moved the pods. Once I had an idea of where they might be, I then used my phone’s Find My app to track down the exact location of my misplaced Airpods. If this doesn’t work, however, more creative approaches like using audio cues or enlisting the help of others will come in handy.

    At times like these, it’s helpful to remember that everything has its place; even if it takes some extra effort to find our beloved Airpods again! Taking a step back allows us to look at our situations from different angles so we can figure out what works best for us—and hopefully reconnect with our much needed earbuds soon enough. Good luck on your treasure hunt!

  • How To Watch Netflix On Facetime

    How To Watch Netflix On Facetime

    Streaming services like Netflix are becoming increasingly popular, allowing people to watch their favorite shows with friends and family even when they’re apart. To make this easier, Apple’s FaceTime service provides a video call service that lets you chat face-to-face while watching something together. In this article, we’ll explore all the possible options available so you can enjoy quality time with loved ones without leaving home.

    Overview Of Requirements

    Watching Netflix on FaceTime is a great way to stay connected with friends and family while enjoying your favorite movies or shows. To do this, there are certain requirements you must meet in order for it to work properly. This includes having the right devices, meeting streaming and video call setup requirements, as well as understanding how group video calls work.

    When setting up FaceTime for streaming Netflix, you must make sure that all the participants have compatible Apple devices like iPhone 11 Pro Max or iPad Air 2 with iOS 13 installed. Additionally, they will need a good Wi-Fi connection or an adequate data plan if streaming over cellular service. You also want to ensure everyone has enough storage on their device so they can download the most recent version of Netflix’s app before getting started.

    Finally, when making a group call using FaceTime, you should keep in mind that no more than 32 people can join at once – otherwise you’ll have to set up multiple calls instead! With these basic requirements met, you’re ready to move onto setting up Netflix for your next Facetime viewing session!

    Setting Up Netflix For Facetime

    Now that you’ve met the basic requirements for streaming Netflix on FaceTime, it’s time to get setup and configured. To begin, open up the Netflix app on your device and sign in with your account. Once this is done, select which movie or show you want to watch during your video call session. After selecting a title, tap the “Cast” icon located at the top right corner of the screen – this will cause a list of compatible devices to appear. Select “FaceTime” from this list, then enter the phone numbers or emails associated with each participant who will be joining your group video call.

    After confirming all participants have been added, press “Start” and confirm that everyone has received an invitation to join via their respective devices. When they accept, their profile pictures should appear alongside yours as confirmation that they are connected to the same streaming session. You can also check if people are having trouble connecting by tapping their image; if there is an issue, there will be an indicator next to their name so you know what needs resolving before continuing!

    With everything ready-to-go, click “Play” on your device and enjoy watching together! No matter where everyone is located geographically, FaceTime allows you to connect with friends and family while enjoying great quality entertainment without any hassle.

    Connecting To A Group Video Call

    Group video calls via FaceTime are an ideal way to stay connected with friends and family from afar, especially when you’re all looking for a fun Netflix streaming experience. While setting up the call can seem like an intimidating task at first, it doesn’t have to be complicated! With just a few simple steps, you can easily get your group ready to start enjoying their favorite movies and shows in no time.

    The key is starting off on the right foot by making sure everyone has access to the movie or show they want to watch before diving into the actual call setup process. Once that’s out of the way, launching your group video call is as easy as selecting “FaceTime” from the list of compatible devices that appear after tapping the “Cast” button on your device. Then enter in each participant’s phone numbers or emails associated with their respective accounts – this will ensure every person receives an invitation so they can join your session.

    Once invitations have been sent out and accepted, click ‘Play’ and enjoy watching together! It may take a bit of trial-and-error until everyone gets comfortable connecting over FaceTime but once you do, there’s no limit to how much entertainment you can share with those who matter most regardless of distance.

    Tips For An Optimal Streaming Experience

    Now that everyone’s connected, it’s time to make sure you get the most out of your streaming experience. Here are a few tips for an optimal group viewing session:

    First and foremost, be aware of what devices your friends and family have access to before joining the call — this will ensure that no one has any issues connecting or experiencing lags in streaming quality. It may also help if each person checks their internet connection speeds prior to opening up the call; while FaceTime can work with slower connections, faster ones tend to result in higher video resolutions and better overall picture clarity.

    Second, take into account device compatibility when selecting content – some services may not support certain platforms so double-check ahead of time to avoid any hiccups during playback. And lastly, consider upgrading streaming plans with providers like Netflix to get more concurrent users per account – this way, everyone on the call can enjoy full episodes without having to worry about buffering delays due to limited bandwidth or speed restrictions.

    By following these simple steps, you’ll be able create amazing shared entertainment experiences over FaceTime regardless of where everyone is located! With high-quality visuals and minimal interruptions from slow loading times, there’s nothing stopping you from enjoying all your favorite movies and shows together anytime you want.

    Conclusion

    Facetiming with Netflix is a great way to stay connected and have fun with friends and family. All you need to do is set up your Netflix account and connect it to FaceTime. Once you’ve done that, it’s easy to invite your group and start streaming. You can even optimize the experience by following a few tips and tricks. So give it a try and turn your next movie night into an epic one!

  • How To Import Photos From iPhone To Mac

    How To Import Photos From iPhone To Mac

    Are you looking for an easy way to import your photos from iPhone to Mac? Want to make sure it’s done quickly so you can get on with the rest of your day? We’ve got just the thing! Our guide will show you how to transfer photos and videos from an iPhone or iPad directly onto a Mac in no time.

    The process is actually quite simple, but that doesn’t mean there isn’t room for confusion along the way. That’s why we put together this step-by-step guide that’ll walk you through every stage of importing photos from iPhone to Mac — even if you’re not too tech savvy. No more worries about lost data: With our instructions, everything will be safely transferred over in no time.

    So don’t wait any longer! Equip yourself with all the knowhow necessary to save those precious memories without hassle. Follow us as we break down exactly what needs to be done when transferring photos and videos from iOS devices straight onto a Mac computer. Let’s get started!

    Overview Of The Process

    Have you ever wanted to transfer photos from your iPhone to your Mac? Here’s a quick overview of the process.

    The first step is establishing a connection between your devices, so that data can be transferred between them. You’ll need a USB cable or Wi-Fi access in order to bridge the two systems together. Once you have connected both devices, you are ready to move on to the next stage, which involves importing the photos themselves.

    Fortunately, Apple has made it easy for users to import pictures and videos directly from their iPhones onto their Macs without having to use any third-party applications. The process of transferring files only requires a few simple steps and allows you to quickly manage large libraries of images with ease. With this method, all you need do is select the desired media from your device and then specify where it should be sent on your computer – usually within seconds!

    Rather than worrying about how much time it will take or if there are any complicated processes involved, simply follow these straightforward instructions and before long you’ll have successfully imported all of your favorite memories into one place – no fuss required! From here we will go over exactly how to establish this connection in more detail…

    Establishing A Connection

    Now that we’ve taken a look at the overall process, let’s dive into establishing the connection between your iPhone and Mac. This is an essential part of getting started – without it, you won’t be able to transfer any photos or videos! Thankfully, Apple has made this incredibly easy and straightforward.

    The most direct way to pair your devices is by using a USB cable – simply connect one end to your phone and the other end to your computer and then wait for them to recognize each other. If you don’t have access to a USB cord, you can also use Wi-Fi to bridge the gap between both systems (though it may take longer). To do this, make sure both are connected on the same network and then select “Trust” when prompted on either device.

    Once your iPhone and Mac are linked up, they should remain together until you disconnect them manually. Don’t worry if there isn’t an icon or message telling you that they are connected; as long as both appear online in their respective settings menus (or in iTunes if you’re using a USB), they should still be paired. With everything ready to go now, all that’s left is transferring those photos over…

    Transferring Photos

    It’s time to get your photos from Point A (your iPhone) to Point B (your Mac). Moving your images and videos over is simple, regardless of whether you’re using a USB cable or Wi-Fi connection – all it takes is a few clicks!

    The first step in the process is launching an app on either side; for iPhones, this will usually be Apple’s Photos app. This application gives you access to all the pictures stored on your mobile device. On the computer side, you can use either iTunes or Image Capture – both work well here. Whichever program you choose, make sure that it recognizes your phone once you open it up.

    From there, it’s just a matter of navigating around until you find what you need: if transferring multiple files at once, simply select them all and drag them into the desired folder on your desktop. If only dealing with one image or video clip, click ‘import’ and then pick where it should end up on your machine. Regardless of which method you prefer, syncing these two devices together couldn’t be easier!

    Now that everything has been moved across safely and securely from iPhone to Mac – let’s take a look at finalizing the import process.

    Finalizing The Import

    So now that all of your photos have safely been transferred over, let’s look at finalizing the import process. We want to make sure everything is in its rightful place and ready to be used on our Macs!

    The first thing you’ll need to do is locate where your images are stored. Typically, if using a USB cable or Image Capture as your transfer method, these files should show up in Apple Photos or iPhoto (depending on which version of OSX you’re running). If utilizing Wi-Fi connection, however, they may end up somewhere else – like iCloud Photo Library. Either way, just take the time to check around and find out exactly where those pictures landed.

    Once this step has been completed, it’s simply a matter of organizing and sorting through whatever has come across from iPhone to Mac: tagging people in individual shots; creating folders for certain events and occasions; deleting any unnecessary/duplicate items; etc.. This can also be done on both devices simultaneously so that nothing gets missed. And with that, you’ve successfully imported photos from iPhone to Mac!

    Conclusion

    In conclusion, importing photos from an iPhone to a Mac is not as complicated as it may seem. As long as you have the proper cables and know where to find them, it’s really quite simple! Once your phone and computer are connected, all that’s left is for you to select which images you’d like to transfer over.

    It can be daunting when first embarking on this process – but with patience and determination, anyone can do it! Are there any tech-related tasks out there that seem impossible? With time and effort, I’m sure they’re achievable too.

    At the end of the day, transferring photos from your iPhone to a Mac just requires some basic knowledge of technology. And who knows? You might even pick up some new skills along the way. So why not give it a try? After all, what have you got to lose?

  • How To Silence Apple Watch

    How To Silence Apple Watch

    Do you ever feel like your Apple Watch is too loud and annoying? Have you searched for ways to silence it but can’t seem to find the right solution? Don’t worry, we’ve got you covered. In this article, we’ll be walking you through how to silence your Apple Watch quickly and easily! You won’t need any technical knowledge or expensive tools – just a few simple steps and you’re all set. So let’s get started and help make sure that pesky watch stays silent when it needs to be.

    The first step in silencing your Apple Watch is making sure Do Not Disturb mode is enabled. This will prevent notifications from buzzing or lighting up the screen, allowing you to enjoy peace and quiet without interruption. To enable Do Not Disturb mode on your watch, simply open the settings app and select “Do Not Disturb”. Once activated, all incoming notifications will be silenced until manually deactivated.

    Finally, if even after enabling Do Not Disturb Mode you still find yourself dealing with an overly noisy watch, there are additional settings available which allow users to further reduce sound levels. From the same menu as before, select “Sounds & Haptics” and then adjust the slider bar so that it sits at its lowest possible setting. With these two adjustments combined, your Apple Watch should now remain completely silent throughout use!

    Overview Of Apple Watch Features

    You would think with all its features, the Apple Watch is one of those devices that can’t be silenced. After all, it has functions and capabilities to help you stay connected and informed throughout your day. But what if you want to keep things quiet? You’d be surprised at how easy it is to silence your Apple Watch!

    The first step in understanding how to mute your Apple Watch is getting an overview of its features. The Apple Watch comes with a range of specs designed for convenience and connectivity. It allows users access to their music library, text messages, notifications from apps, as well as fitness tracking capabilities. In addition, its water resistant design provides protection against splashes or spills when out and about.

    When it comes to sound control on the Apple Watch, there are multiple ways to customize settings so that it meets your specific needs – whether you’re looking for complete silencing or just reducing volume levels. With this knowledge in hand, let’s move onto understanding the different sounds available on the device so we can start adjusting our preferences accordingly.

    Understanding The Different Sounds

    When it comes to sound control on the Apple Watch, understanding the different sounds available is key. There are three main types of alerts and notifications that will emit from your device: watch alerts, audible notifications, and sound effects.

    Watch alerts are those specific to the watch itself — things like alarms or timers you have set. Audible notifications include emails, text messages, or any other type of message received through an app on your phone that sends a notification to your wrist (e.g., social media apps). Finally, sound effects refer to any alert tones associated with certain tasks such as unlocking your watch face or completing a fitness goal.

    The good news is that all these sounds can be managed in terms of volume levels and frequency – giving users complete control over how their Apple Watch operates at any given time. With this knowledge in hand, let’s move onto setting up Do Not Disturb mode so we can further customize our preferences for silence when desired.

    Setting Up Do Not Disturb Mode

    With the power of Do Not Disturb mode, we can take our Apple Watch sound preferences to the next level. Setting up Do Not Disturb is easy and allows us to adjust settings for when exactly we want silence on our device. To get started, simply open Control Center – either by swiping down from the top of your watch face or tapping on Settings > Control Center. From here you’ll see a moon icon; tap on it to enable Do Not Disturb mode.

    You can also customize this setting beyond its default ‘on’ state if desired. If you go into Settings > General > Do Not Disturb, you will be able to further adjust the hours during which your device remains silent as well as specify who should still be able to reach you even while in DND (e.g., favorites). Once enabled, all other sounds associated with alerts, notifications, and effects are silenced – freeing up users from having to manually turn off each type of alert individually.

    One additional feature worth noting: You may have noticed that there’s an auto-reply message option available when enabling Do Not Disturb mode. This allows users to set a custom text message sent back automatically if someone attempts to contact them directly via their Apple Watch while in DND mode — very handy! Now let’s move onto how we can further mute calls and messages without having to resorting to full-time DND mode usage.

    How To Mute Calls And Messages

    Just like silencing a phone call or text message, we can also mute calls and messages on our Apple Watch. This is especially useful for those times when you want to be aware of incoming communications but don’t necessarily need to hear the sound associated with them. Muting calls and messages on your Apple Watch is as simple as flipping a switch – here’s how to do it:

    First off, open Control Center by swiping down from the top of your watch face or tapping on Settings > Control Center. You will see an icon labeled ‘Mute’ – tap this icon once to silence all incoming notifications, messages, and alerts until you decide otherwise. It’s almost like flipping a light switch; one tap turns the sounds off while another brings them back into play. Additionally, if you’d like separate control over whether your Apple Watch should remain silent during calls versus other types of notifications (e.g., emails), then simply go into Settings > Sounds & Haptics where you’ll find two toggle switches – one for muting calls and one for muting other notifications such as texts and email updates.

    Overall, taking just a few moments to adjust these settings beforehand can make life much easier in the long run — no more fumbling around trying to turn off multiple types of alert noise at once! Now let’s look at what else can be done beyond DND mode and manually muting individual elements…

    Adjusting Notification Volume

    Adjusting the volume of notifications on our Apple Watch is an important feature that can help us stay aware without being overwhelmed by sound. We can easily adjust the sound of incoming notifications from within the Audio settings section in our watch’s Settings menu. Here, we’ll find a “Notification Volume” slider which allows us to customize how loud or soft those alerts will be heard. Additionally, if you’d like to take your sound customization even further, then head over to the Sounds & Haptics section where you can also choose different alert sounds for specific types of notifications and apps (e.g., Mail vs Messages).

    Finally, it’s worth noting that these audio settings are also accessible from Control Center itself — simply long-press on the Mute button until a small popup appears with options to adjust both notification volume as well as ringer volume levels. This way, we don’t have to dive deeper into menus in order to get quick access to adjusting these settings; they’re just a few taps away! With this newfound knowledge under our belts, let’s now talk about what else we can do beyond muting calls and adjusting notification volumes…

    Customizing Airplane Mode Settings

    Beyond just adjusting the volume of our notifications, we can also customize other settings related to Airplane Mode. If you’re looking for a way to silence your Apple Watch completely, then this is an important feature that’s worth exploring. To access it, simply head into the watch’s Settings app — here we’ll find the “Airplane Mode” toggle which allows us to turn off all radios and disable any incoming calls or messages from coming through. This will effectively silence your Apple Watch until you decide to re-enable those features again.

    Additionally, if you’d like even more control over what types of notifications are silenced when enabling Airplane Mode, then take advantage of the “Customize” button located within this same menu in Settings. Here, we can select specific apps or services (e.g., Mail or Messages) whose notifications shouldn’t be allowed while in Airplane Mode — allowing us to maintain some level of awareness without having everything turned on at once.

    With these options available for customizing how our Apple Watch behaves based on our needs and preferences, now let’s talk about what else we can do beyond silencing things temporarily: blocking all notifications completely!

    Blocking All Notifications Completely

    We often find ourselves in situations where the sound of alerts and notifications can be disruptive or distracting. Whether it’s at a meeting, while studying, or during any other activity that requires silence – we may consider blocking all notifications completely to avoid getting sidetracked. With this goal in mind, let’s take a look at how we can stop notifications from appearing on our Apple Watch:

    1. Head into the Notifications menu located within Settings. Here we’ll find a toggle switch for “Do Not Disturb” mode which allows us to turn off most incoming alert sounds and vibrations coming through regardless of whether we’re using Airplane Mode or not.
    2. We can also choose to disable specific apps from sending us notifications as well — simply locate its entry under the “Notification Center” section and then use the provided switches to customize what types (if any) are allowed through.
    3. Finally, if you’d like to block all alerts entirely, there is an option available called “Block All Alerts” which will automatically silence everything until you manually re-enable them again later. Once enabled, no messages or calls will come through even when Do Not Disturb mode isn’t active so make sure to only use this feature when absolutely necessary!

    Having now covered some ways around silencing our Apple Watch along with options for blocking all notifications completely, it’s time to discuss disabling microphone and camera access altogether…

    Disabling Microphone And Camera Access

    Aside from blocking notifications, we may also consider disabling microphone and camera access on our Apple Watch to ensure privacy. Disabling these features can be done in a few simple steps:

    First, open the Settings app on your watch and navigate to Privacy. Here you’ll find an option for “Microphone & Camera Access” which will allow you to disable both of these services individually if desired. Simply toggle the switches next to each corresponding setting and then confirm your selection by tapping Done when finished.

    It’s important to note that some apps may require microphone or camera access before they’ll function properly – so if you’re planning on using them, make sure not to disable these settings completely! However, as long as no other apps are affected, this should effectively stop any unwanted audio/visual recordings from being taken without your knowledge or permission.

    Now that we’ve discussed how to disable microphone and camera access on our Apple Watch, let’s move onto enabling Theater Mode…

    Enabling Theater Mode

    With a single swoop, we can now silence our Apple Watch and enter Theater Mode. This remarkable feature is designed to make sure that your watch won’t disturb anyone in the theater – or anywhere else for that matter!

    Enabling Theater Mode on your Apple Watch is incredibly simple; all it takes is a few taps of the screen. First, open the Settings app on your device and navigate to Control Center & Notifications. Here you’ll find an option for “Enable Theater Mode” which will allow you to turn it on with just one tap. Once enabled, your watch’s display will be dimmed and vibrations silenced until you manually disable this mode again. It’s worth noting that while in Theater Mode, notifications will still appear but they won’t make any sound or vibrate – so no need to worry about disturbing those around you!

    In addition to keeping your watch quiet in theaters, enabling Theater Mode also allows us to enjoy some quieter moments without having our wrist buzzing constantly. Whether it’s during work meetings or family dinners, activating this setting helps keep distractions at bay and makes sure that only important notifications are allowed through. So why not enable Apple’s silent theater today?

    Utilizing Silent Mode

    In addition to Theater Mode, we can also utilize the Apple Watch’s Silent Mode feature. As its name implies, this enables us to quickly and easily turn off all sounds and vibrations on our device for a set amount of time. This is perfect for those times when we want some extra peace and quiet without having to worry about potentially disturbing others around us!

    Here are 4 simple steps to activate silent mode on your Apple Watch:
    1) Open the Settings app and navigate to Sounds & Haptics.
    2) Tap on “Vibrate” which will bring up two options – Vibrate On or Set Silent. Selecting “Set Silent” will enable silent mode until you manually disable it again.
    3) You’ll then be able to choose how long you’d like silent mode enabled; you can select anywhere from one hour up to 24 hours depending on your needs!
    4) Once done, tap Done in the top right corner of your screen and that’s it – your watch is now in silent mode until you decide otherwise!

    With these few swift taps, we’re now able to customize our Apple Watch experience more than ever before. Whether it’s introducing some temporary peace with silent mode or just preventing potential disruptions with theater mode, these features make sure that we never miss out on important notifications while still maintaining a respectful environment at all times.

    Conclusion

    In conclusion, silencing the Apple Watch is a great way to give yourself some peace and quiet. It can also be beneficial if you need to take an important call or have a meeting in public. With Do Not Disturb mode and Silent Mode, users can customize their experience to fit their needs. All of these features represent different aspects of control — the ability to silence your device when necessary, while still being able to receive notifications at other times. By managing sound settings on our Apple Watches we are symbolically showing that we are in charge of our lives and taking responsibility for how much information we want coming into our day-to-day lives. In this way, it’s not just about turning down the volume but rather taking back control over what comes into our life each day.

  • How To Stop Siri From Reading Messages On Airpods

    How To Stop Siri From Reading Messages On Airpods

    Are you tired of Siri reading your messages out loud every time you take off your AirPods? It can be really annoying, especially if you’re in a public space and don’t want everyone to hear what’s being said. Fortunately, it is possible to stop Siri from automatically reading text messages on your AirPods. In this article, we’ll show you how easy it is to turn off the feature so that Siri won’t read aloud any incoming notifications or messages. We will also provide tips for ensuring maximum privacy when using your AirPods. So if you’re looking for an effective way to keep conversations private while still enjoying the convenience of wireless audio device technology, then this article is just what you need!

    Overview

    Have you ever been in a crowded public space, like an airport or train station, and heard someone’s Airpods reading their messages out loud? It’s not only embarrassing but can be intrusive and uncomfortable for those around them.

    Fortunately, there are steps we can take to stop Siri from doing this on our own devices. Through the privacy settings of your device, you can control when audio notifications are enabled. This includes disabling audio alerts when messages arrive so that they won’t play through your Airpods. Additionally, troubleshooting any issues with your Airpods’ connection may also help prevent unwanted audio notifications from playing.

    With these simple tips it’s easy to enjoy all the benefits of Apple Airpods without compromising your privacy or making others feel awkward. Now let’s explore how to set up your airpods for maximum security and peace of mind.

    Setting Up Your Airpods For Privacy

    To ensure maximum privacy when using your Airpods, it’s important to adjust the settings on your device. This will secure the connection between your phone and your earbuds so that audio notifications don’t play in public places. To do this, go into the ‘Settings’ menu of your device and select ‘AirPods’. From here you can customize various preferences such as turning off Siri or adjusting sound levels for specific apps. You can also toggle whether audio alerts are enabled for incoming messages, calls, and other notifications.

    If you’re having trouble with any part of the setup process, double check that the devices are properly connected by going into Bluetooth settings on both devices. Make sure all connections have been established correctly before proceeding with adjustments to audio preferences. Additionally, be sure to keep software up-to-date in order to maintain a strong connection between your Airpods and your device.

    Once everything is set up correctly, you’ll be able to enjoy listening without worrying about interruptions from unwanted audio notifications playing through your Airpods in public spaces. Now we’ll explore how to turn off Siri completely on our Apple Airpods so that no matter where we are, there’s no chance of embarrassing ‘read aloud’ moments.

    Turning Off Siri On Your Airpods

    We all know the feeling of dread when Siri starts reading aloud a message in public. To avoid any potential embarrassment and ensure your Airpods remain private, it’s important to disable Siri completely. Here are four easy steps to take:

    1. Go into the ‘Settings’ menu on your device.
    2. Select ‘AirPods’ from the list of options available.
    3. Toggle off the switch that says ‘Siri’ or ‘Allow Siri While Wearing This Device’.
    4. You can also adjust sound levels for specific apps if desired.

    After completing these steps, you’re ready to enjoy listening without worrying about audio notifications playing through your Airpods in public spaces. With just a few adjustments to settings, you can be sure that conversations are kept between you and those closest to you — no matter where you go! Now we’ll look at how to disable voice feedback so that Siri remains silent even during accidental activation.

    Disabling Voice Feedback

    In addition to turning off Siri completely, you can also disable voice feedback so that no audio notifications are played even if the Airpods accidentally activate. To do this, follow a few simple steps:

    First, open up the ‘Settings’ menu on your device and select ‘AirPods’. From there, find the option labelled ‘Siri Voice Feedback’ or something similar. Toggle off the switch next to it in order to stop any sound from playing when Siri is activated by mistake. This will ensure that only your own voice is heard through the earbuds while they remain connected to your device.

    It’s important to note that disabling voice feedback does not turn off all sounds associated with Siri — just those related specifically to voice recognition technology. You’ll still be able to hear audio cues like chimes whenever an action has been successfully completed. However, these alerts are much less intrusive than full-blown conversations being read out loud!

    Now that we’ve covered how to disable both Siri and its accompanying voice feedback settings, let’s look at how to adjust listening levels for specific apps on Airpods.

    Adjusting Listening Levels

    Now that we’ve tackled how to turn off Siri and its voice feedback, it’s time to look at how to adjust sound levels for specific apps on your Airpods. Adjusting the listening levels is a great way to customize your audio experience so you can easily control what kind of sounds are being heard through the earbuds.

    To begin adjusting the volume settings, open up the ‘Settings’ menu again and select ‘AirPods’. From there, find the option labelled ‘Volume Control’, or something similar. You’ll then be able to make adjustments to individual app’s sound levels using a simple slider system. This will allow you to quickly increase or decrease audio levels depending on what type of content you’re currently consuming.

    It’s also possible to make more fine-tuned adjustments by tapping into each app’s own native sound settings, allowing for greater customization when it comes to controlling audio notifications. Whether you want louder music streaming from Apple Music or softer alerts coming from Messages — with just a few taps, you’ll be able to achieve exactly what you need in terms of sound level management with ease!

    From here, let’s move onto discussing further ways in which you can control audio notifications while using Airpods.

    Controlling Audio Notifications

    It’s like having an orchestra conductor in your ears, carefully crafting the perfect symphony of sound. With audio notifications from apps and services, you can customize the sounds that reach your earbuds so that only what matters most to you is heard. Whether it be a gentle reminder for something or an urgent alert — controlling audio alerts on Airpods allows users to craft their own unique auditory experience with ease.

    The first step towards managing these settings is understanding how they work. Audio prompts will usually come as either audible tones or spoken messages depending on the app or service being used at any given time. These are all designed to serve different purposes but ultimately provide information pertaining to whatever task may be occurring within the app itself. By adjusting audio levels across individual apps individually, users can ensure that important notifications stand out while more mundane ones remain muted.

    When it comes to those who prefer a quieter listening experience, there are still ways to receive pertinent information without necessarily needing to turn up the volume too much. Utilizing visual cues such as flashing lights or vibrations could help indicate when certain audio alerts should be addressed by allowing users to better control which type of notification they want coming through their Airpods at any given moment. This way, no matter what kind of environment one finds themselves in — whether it’s loud or quiet — everyone can keep track of incoming audio notifications with relative ease!

    With this newfound knowledge about managing audio notifications, let’s now look into further steps we can take in order to block unwanted messages sent directly through our Airpods.

    Blocking Unwanted Messages

    In order to stop unwanted messages from coming through our Airpods, there are a few steps we can take. The first is to go into the settings for our device and disable Siri’s ability to read incoming notifications aloud. This will prevent any alerts or messages sent directly by apps or services from being heard in our ears. We can also check what kind of audio notifications are enabled on each app so that only those that matter most come through without unnecessary noise.

    If desired, users can even choose to block certain contacts outright if they want complete control over who gets access to their ears! This way, specific people can be prevented from sending voice messages which could otherwise be intrusive when received while out in public or just not wanted at all. To make this happen, simply head over to the contact list associated with your device and either delete them entirely or mark them as blocked — both options help ensure that no further communication attempts occur between you two.

    Having taken these precautions, users now have full command over their auditory experience via Airpods! No longer do worrying about loud interruptions or receiving unexpected messages need to concern us since we’ve already set up measures that guarantee a peaceful listening environment. With this newfound freedom comes greater opportunities for personalization; allowing everyone to craft their own unique soundtrack tailored just how they like it!

    Deleting Or Blocking Contacts

    With our newfound control over incoming notifications and audio, it’s time to take a look at how we can manage the contacts on our device. After all, if we want to block out any unwanted messages or calls from certain people, then having an organized list of contacts is essential. Luckily, there are several options available for deleting, blocking, removing and excluding contacts as well as unsubscribing them altogether!

    First up is the delete contact option which allows users to quickly remove someone they don’t wish to communicate with anymore. This will also prevent them from being able to send future messages or attempt to call us via Airpods. There’s also the blocked contact feature that prevents selected persons from calling or messaging in the first place; perfect for those who’d prefer not to receive any communication whatsoever from specific individuals.

    For those who simply want more control over their contact list rather than completely cutting ties with someone forever, there’s always the option of removing or excluding them instead — this way no further attempts of communication occur but without actually disappearing from one’s list entirely. Additionally, users can even choose to unsubscribe particular contacts too so that new alerts won’t be sent but past ones still remain accessible should they ever need reviewing again.

    Having explored different ways of managing our contact lists accordingly, let’s now turn our attention towards choosing the right settings so that only desired audio notifications come through when needed most!

    Choosing The Right Settings

    Now that we’ve taken a look at how to manage our contact list, it’s time to ensure the right audio settings are in place so that only desired notifications come through on Airpods. To do this, users will need to adjust their device’s privacy and Siri settings as well as select the correct listening levels for incoming notifications.

    First off, let’s take a closer look at Airpod settings. This is where you can choose what types of alerts appear when connected via bluetooth such as incoming calls or messages from selected contacts — all of which can be customized according to user preferences. Additionally, if your current setup includes voice-activated assistants like Siri then additional adjustments may also be necessary; here one can decide whether incoming audio notifications should override existing noise cancellation features or not depending on personal preference.

    Finally, don’t forget about adjusting the listening level too! It’s important to make sure these settings aren’t set too high otherwise unwanted background noises might still creep into conversations without permission — something that no one wants! The good news is though that this feature can easily be adjusted via any number of compatible devices making customization quick and straightforward.

    Having covered everything there is to know about setting up preferred audio notifications on Airpods, let’s now turn our attention towards troubleshooting tips for addressing any potential issues going forward!

    Troubleshooting Tips

    When it comes to troubleshooting issues with Airpods, the first step is to check for any connection problems. This can be done by verifying that bluetooth is enabled on both your AirPods and device as well as ensuring that they are properly paired. If there’s still an issue then try resetting your AirPods or reconnecting them manually if necessary.

    In addition to looking into connection issues, users should also double-check their Siri settings in case of voice recognition difficulty or accidental audio feedback when receiving notifications. To prevent this from happening make sure you have the right privacy settings turned on so only approved contacts will be able to access information like messages over your headphones — a great way of avoiding unwanted interruptions!

    Finally, some other helpful tips include regularly updating your firmware which can help address minor bugs or glitches as well as keeping ear wax at bay since even small amounts can affect sound quality. Doing these things can go a long way towards making sure your Airpod experience stays top notch!

    Conclusion

    The bottom line is that you have the power to control how and when Siri reads your messages through your Airpods. With some simple steps, you can create a secure environment and enjoy the convenience of hands-free communication without worrying about privacy concerns.

    By adjusting listening levels, blocking unwanted contacts and disabling voice feedback, I can ensure that my conversations remain confidential while using my Airpods. Once these settings are in place, I’m confident knowing that Siri won’t be reading out all of my incoming messages on public transport or at work!

    Overall, having control over who hears what I say is an important factor for me when it comes to using technology like Airpods. With just a few tweaks here and there, I can protect myself from any potential breaches of privacy so that I can enjoy the benefits of hands-free communication with peace of mind.

  • How To Change Airpod Name

    How To Change Airpod Name

    Are you looking to change the name of your AirPods? Did you know that changing the name of your AirPods is easy and only takes a few steps? If so, then this article is perfect for you! In it, we’ll provide a step-by-step guide on how to change the name of your AirPods. Whether you want to give them an original moniker or just make them easier to identify among other devices, our guide will show you exactly what to do. So let’s get started!

    Do you own an Apple device like an iPhone or iPad? Then follow these simple instructions and you’ll be able to rename your AirPods in no time. First, open up your Settings app and then select Bluetooth from the list. From there, tap on the information icon next to the entry for ‘Airpods’ and then type in whatever new name you’d like for them. Once done, hit ‘Done’ and voila – your AirPod’s have been renamed!

    Finally, if none of that worked out for some reason, fear not – all hope isn’t lost yet. You can also use your Mac computer (running macOS 10.14 Mojave or higher) to quickly rename your AirPods too. To do this, simply open System Preferences > Bluetooth > Select Your AirPods > Click Rename > Type in a New Name. And with that, you’re ready to go!
    So don’t wait any longer – start renaming those AirPods now!

    Overview Of Airpods

    An overview of AirPods provides a look at Apple’s revolutionary wireless headphones. Equipped with powerful features, innovative design and superior functionalities, these earbuds have quickly become the go-to choice for many users. The sleek and compact design makes them portable and comfortable to wear, while their wide compatibility range means they can be used with most devices.

    When it comes to features, AirPods offer an impressive array of options such as voice recognition technology for Siri support, advanced noise cancellation capabilities, long battery life and much more. Additionally, their special charging case lets you recharge both buds simultaneously in just 15 minutes.

    The overall design of the AirPods is also noteworthy thanks to its lightweight construction combined with seamless integration into iOS devices with no additional setup required. It’s easy to see why AirPods are rapidly becoming one of the top choices among music lovers everywhere. With so many great features packed into such a small package, it’s clear that this product has revolutionized the way we listen to audio on the go. Taking all this into consideration, let’s move onto connecting your airpods to a device…

    Connecting Airpods To A Device

    Connecting your AirPods to a device is surprisingly easy. With the simple pairing process, you can have them set up in just a few minutes. To begin, open the settings menu on your device and select “Bluetooth” from the list of options. This will activate Bluetooth and give it permission to search for nearby devices. Once you see your AirPods appear under available devices, simply tap them to start the connection process.

    The next step involves confirming that you are attempting to pair with your own AirPods by entering an authentication code which should be provided with your purchase or found printed on the back of their case. After entering this code, the two devices will connect almost instantly and audio playback should begin shortly afterward.

    Now that we’ve gone over how to easily connect your AirPods to any compatible device, let’s move onto discussing how to customize their name for improved recognition among other bluetooth-enabled gadgets.

    Opening The Settings Menu

    To get the ball rolling, you’ll need to open up your AirPods’ settings menu. This is where any customization and preferences can be adjusted so you can make sure that your device works just for you. To do this, simply go back into the Bluetooth settings on your device and select your AirPods from the list of connected devices. Once selected, a new window will appear which contains all available options related to those specific earphones.

    It should now become easy to spot the ‘Name’ option in the main menu as it stands out among other choices like equalizer or noise cancellation. Depending on what type of device you are using, getting access to this menu may require a few additional steps but nothing too complicated. For example, some users may have to scroll down until they see an icon labeled ‘AirPod Settings’ before being able to locate the right command.

    Once inside the appropriate location, all that remains is selecting ‘Name’, typing in whatever moniker suits you best and confirming with a tap – after that; recognition between other gadgets should begin almost immediately with no further intervention required! Moving forward then let’s take a look at how we can easily find this particular setting within our AirPod’s extensive sub-menu.

    Finding The ‘Name’ Option

    Now that we know how to access the settings menu, it’s time to find the option to rename our AirPods. The ‘Name’ command should be relatively easy to spot as it stands out among other choices like equalizer or noise cancellation. Depending on what type of device you’re using, getting access to this menu may require a few additional steps but nothing too complicated.

    For instance, some users may have to scroll down until they see an icon labeled ‘AirPod Settings’ before being able to locate the right command. Once inside the appropriate location all that remains is selecting ‘Name’, typing in whatever moniker suits you best and confirming with a tap – after which recognition between other gadgets should begin almost immediately without further intervention required!

    With this knowledge, altering your wireless earphones’ naming conventions has never been easier; no more hassle when connecting them to another device or having multiple pairs registered under different titles. Now let’s move onto entering a new name for your AirPods – surefire way of avoiding any confusion going forward!

    Entering A New Name

    Unveiling a new identity for your AirPods can be almost as exciting as buying them in the first place. Like opening up a secret box of possibilities, entering the desired name and setting it in stone brings forth an entire realm of options.

    To begin with, utilizing this newfound freedom to rename our wireless earphones is akin to painting on a blank canvas – what better way to fully customize one’s listening experience? With that said, let’s dive into how we go about making sure those changes are not only successful but also long-lasting:

    • Entering the Name: First off, after selecting ‘Name’ from within the settings menu you’ll want to make sure that whatever moniker you pick doesn’t exceed 10 characters. This is important since anything beyond this limit will cause issues when attempting recognition between other devices. Furthermore, try picking something memorable like your favorite animal or color – this should help avoid any confusion down the line!
    • Special Characters: In addition to length restrictions, special characters (like numbers or symbols) may not be supported depending on which gadget you’re connecting with so double check before finalizing your selection.

    With all these considerations taken care of and the perfect name chosen accordingly now comes the time to save it and put it into action; no more need for extra steps everytime wanting to link up different gadgets!

    Saving The New Name

    Now that the perfect name has been chosen, we can move on to saving and applying it. This process is quite straightforward but there are a few steps one must take in order to confirm what they’ve entered.

    First off, once you’ve double-checked your entry click ‘Rename’ at the bottom of the screen – this will cause any changes made to be saved automatically. However, before moving onto another device or disconnecting altogether make sure ‘Save’ appears beside your new moniker – if not then try entering it again as something may have gone wrong with recognition.

    Lastly, after checking everything looks correct go ahead and hit ‘Apply’ – this should signify that all settings were successfully updated and ready for use! With that out of the way let’s now look into making sure these modifications hold up over time by verifying our change…

    Verifying The Change

    Having applied the name change, it’s now time to confirm that our modifications are accurate and up-to-date. To make sure everything is in order, we can take a few simple steps to verify our airpod name alteration.

    Firstly, when you’re done with the renaming process double check your new moniker appears on both devices by reconnecting them back together – this should ensure they’ve been updated correctly and any changes made have stuck around. Secondly, if necessary undertake a quick ‘name check’ of your own through searching for either device individually or both at once – this will help troubleshoot any issues and make sure no unexpected discrepancies appear between what’s saved locally versus stored online.

    Lastly, after ensuring all settings look correct try disconnecting then reconnecting again to see whether the update has taken effect – if not then repeat the previous step as something may have gone wrong during recognition earlier on. Now that these basics have been covered let’s move onto advanced renaming options…

    Advanced Renaming Options

    It’s possible to customize your airpod renaming beyond the basics we’ve just discussed. If you’re looking for some more unique name changing options, there are quite a few creative customization tips that can help bring out the best in your wireless earbuds. From funny nicknames to puns, there’s no shortage of ways to make your listening experience all the more personalised and enjoyable.

    For starters, try thinking of ideas based on music or movies – this is an easy way to come up with fun names that reflect what you like and enjoy most. Secondly, if you own multiple sets consider naming them after family members or close friends – this adds another layer of sentimentality when it comes to connecting with others over audio. Lastly, why not get inspiration from characters in books or online sources? Whether it be alliterations or acronyms they offer plenty of scope for inventiveness when crafting those special airpod customizations.

    With these helpful hints in mind, let’s now take a look at troubleshooting tips…

    Troubleshooting Tips

    If your airpods aren’t working as expected, there are several troubleshooting tips to help you out. The first step is to reset them and try pairing again – just press and hold the setup button on the back of each airpod for at least 15 seconds until the LED light flashes white. This will disconnect them from any other devices they’re connected too, allowing you to start fresh with a new connection.

    You might also need to check if your device settings are up-to-date; ensure that Bluetooth is enabled and make sure there’s no interference in the area by moving away from any electronics or metal objects nearby. If none of these steps work, consider performing a complete restore via iTunes or iCloud – this should clear all existing connections and allow you to rename your airpods without any glitches.

    Lastly, it’s worth noting that some users have reported having trouble connecting their AirPods after renaming them – so be sure to test out the new name before making it permanent! With all these helpful hints in mind, let’s take a look at best practices for naming your AirPods…

    Best Practices For Naming Airpods

    When it comes to naming your AirPods, there are a few best practices you should keep in mind. First and foremost, make sure the name is unique so that it doesn’t conflict with any of your other devices or those of someone nearby. Additionally, try to avoid using special characters or spaces when creating the new title – this can cause confusion for some systems. Here’s a list of tips for airpod renaming:

    • Choose something memorable: Names like “My Left Earbud” and “Righty McRightface” might be funny but they won’t help you differentiate between multiple pairs of AirPods. Try to find a name that stands out but also describes the device accurately (e.g., “Rose Gold Earpods”).

    • Personalize it: If you own more than one pair of AirPods, give each set its own distinct name (e.g., “Mom’s Airpods” & “Dad’s Airpods”) so that you don’t get them mixed up down the line.

    • Keep it short: Long names will likely cause issues when trying to connect, so aim for something concise yet descriptive (e.g., “Work Earphones”).

    By following these guidelines and double-checking before making any changes permanent, you’ll have no trouble coming up with an appropriate title for your beloved earbuds!

    Conclusion

    In conclusion, AirPods have become a must-have accessory for anyone who loves to listen to music or take calls while on the go. Renaming your AirPods is an easy way to personalize and identify them from other sets of headphones. With just a few clicks, users can quickly change their AirPod’s name with no hassle at all.

    The fact that Apple has sold over 500 million pairs of AirPods should be enough evidence of how popular these wireless earbuds are today. This statistic alone shows how many people enjoy the convenience and comfort of having high-quality earphones without any wires getting in their way.

    Renaming your AirPods doesn’t just make them easier to find – it also helps you show off your style and express yourself through the names you choose. Whether you want to stick with something simple like “Lefty” and “Righty” or get creative by giving them unique nicknames, renaming your AirPods is sure to put a smile on my face every time I reach for them!

  • How to reset keyboard on iPhone

    How to reset keyboard on iPhone

    If you are having trouble typing on your iPhone, resetting your keyboard can help you get back on track. Resetting your iPhone keyboard can help you resolve many of the common issues that can occur with your keyboard, such as freezing, lagging, auto-correct mistakes, and incorrect autocorrect predictions. By resetting the keyboard dictionary, you can clear all stored words and phrases, which can help improve the performance of the keyboard.

    Resetting the keyboard will also give you a fresh start if you have recently switched to a new language or added a new text replacement phrase. Resetting your iPhone keyboard can also be beneficial when troubleshooting an issue with your device or if you want to make sure it is clean and optimized for use.

    In this blog post, we’ll explain how to reset your keyboard on an iPhone and why it’s important to do so. With a few simple steps, you’ll be able to quickly and easily reset your keyboard and get back to typing on your iPhone

    How to reset your iPhone keyboard

    1. Open the Settings app on your iPhone.
    2. Tap the General option from the menu.
    3. Scroll down to the bottom of the screen and tap the Transfer or Reset iPhone option.
    4. On the bottom of the following screen, tap the Reset option.
    5. Now, tap the Reset Keyboard Dictionary option from the menu that appears at the bottom.
    6. Enter your phone passcode and tap the Done button in the upper-right corner.
    7. Tap the Reset Dictionary verification message, and you’re ready to go.
    8. The process will restore the keyboard dictionary on your iPhone or iPad.
    9. You cannot undo this process. Once you tap Reset Dictionary, it will permanently delete your keyboard history.
    10. After the reset, the keyboard dictionary will slowly learn your habits and store new words. If you want to prevent your iPhone.

    Can I see my iPhone keyboard history?

    As you use your phone, the keyboard dictionary learns and stores words which later gives to your keyboard as auto-correct and predictive words. However, there is no way you can see your keyboard history which contains a list of all words you have typed using your phone’s keyboard. You can reset when you start seeing unwanted text and your keyboard start responding slowly.

    How Do I Delete My iPhone Keyboard History?

    You can only delete your iPhone keyboard history by resetting it. Make sure you are ready to reset before doing so because if you reset, you can’t undo the action.

    Conclusion

    Resetting the keyboard on your iPhone can be a great way to start fresh with your typing experience. This process is easy and quick, and it will restore your keyboard’s settings to their default values. By resetting your keyboard, you will be able to type messages, emails, and more, as well as help ensure your privacy is better protected.

  • How to force quit on a MacBook

    How to force quit on a MacBook

    If your MacBook is running slow or an application isn’t responding, it might be time to force quit the program. Force quitting an application is an easy process and can help you get back on track quickly.

    Knowing how to force quit on a MacBook can help you save time and frustration when dealing with a stuck program. In this article, we will provide a step-by-step guide to force quit on your MacBook. By following these steps, you’ll be able to quickly and easily exit any program that isn’t responding.

    What is force quit on MacBook?

    Force quitting an application on a MacBook is a way to stop the application from running without having to shut down your computer. This is useful if an application stops responding, becomes unresponsive, or is otherwise not functioning properly. Knowing how to force quit on a MacBook can help you get back to working quickly and efficiently.

    Why is my MacBook frozen?

    Sometimes that can happen because you’re running a lot of software or a particularly demanding app. Other times, it can be caused by badly coded software or even malware. Stopping apps that are taking up a lot of processing power can help to stop your Mac from freezing.

    How to force quit on MacBook from the Apple menu

    1. First, identify the app that is unresponsive. If you have multiple apps open, the simplest way to indicate the unresponsive app is to look at the cursor. If the cursor looks normal, the app is still responsive. If the cursor resembles the rainbow spinning wheel, the app is unresponsive.
    2. Once you’ve identified the unresponsive app, locate the taskbar at the top of your screen. In the far left, select the Apple logo to access the dropdown menu.
    3. In the dropdown menu, select “Force Quit”
    4. A new window will pop up with all the applications you have open on your Mac.
    5. Select the application you wish to force quit. If you want to force quit more than one application, use the Command to select multiple.
    6. Next, select Force Quit

    How to force quit on MacBook with a keyboard shortcut

    1. With the keyboard short code, you will not need to manually locate any apple icon and taskbar.
    2. The menu automatically opens for you and then you select the unresponsive application and you click on force quit.
    3. To access the menu, use the keyboard shortcut Option + Command + Esc.

    How to force quit on MacBook using Activity Monitor

    A Mac’s Activity Monitor is an easy way to locate troublesome applications, see how much energy or CPU power they are using, and force them to quit.

    1. First, launch Activity Monitor. You can do this by using the Spotlight feature (Command + Space) or by going to Finder > Applications > Activity Monitor.
    2. Once Activity Monitor is open, find and select the app you want to force quit.
    3. After you’ve selected the app, select the stop icon (resembling an octagon with an “X” in the middle).
    4. A pop-up window will ask if you are sure you want to quit this process. Select “Force Quit” from the list of options. The app will then close.

    What to do if force quit isn’t working on a MacBook

    The force quit feature is the simplest way to shut down faulty applications, but sometimes you can’t even do that. If force quit isn’t an option and your screen is completely frozen, restart your Mac.

    Conclusion

    Force quitting on a MacBook is an essential skill to have in order to keep your computer running smoothly. Whether you’re dealing with a stubborn program or an application that’s consuming too much of your system’s resources, force quitting will give you the opportunity to quickly and easily end the process.