Category: Apple

  • How to print with iPhone

    How to print with iPhone

    Printing documents from a phone can be incredibly convenient, whether you’re in the office or on the go. If you own an iPhone, you can print directly from it without having to transfer your documents to a computer.

    This article will provide step-by-step instructions on how to print directly from your iPhone. With just a few taps, you’ll be able to easily print documents, photos, emails, and more.

    How to print from an iPhone with AirPrint

    Most current printers with wireless capabilities have the AirPrint feature, which allows the printer to easily sync up with an iPhone and print directly. To add a printer to your iPhone with AirPrint;

    1. Open the document, image, or webpage you wish to print. This can be located in your email, web browser, Photos app, Files app, or elsewhere.
    2. Locate and hit the Share button, which is the square with an arrow aiming upward out of its center. If you don’t see this button, depending on the app you’re using, you may need to select the icon of three horizontal dots or the icon of an arrow pointing to the left.
    3. In the pop-up, scroll down until you see an icon of a printer next to the word Print.
    4. Tap Printer, and on the next screen, then select the desired printer from the list.
    5. Hit on Print written in blue in the top-right corner of the screen.

    How to print from an iPhone without AirPrint

    Some printers do not have the AirPrint features. But hey, you can still print whatever you want to print so far as the printer has a WIFI connectivity. You just have to download a print app for the printer to your iPhone and there you go. To set up a printer on your iPhone without AirPrint;

    1. Open your printer’s app on your device.
    2. Turn on your printer’s Wi-Fi.
    3. Go into your phone or tablet’s Settings and hit Wi-Fi.
    4. Locate your printer under other networks and tap on it.
    5. Pull up the document, image, or webpage you want to print, then hit the Share icon.
    6. You should now be able to connect the printer through the app and print.

    How to print from an iPhone with a USB cable

    Your printer has neither AirPrint nor WIFI and you still wished you can use it for your printing works from your phone. Well, there is still an option for you if it supports a USB cable insertion which I am sure this time around, it does. All you have to do is to get a USB cable and a USB OTG (on-the-go) adapter that connects your iPhone to the USB cable. To print from an iPhone with a USB cable,

    1. Turn on your printer and connect one end of the USB cord to your printer and the other end to the USB OTG cord. Plug the other end of the USB OTG cord into your iPhone.
    2. A pop-up should appear on your iPhone
    3. Tap OK.
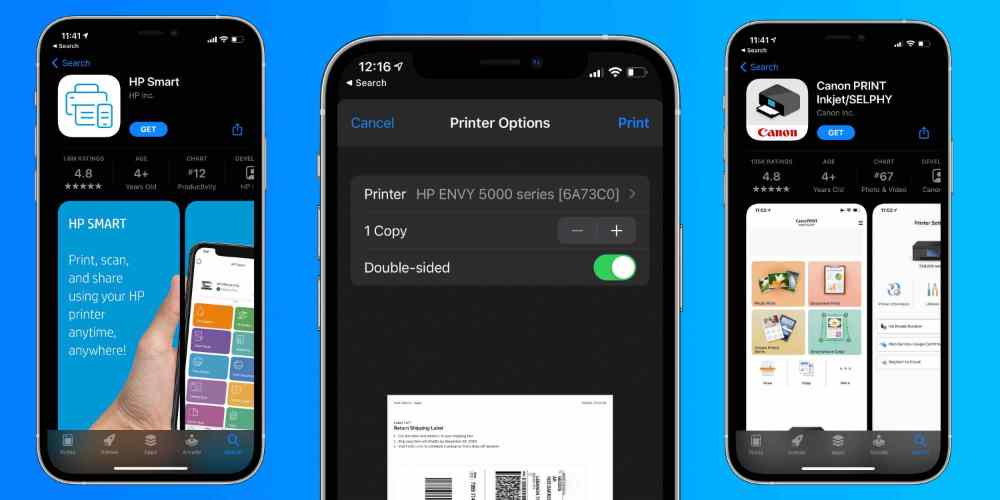
    4. On your iPhone, go to the document you wish to print and tap the Share button.
    5. In the Share menu, select the Print option.
    6. The connected printer should appear next to the Printer on the Printer Options page.
    7. Tap Print in the upper-right corner.

    Can I plug my iPhone directly into a printer?

    Connecting your iPhone to your printer is possible when you have at least a USB cable and an OTG adapter.

    Difference between printer and AirPrint

    AirPrint is an IOS or macOS feature that enables easy printing with a printer that supports an AirPrint feature. A normal printer does not support the AirPrint feature which means you will need to connect to WIFI to be able to download. Another option for a normal printer is by using a USB cable and OTG adapter.

    How do I manually connect my iPhone to my printer?

    To manually connect your iPhone to a printer,

    1. Open Settings
    2. Locate Hardware
    3. Select Printers
    4. Create Printer Station and give it a name.
    5. Tap Printer then selects a printer.
    6. Click Connect AirPrint printer and choose your printer.
    7. If the printer does not support AirPrint, on your WIFI and search for the printer connectivity name and connect.

    Conclusion

    You don’t need to stress about how you can print a file or image on your iPhone, it has now been made easier and simple. Follow the steps above and you will have yourself in a convenient position.

  • How to delete contacts on an iPhone

    How to delete contacts on an iPhone

    In this article, we’ll explain how to delete contacts from your iPhone so you can keep your address book clutter-free. Deleting contacts on an iPhone is a straightforward process, and can be completed in just a few simple steps.

    Keeping your contact list organized and up-to-date is important, and sometimes that means deleting contacts you no longer need. The iPhone’s user-friendly interface makes it easy to remove contacts you no longer need.

    Whether you’re trying to free up storage space or just want to get rid of some outdated contacts, this guide will show you how to delete contacts on an iPhone in just a few steps.

    How to delete contacts on iPhone

    Deleting individual contacts

    1. Open the Contacts app on your iPhone and tap the Contacts tab at the bottom of the screen.
    2. Scroll to the contact you want to delete and tap on their name.
    3. Tap Edit at the top-right corner of the contact’s information page.
    4. Scroll to the very bottom of the page and hit on Delete Contact to confirm your choice.

    Deleting multiple contacts

    You will need to have a computer to do this and your iCloud account set to save contacts beforehand. To do this,

    1. Head to the iCloud website and sign into your account. You might need to enter a code sent to your iPhone.
    2. Click Contacts.
    3. On the iCloud site, you can also access your saved Photos, Notes, and more.
    4. Find the contacts you want to delete and select them all at once. The way to do this will differ depending on whether you’re using a Mac or PC.
    5. On a Mac, hold Command as you click each contact you want to delete.
    6. On a PC, hold Ctrl as you click each contact you want to delete.
    7. Once you have them all selected, click the gear icon in the bottom-left of the screen, and then Delete.
    8. You’ll be asked to confirm that you want to delete the contacts. Click Delete.

    Deleting all contacts at once

    If you want to get rid of every contact at once, you’ll also need to use your iCloud account.

    1. Open your iPhone’s Settings app and tap your name at the top to open the Apple ID menu.
    2. Tap iCloud.
    3. On the page that opens, check to see if the toggle switch next to Contacts is enabled. If it is, tap it to turn it off.
    4. You’ll be asked what you want to do with your contacts. Select Delete from My iPhone.

    How to block a contact so they can’t call you

    There is this number disturbing you and calling you to the extent that, you get so much annoyed. If you just delete it, this number will keep disturbing you. Now, the best way is to block the contact for a peaceful mind You want to block the number but you don’t know how. Well, it is as easy as you may not seem. To block a contact on your iPhone,

    1. Open the Contacts or Phone app and tap the contact you want to block.
    2. Scroll to the bottom of their information page and select Block this Caller.
    3. Tap Block Contact to confirm your choice.

    Benefits of deleting contacts from your phone

    The ability to delete contacts on your iPhone is a key component of keeping your device organized and running smoothly. By deleting unwanted contacts, you can ensure that the people you really want to keep in touch with are easily accessible and that your device isn’t bogged down by redundant entries.

    Here are some of the key benefits of deleting contacts from your iPhone.

    Free up storage space

    One of the biggest benefits of deleting contacts from your iPhone is that it can help to free up storage space on your device. Over time, contact lists can get crowded with outdated information, which takes up precious memory. By deleting those contacts, you can reclaim some of the storage space that would otherwise be taken up by those entries.

    Easier navigation

    Removing unwanted contacts can also make it easier to navigate your contact list. With fewer entries cluttering up the list, it will be much easier to locate the contacts you need when you need them.

    Increased security

    Deleting contacts from your iPhone can help to keep your personal information more secure. When you delete a contact, all of their information is removed from your device, which means that it won’t be accessible to anyone else if your phone is lost or stolen.

    Conclusion

    Now that you know how to delete contacts on your iPhone, it’s time to put it into practice. Removing unwanted contacts from your iPhone will help you stay organized and make sure you’re connecting with the right people.

  • How to connect your Airpods to your Mac

    How to connect your Airpods to your Mac

    Do you have a Mac computer and Airpods, but you don’t know how to connect them together? Don’t worry, it’s easier than you think! Connecting your Airpods to your Mac is a simple process that can be completed in just a few easy steps. In this article, we will guide you through the process of connecting your Airpods to your Mac, so you can enjoy all the benefits of listening to music or talking on the phone with your Airpods.

    What is an Airpod

    Airpods are Apple’s popular wireless earbuds that provide an easy and convenient way to listen to music, podcasts, and more. They use Bluetooth technology to connect to your iPhone, iPad, Apple Watch, or Mac, allowing you to listen to audio without being connected by a wire.

    Airpods have become a popular accessory for anyone who wants to enjoy their music and audio with ease. However, many people may be unfamiliar with how to connect their Airpods to their Mac computer. This guide will walk you through the steps on how to quickly and easily pair your Airpods with your Mac.

    Once you’ve set up your Airpods with your iPhone or iPad, they will automatically be available to use with your Mac. Just make sure that your Mac is running macOS Catalina 10.15 or later and that it’s signed in with the same Apple ID as your other devices.

    How to connect Airpods to MAC for the first time

    If your AirPods aren’t already connected to your iPhone, you can connect them directly to your Mac.

    1. With the AirPods in their charging case, open the lid and keep the AirPods inside.
    2. Press and hold the button on the back of the case until the status light starts to flash.
    3. On your Mac, click the Apple icon in the menu bar at the top to open the Apple menu. 
    4. Click System Preferences.
    5. In the System Preferences window, click Bluetooth.
    6. In the list of devices, find the AirPods you want to pair the Mac with, and click Connect.
    7. After the connection is complete, the AirPods will appear at the top of the Devices list, ready to be used.

    How to connect your AirPods to your Mac if you already use them on your iPhone

    Your AirPods are designed to connect to your Mac automatically if you are using the same Apple ID on your Mac and iPhone.

    1. Open your AirPods case.
    2. On your Mac, click the Volume icon in the menu bar at the top of your screen.
    3. In the Output Device section of this menu, select your AirPods.  

    What to do if you are having trouble connecting your Airpods to MAC

    Make sure your Mac is logged into the same Apple ID as your iPhone.

    In the System Preferences window click Apple ID to make sure you’re signed in and using the same ID.

    Make sure Handoff is turned on.

    In the System Preferences window, click General, and make sure there is a check mark next to Allow Handoff between this Mac and your iCloud devices.

    Make sure you can see the volume icon in the menu bar.

    If you don’t see it, you need to turn it on. In the System Preferences window, click Sound and then click the checkbox next to Show volume in menu bar.

    Reasons why your Airpods are refusing to connect to your MAC

    If you are having trouble connecting your AirPods to a Mac, there are a few things you can do:

    Have you charged your Airpods?

    Place the AirPods in their case, plug a USB cable that’s connected to power into the case, and charge them for 1-2 hours.

    Is your MAC updated?

    You need macOS Sierra or later to install the first-generation AirPods, and macOS 10.14.4 or later for second-generation AirPods.

    Have you paired the AirPods to the MAC?

    Find the AirPods in the Bluetooth list on your Mac and click the X button on the right. Then, repeat the pairing process.

    Reset the AirPods

    and hold the button on the back of the AirPods case for at least 15 seconds. Let go of the button when the status light starts to flash amber.

    Reeboot your MAC computer

    Iyour Mac’s Bluetooth connection has run into a problem, restarting your Mac can reset it and hopefully get it working properly again.

    Conclusion

    Connecting your Airpods to your Mac is an easy process. Once connected, you can easily access audio from any device connected to your Mac, such as music players, video players, or online streaming services.

  • How to unpair and reset Apple Watch

    How to unpair and reset Apple Watch

    Do you want to unpair and reset your Apple Watch? Unpairing and resetting your Apple Watch can be a daunting task for many, but it doesn’t have to be. In this article, we will provide step-by-step instructions on how to easily unpair and reset your Apple Watch. By following our instructions, you’ll be able to safely unpair and reset your Apple Watch so you can start using it as you normally would.

    What is an Apple Watch

    Apple Watch is a revolutionary device that provides a unique and personal way to stay connected with the world. It allows users to access notifications, communicate with friends and family, track their fitness activities, and much more. Apple Watch offers a wide range of features and benefits that can help you stay organized and on top of your daily tasks.

    How to unpair and erase your Apple Watch

    1. Keep your Apple Watch and iPhone close together as you unpair them.
    2. Open the Apple Watch app on your iPhone.
    3. Go to the My Watch tab and tap All Watches.
    4. Tap the info button  next to the watch that you want to unpair. 
    5. Tap Unpair Apple Watch
    6. Tap Unpair [your Apple Watch name].
    7. For GPS + Cellular models, choose whether to keep or remove your cellular plan.
    8. Type your Apple ID password to activate disabled link, then tap Unpair. 

    How to reset your Apple Watch

    1. On your Apple Watch, tap Settings > General > Reset > Erase All Content and Settings. 
    2. Type your password if prompted.
    3. For GPS + Cellular models, choose to keep or remove your cellular plan.
    4. If you want to pair your Apple Watch and iPhone again, keep your plan. 
    5. If you don’t want to pair your Apple Watch and iPhone again, remove your plan.
    6. Tap Erase All to confirm. This resets your Apple Watch to the factory settings.

    Conclusion

    Congratulations! You now know how to unpair and reset your Apple Watch. Unpairing and resetting your Apple Watch is an important task that ensures that it remains in optimal working condition.

  • How to restart iPhone 12, 13 and 14 series

    How to restart iPhone 12, 13 and 14 series

    Are you having trouble getting your iPhone 12, 13, or 14 series to turn on? If so, you’re not alone. Fortunately, restarting your device can help you troubleshoot the issue and get your phone back up and running.

    Restarting your device can help solve many common issues, like frozen screens, apps that don’t respond, or battery problems. In this blog post, we’ll provide instructions on how to restart the iPhone 12, 13, and 14 series. With just a few easy steps, you’ll be able to get your device back up and running again in no time.

    Restarting your iPhone 12, 13 and 14 series

    Restarting is a way of resetting the device’s settings and refreshing the system. It can be useful if you are experiencing some sort of issue with your iPhone or if you just want to give your device a fresh start.

    1. First, press and hold down the power button on the right side of your device until the slide to power off bar appears.
    2. Slide the bar across the screen to turn off your device.
    3. Once the device is powered off, press and hold the power button again to turn it back on.
    4. You should see the Apple logo appear shortly after. Once your phone has rebooted, it should be running normally again.

    Forcing a restart on your iPhone

    If you need to force a restart on your iPhone 12, 13, or 14 series, it’s easy to do. Doing this will clear up any glitches you may be experiencing and allow your device to function properly.

    Before we begin, please note that forcing a restart is different from resetting your device, which wipes all the data on it and restores it to factory settings.

    1. To force a restart, press and hold both the side button and the down volume button at the same time for at least ten seconds.
    2. If the Apple logo appears, your device is restarting. The entire process takes about 30 seconds to complete.
    3. When your device has finished restarting, it should be running normally again.

    In some cases, restarting your iPhone may not be enough to solve certain issues. If restarting does not seem to help, you may need to reset your device to its factory settings. Doing this will erase all data from your device and will require you to set it up from scratch again. It is recommended that you backup any important data before resetting your device.

    Backing up your iPhone

    If you need to reset your iPhone 12, 13, or 14 series, the steps are relatively simple. It’s important to backup any data you want to keep before resetting your phone, as all data will be lost during the reboot process.

    Before you get started, make sure you have access to a computer, and that it has the latest version of iTunes installed. Here’s what to do:

    1. Connect your iPhone to your computer with the USB cable.
    2. Open iTunes and select your iPhone in the list of devices.
    3. Click Back Up Now to back up your device.
    4. Once the backup is complete, click the Restore iPhone button.
    5. Follow the on-screen instructions to finish restoring your iPhone.
    6. When prompted, set up your iPhone as a new device.
    7. Once you’ve successfully completed these steps, your iPhone should be restarted and ready for use.
    8. Make sure to double-check your backed up data after the restart to make sure everything is intact.

    Updating your iPhone

    1. Backup your device using iCloud or your computer.
    2. Plug your device into a power source and connect. Go to Settings > General, then tap Software Update.
    3. If you see more than one software update option available, choose the one you want to install.
    4. Tap Install Now. If you see Download and Install instead, tap it to download the update, enter your passcode, then tap Install Now.

    Conclusion

    If you’re having issues with your iPhone 12, 13, or 14 series and need to restart it, the steps are fairly simple. It’s important to remember that restarting your device can help solve some common problems, but it’s not a solution for every issue. If you continue to experience problems with your device after restarting it, we recommend taking it to an authorized Apple service provider for further diagnosis.

  • Prices of all iPhone models in Ghana and where to buy

    Prices of all iPhone models in Ghana and where to buy

    You have decided that you want an iPhone but you have no idea what the best deal out there is. In Ghana, the cost of iPhone models varies from market to market and even from location to location in the same market so it can be hard to know where you can get the best deal on your new phone.

    iPhone prices in Ghana are outrageous. You can talk about the fact that the phone is a dollar-rated phone and since the cedi is down, that is what makes the prices too high. It also comes to the fact that; the phone is so much worshipped in Ghana and that is what people use to outprice them.

    However, there are still plenty of ways you can get your hands on an iPhone at a reasonable price. Prices may vary by region, so be sure to check out the individual markets to see it there is one better for you.

    Introducing iPhone

    iPhone is a smartphone designed and developed by Apple Inc. It was introduced on January 9, 2007, at the Macworld Expo. The first generation phone was sold from June 29, 2007, to September 12, 2008. In July 2010, the iPhone 4s was released. There are many other models that have been introduced to the market since its introduction.

    Prices of all iPhone models in Ghana

    iPhone ModelStorage SpacePrice
    iPhone 516GB, 32GB, 68GBGHS 400
    iPhone 5s16GB, 32GB, 64GBGHS 550
    iPhones 5c8GB, 16GB, 32GBGHS 650
    iPhone 616GB, 32GB, 64GB, 128GBGHS 1,600
    iPhone 6s16GB, 32GB, 64GB, 128GBGHS 1,700
    iPhone 6plus16GB, 64GB, 128GBGHS 1,750
    iPhone 6splus16GB, 32GB, 64GB, 128GBGHS 2,000
    iPhone 732GB, 128GB, 256GBGHS 1,699
    iPhone 7plus32GB, 128GB, 256GBGHS 2,500
    iPhone SE (1ST Edition)16GB, 32GB, 64GB, 128GBGHS 1,250
    iPhone 864GB, 128GB, 256GBGHS 2,750
    iPhone 8plus64GB, 128GB, 256GBGHS 3,000
    iPhone X64GB, 256GBGHS 3,044
    iPhone XR64GB, 128GB, 256GBGHS 3,250
    iPhone XS64GB, 256GB, 512GBGHS 5,484
    iPhone XS Max64GB, 256GB, 512GBGHS 6,094
    iPhone 1164GB, 128GB, 256GBGHS 3,654
    iPhone 11 Pro64GB, 256GB, 512GBGHS 5,484
    iPhone 11 Pro Max64GB, 256GB, 512GBGHS 6,094
    iPhone SE (2nd Edition)64GB, 128GB, 512GBGHS 2,617
    iPhone 1264GB, 128GB, 512GBGHS 4,874
    iPhone 12 Mini64GB, 128, 512GBGHS 5,000
    iPhone 12 Pro128GB, 256GB, 512GBGHS 6,900
    iPhone 12 Pro Max128GB, 256GB, 512GBGHS 8,500
    iPhone 13128GB, 256GB, 512GBGHS 7,650
    iPhone 13 Mini128GB, 256GB, 512GBGHS 8,200
    iPhone 13 Pro128GB, 256GB, 512GBGHS 9,100
    iPhone 13 Pro Max128GB, 256GB, 512GBGHS 12,500
    iPhone 14128GB, 256GB, 512GBGHS 14,000
    iPhone 14 Plus128GB, 256GB, 512GBGHS 16,000
    iPhone 14 Pro128GB, 256GB, 512GB, 1TBGHS 17,000
    iPhone 14 Pro Max128GB,256GB, 512GB, 1TBGHS 19,000

    Where to buy iPhones in Ghana

    iPhone can be bought at any accredited sales point across the country. You can also make your order on Jumia Ghana and Jiji Ghana. However, it is in the best interest to meet the buyer and make sure everything is correct when purchasing it from a place like Jiji Ghana.

    You can also purchase it from the shops below:

    Lebron’s iPhones

    Location: Circle Mall

    Tel: 0559550513

    Steve’s Tech World

    Location: Adenta, Asseblies Junction

    Tel: 0574773958 / 0557419724

    iStore (Apple Authorized Service Center)

    Location: Accra Mall, Spintex Road

    Tel: 054 433 6856

    iSHOP Ghana

    Location: Kotobabi RD

    Tel: 024 435 9596

    Apple Ghana Electronics

    Location: Accra

    Tel: 024 444 9441

    Conclusion

    As you can see, the prizes vary depending on the model. If you are interested in buying a smartphone from Apple, it is best to be aware of what you are spending your money on.

  • iPhone 13 Pro Max Price in Ghana

    iPhone 13 Pro Max Price in Ghana

    There is a wide variety of different phones to choose from when it comes to mobile devices, but there are some things that you should consider before making your purchase.

    The first thing that you should think about is how often you will use the phone. If you will be using it constantly, then go with one of the more expensive models that can handle more usage and be sturdy enough to last.

    The iPhone 13 pro max, is now alive in the tech world. The innovative device seems to have everything the standard iPhone user desires, with faster and more reliable speeds, improved camera capabilities and even a bigger screen than ever before.

    Best of all, the price tag on this model is moderate. Curious how much it cost in Ghana? Check out our table below to find out how much you’ll pay in your country when you buy one of the iPhone 13 series.

    Why should you buy the iPhone 13 Pro Max?

    The iPhone 13 Pro Max is a great buy. It has a fast processor and it lasts longer than most phones on the market. Plus, it’s got a sleek design that fits comfortably in your hand and is water-resistant.

    It’s also got a large battery, so you don’t have to worry about running out of juice halfway through the day. The camera quality is also impressive – all those photos you take will be crystal clear.

    Similarities in all iPhone 13 models

    • Similar square design
    • They all have an OLED displays
    • They all have a Front camera
    • They all have an A15 chip
    • iOS 15 software available for all models
    • 5G Internet connectivity

    Differences in all iPhone 13 series

    Physical size

    • iPhone 13 mini: 131.5 x 64.2 x 7.65mm, 141g
    • iPhone 13: 146.7 x 71.5 x 7.65mm, 174g
    • iPhone 13 Pro: 146.7 x 71.5 x 7.65mm, 204g
    • iPhone 13 ProMax: 160.8 x 78.1 x 7.65mm, 240g

    Display size

    • iPhone 13 mini: 5.4-inches
    • iPhone 13: 6.1-inches
    • iPhone 13 Pro: 6.1-inches
    • iPhone 13 ProMax: 6.7-inches

    Display refresh rate

    • iPhone 13 mini: 60Hz
    • iPhone 13: 60Hz
    • iPhone 13 Pro: 120Hz
    • iPhone 13 ProMax: 120Hz

    Cameras

    • iPhone 13 mini: Dual rear camera
    • iPhone 13: Dual rear camera
    • iPhone 13 Pro: Triple rear camera, extra features
    • iPhone 13 ProMax: Triple rear camera, extra features

    Battery capacity

    • iPhone 13 mini: Can last up to 17 hours.
    • iPhone 13: Can last up to 19 hours.
    • iPhone 13 Pro: Can last up to 22 hours.
    • iPhone 13 ProMax: Can last up to 28 hours.

    Storage capacity

    • iPhone 13 mini: 128/256/512GB
    • iPhone 13: 128/256/512GB
    • iPhone 13 Pro: 128/256/512GB/1TB
    • iPhone 13 ProMax: 128/256/512GB/1TB

    GPU

    • iPhone 13 mini: 4-core
    • iPhone 13: 4-core
    • iPhone 13 Pro: 5-core
    • iPhone 13 ProMax: 5-core

    Colours

    • iPhone 13 mini: Six colours (Starlight, Midnight, Blue, Pink, Green, Red).
    • iPhone 13: Six colours (Starlight, Midnight, Blue, Pink, Green, Red).
    • iPhone 13 Pro: Five colours (Silver, Graphite, Gold, Sierra Blue, Alpine Green).
    • iPhone 13 ProMax: Five colours (Silver, Graphite, Gold, Sierra Blue, Alpine Green).

    Prices

    • iPhone 13 mini standard price: $699 / GHS 10,135
    • iPhone 13 standard price: $799 / GHS 11,585
    • iPhone 13 Pro standard price: $999 / GHS 14,485
    • iPhone 13 ProMax standard price: $1,099 / GHS 15,935

    NB: The prices vary based on where you buy it from and how you acquire yours. The above is a standard price that should ne used as an expectancy.

    Conclusion

    The iPhone 13 Pro Max is an expensive phone, but it has a lot to offer. There are third-party companies that sell the same device for less than half that cost, but make sure you get it in the right state to prevent drawbacks.

  • How to Fix iPhone Hotspot that Keeps Disconnecting from Your Device

    How to Fix iPhone Hotspot that Keeps Disconnecting from Your Device

    Despite the fact that iPhones are among the most dependable and stable smartphones, the hotspot feature has consistently disappointed many customers.

    Users of iOS have long complained that their iPhone hotspot frequently disconnects, but Apple hasn’t done much to permanently remedy the issue.

    The problem even appears on the newest iPhone 13 devices running iOS 15 and later, proving its existence. Fortunately, you can get past this by using a few short-term fixes and workarounds.

    Why do iPhone hotspot connections keep losing connection?

    1. There are a number of potential causes for your iPhone hotspot to constantly disconnecting, including:
    2. The iPhone gets too hot.
    3. Hotspot has been idle for more than a minute.
    4. Drops in internet connection
    5. Wi-Fi or mobile data is turned off.
    6. After a fresh software upgrade, a bug or problem.

    How to properly fix iPhone hotspot that keeps disconnecting issue

    You can use the solutions in this section to circumvent the problem if it bothers you.

    1. Restart your iPhone

    Even though restarting a device is one of the most straightforward troubleshooting techniques, it’s the most popular since it frequently resolves a variety of annoying problems. Restarting the device and attempting again should thus be your initial course of action.

    Be aware that restarting the phone could only be a temporary fix if there is a persistent software bug; you might have to restart the phone each time the issue arises. If a restart doesn’t work, look at our other possible remedies.

    2. Reset your hotspot

    To test whether it solves the issue, you may try setting up your hotspot once more. To accomplish this, all you have to do is choose Forget in the Wi-Fi settings on your PC, Mac, or other device that you want to connect to the iPhone hotspot. Reconnect to the hotspot after which type the password once more.

    You may even reset your iPhone’s hotspot if you want to take things a step further by doing the following:

    1. On your iPhone, open the Settings app.
    2. Hit the Personal Hotspot button.
    3. Change the hotspot’s password, then click Done.
    4. Turn on the option to let others join.
    5. Connect to the hotspot right away using any device, then input the password to reconnect.

    Maximize compatibility by enabling

    As the name implies, the hotspot disconnecting issue on your iPhone will significantly decrease if you choose the Maximize Compatibility feature, especially when connecting it using older hardware.

    The iPhone 12 and subsequent devices have this option. Take these actions to turn it on:

    1. Open the Settings application.
    2. Tap Personal Hotspot in step two.

    3. Switch on the Maximize compatibility setting

    Please take note that if you enable this option, your internet speed may be reduced. Use this functionality only when essential, then.

    Switch on automatic network selection

    Most users may ignore this approach because the Automatic Network option is turned on by default. Toggle this setting back on, especially if you’re out and about, if you’ve already done so for whatever reason.

    When the functionality is deactivated, the hotspot will disconnect or switch off if you leave your network’s coverage region. The network wouldn’t immediately connect to the closest tower, which would cause the internet to cease functioning. To see if the Network Selection is on Automatic, follow these steps:

    1. Activate the Settings app.
    2. Decide on Mobile Data.
    3. Next, choose Network Selection.

    4. Turn on the Automatic switch

    Ensure You Have Sufficient DataWe frequently use all of our limited cellular data without even realizing it. Your hotspot may continually disconnecting if you have over your weekly, daily, or monthly data allotment. Use your iPhone as directed to check your data usage:

    1. Start the Settings app.
    2. Choose Mobile Data and view the Personal Hotspot’s data use.

    Why the Personal Hotspot on your iPhone keeps disconnecting can be explained if you see a high data use that exceeds your allowance. In order to guarantee that the data consumption does not go above the limit moving ahead, you will need to monitor it.

    5. Turn off the Low Power Mode

    Although the iPhone’s low power mode is very useful, it also makes other capabilities, such as the Personal Hotspot, difficult to use or use. As a result, the hotspot can disconnect if you switch on Low Battery mode on your iPhone.

    Furthermore, the Personal Hotspot may frequently disconnect even if you activate it with Low Power Mode enabled.

    1. Open the Settings application.
    2. Access the Battery settings.
    3. If Low Power Mode is selected, turn it off.

    6. Apply the most recent system updates

    Due to an issue that has already been resolved in a recent version, your iPhone hotspot can occasionally disconnect. Therefore, updating your phone’s software often is a great approach to fix problems like these. Follow the steps below to see if your phone has the most recent iOS update:

    1. Select General from the Settings menu.
    2. Choose Software Update next.
    3. Await for your device to check for the most recent update before installing it.

    Conclusion

    It might rapidly become annoying when the hotspot on an iPhone 13/14 or an earlier model keeps disconnecting. You should be able to get the hotspot to keep a steady connection to all devices, though, by using the solutions suggested above.

    The best course of action is to send feedback to Apple’s customer care team and wait for a speedy update that fixes any bugs if, for some reason, it still doesn’t function as planned.

  • How to Subscribe to Apple Music in Ghana

    How to Subscribe to Apple Music in Ghana

    Most iPhone users in Ghana who like digital streaming services like Apple Music have had difficulties attempting to subscribe and listen to their favorite songs on the app throughout the years.

    What justifies purchasing music at all? Truth be said, recording and production are expensive. It counts as piracy to download unlicensed music. In addition, visiting shady, unreliable third-party websites puts your phone in danger of malware infection.

    Are iTunes and Apple Music the same thing?

    But first, let’s get one thing straight. Compared to iTunes, an Apple Music membership is very different. Apple’s online marketplace for buying media is called iTunes (Music, Movies, Ringtones). Everything you buy from the iTunes store is permanently yours. Additionally, you may download it on a Mac, PC, or any iOS device.

    However, Apple Music is a subscription service rather than a retail outlet. You pay a single monthly charge as opposed to paying for each song. You can listen to every song in the Apple Music library for that price. Any of these songs may be downloaded or added to playlists in your personal collection for offline listening.

    In Ghana, how much does Apple Music cost?

    The cost of an Apple Music subscription in Ghana is GHS 153.94 per month, significantly less than the cost in most other countries. The identical service would cost $50, or around GHS 500, in the US.

    The best part isn’t even that. Typically, Apple offers discounts to college students on all of its goods and services. Therefore, the standard charge is reduced by 50% for students.

    How to confirm your student status with Apple Music

    Apple offers the opportunity to authenticate with myUnidays for a discount for university students in Ghana. The restriction is that you must sign in using a.edu (or.edu.gh) email address that is supplied and maintained by your school. Your university is probably covered, and the verification process takes less than 10 minutes.

    Hit the submit button at the bottom of the page after providing your name, email address, and any other information that is necessary. Sit back and wait for an email verification link to be sent to your school email since this only takes a few minutes to complete.

    How to subscribe to Apple Music in Ghana With and Without Master Card

    Enough said. It appears that using some Ghanaian debit cards to purchase music on iTunes is still difficult, especially for banks whose DCC has been disabled (Dynamic Currency Conversion).

    It’s for this reason that many of us get angry when we see Payment Declined, especially if our credit card is a MasterCard or VISA. Then comes the stress of having to go back to your financial institution to make things right or pay to request a new card, which occasionally may or may not resolve the problem.

    Yes, I know. I experienced this identical emotion as well. However, I discovered a simple technique to resolve this at little to no expense. It stings a lot, especially after trying numerous Ghana credit cards. A third-party program named gomoney is used in this process. Users may pay and share bills, keep track of costs, and transfer and receive money using the online bank known as gomoney.

    You may request a virtual credit card once you download the app and register with all of your information. P.S. Before you may obtain the card, you must also give your BVN in order to further validate your account. Before moving on to the next phase, you must also snap a photo of yourself.

    In order to protect your account from fraud, boost your transactional limits, and take advantage of all gomoney perks, you must provide these data.

    You may request a virtual MasterCard on the app after that is delivered; you can also request a physical MasterCard, but the virtual card request procedure is significantly quicker.

    You must enter the OTP (One Time Password) given to the cellphone number you used to register the account after you click Get Virtual Card in order to validate your account. Make careful to rapidly check before the OTP expires because it has a 5-minute validity window; otherwise, you will have to get another OTP.

    The money app will let you know when your card should arrive, which should be within an hour at most once that has been properly completed. You can return in an hour and there you have it! Your virtual debit card is prepared and costs 0 Ghana cedis to use.

    After that, select See Details to reveal your card information, which you may either capture or write down. Because MasterCard is an authorized biller, you would now use this new virtual card information to subscribe to Apple Music. With this virtual card, you may subscribe to Apple Music with confidence every time.

    Depending on the plan you select, you may not need to fund your gomoney account if you’re a first-time user of Apple Music because the service already guarantees a 3-month free trial period before charges are applied when the expiration date is due.

    However, if you’re an existing subscriber, you’ll need to transfer funds to your gomoney account number, which is prominently displayed on your profile page on the app, in order to successfully complete your subscription.

    Please be aware that if you decide not to continue with the subscription plan, you are able to cancel the subscription before the due date of expiration as well.

    How to cancel Apple music

    1. Simply go to Settings
    2. Select “Cancel Membership” under “subscriptions”, if you are concerned that you might forget to cancel your subscription before it renews.
    3. Up until the next due date, you can continue to use your free trial or current subscription.

    Conclusion

    We hope these instructions aid you to subscribe for Apple music here in Ghana without any hindrance.

  • How to set an alarm on your MacBook

    How to set an alarm on your MacBook

    In order to wake up from a brief desk sleep or to help you remember something, you might occasionally wish to set the alarm on your Mac if you spend most of your day in front of it.

    There isn’t a precise alarm option available on Mac because macOS doesn’t come with a built-in clock application. However, by employing these techniques, your Mac may easily serve as a reminder and come close to performing the same functions as an alarm.

    How to set an Alarm on your MacBook

    Using Wake Up Time

    On Mac, you may set an alarm using the free program Wake Up Time. Although the software hasn’t been updated in the previous six years, it still functions and is compatible with the most recent macOS Monterey release.

    1. Open Wake Up Time on your Mac and select the appropriate time under Alarm Time.
    2. You have two options: use your keyboard to choose the time or click the little arrows.
    3. Select any alarm tone under Sound. To watch a preview, click the play button.
    4. To activate the alarm, click the circular on/off alarm button located in the bottom left corner.
    5. The “Alarm set” text will appear in the light orange indicator box as soon as it is turned on.
    6. At the predetermined time, the alarm will sound and play a sound to wake you up.

    Reminder: If your Mac is awake, the Wake-Up Time alarm software and the other techniques in this guide will function.

    Using the Apple Calendar

    Mac’s modest calendar event notifications. You’ll see a notification in the upper-right corner and hear a brief sound after one second. This functions more like a timer than an alarm, but it can occasionally be useful.

    For instance, you could want a Mac-based reminder to remove food from the oven after two hours while you are working on it. In this situation, using the steps below will allow you to rapidly create a Calendar event with an alert (alarm).

    1. Go to your Mac’s Calendar application. To do this, search for it while pressing command and space.
    2. Click on the Plus button in the top-left corner. In the format specified, type your event information.
    3. For instance, enter at 11:58 AM today and type sees the oven. There will be a calendar event produced. Click alerts in the pop-up window to continue, then select a choice. If necessary, you may add more information.
    4. Another approach is to double-click on the date box you want if you are in the month view.
    5. A popup for a new event will appear. Enter the event name, time, alert, and other information at this point.

    Note: If you carefully double-click on the date number, it will open in full-screen mode, which can be useful for certain people.

    Using Kuku Klok to set an alarm

    A stylish and user-friendly online alarm clock website with a variety of sounds is Kuku Klok. The fact that setting the alarm just requires internet access is better. Following that, the alarm will sound even if your Mac is not online. Use it as follows.

    1. Browse Kukuklok.com on a Mac using any browser.
    2. To set the time, press the + and – buttons or the keyboard’s number keys.
    3. Pick a sound from the right-hand side.
    4. Lastly, choose SET ALARM.
    5. Make sure not to close this tab in your browser.

    Using the Reminders software to set alarms

    You can make alarm alerts with Mac’s Reminder app, just like you do with the calendar app. This demonstrates how notice and a brief alert sound are similar to calendar events.

    1. On your Mac, open Reminders and select + from the top-right menu.
    2. Enter the desired name, then click the I at the end of the row.
    3. Check and remind me on that day.
    4. Set the time and date you want now. You could also take into account a couple of the other possibilities available.

    Conclusion

    I think the approaches I just mentioned resolved your inquiry. They are not as practical as the iPhone or iPad alarm. They do, however, function in case you ever need them. Additional queries? Please post your responses in the space below.