Category: Apple

  • 5 Proven Ways To Recover Deleted Photos on Mac

    5 Proven Ways To Recover Deleted Photos on Mac

    Have you recently lost a photo on your Mac due to an accident or intentionally and were wondering how to recover these photos? If you have, then this article is going to show you 5 proven ways to recover deleted photos on Mac.

    Photos are usually memorable events and scenes we really cherish and want to keep for future references. Even if your photos are not memorable events, then they are something important you want to keep for future reference. They could be screenshots, videos, flipcharts, infographics, etc.

    Unlike most Windows, Linus, and other Operating System users, Mac users usually don’t have external hard drives where they keep these photos since they have iCloud and other backup options. Even if these photos are on hard drives, they are likely to be lost either due to an accident or whatever the reason may be. Being it formatting, malware, faulty macOS upgrade, corruption, these are all likely.

    Because of these unforeseen circumstances, it is good to know some proven ways you can recover deleted photos on your Mac. On the flip side, four (4) of these methods we are going to talk about below are free and do not require you to be a “techy” to be able to go about it. One of the methods although might require you to pay something but there are also free alternatives available.

    5 Proven Ways To Recover Deleted Photos on Mac

    There are several ways you can recover deleted photos on your Mac. You can simply follow a few steps and you will be done, or you can follow a complicated procedure. Better still, you can pay for software to do this for you. But in this article, I am going to talk about only 5 of the top proven methods.

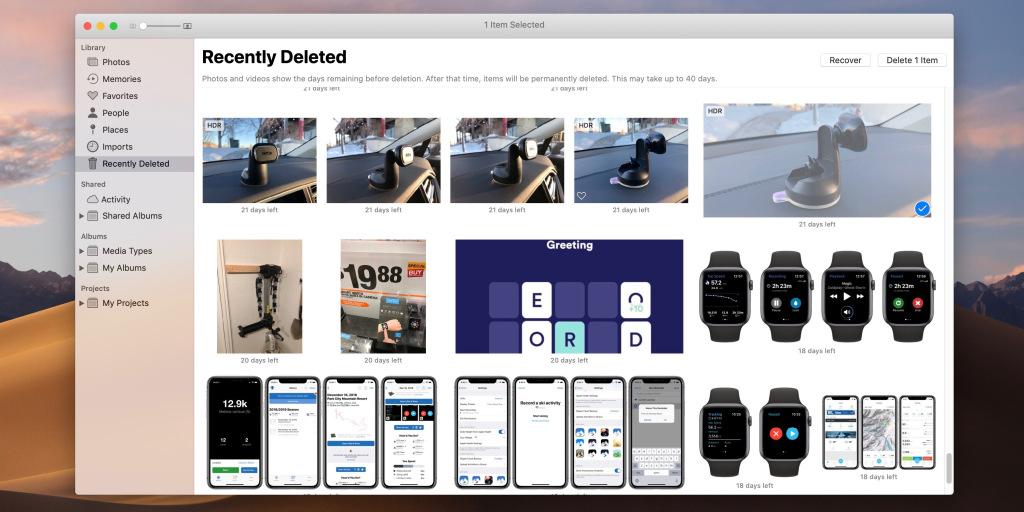
    How To Recover Deleted Photos on Mac Using The Recently Deleted Folder

    All Apple devices allow users to recover photos they deleted within 30 days after they deleted the photos. Mac computers with macOS Big Sur, Catalina, and Mojave also have this feature.

    To be able to use this method, your Mac must be running either of the macOS listed above and the photo must have been deleted within the last 30 days. If you meet the requirement then follow the steps below:

    1. Open the Photos app on your Mac
    2. Click on Recently Deleted in the left pane of the page
    3. Tap or select the photo (s) you wish to restore and then click Recover at the top
    4. Your photo will now be automatically restored to the photos app. Open the app and view your photo.

    How To Recover Deleted Photos on Mac From iCloud

    1. Visit iCloud.com and log in with your Apple ID and password
    2. Click on Photos
    3. Locate the Recently Deleted album
    4. Choose the photo you wish to restore and click Restore

    How To Recover Deleted Photos on Mac From Trash

    In situations where you can’t find the Recently Deleted folder then the Trash bin of macOS comes in handy. Like the Recently Deleted folder, the Trash bin also stores deleted photos in it for 30 days before it is finally deleted.

    1. Open Trash on your Mac
    2. Locate and right-click on the photo you wish to restore
    3. Select Put Back and the photo will return to the original folder

    How To Recover Deleted Photos on Mac Using Time Machine Backup

    Depending on the last time you backed up your Mac, you can recover your deleted photos using the Time Machine backup. Follow the steps below if you wish to use this method.

    1. Connect the external drive with Time Machine backup to Mac
    2. Open Finder and click on the file destination where the photos were deleted
    3. Click to open the Time Machine icon in the menu
    4. Click on the last backup or the date of the backup that contains your photo
    5. Find the photo library backup, select, and Click Restore

    How To Recover Deleted Photos on Mac Using A Photo Recovery Software

    After following all the above methods and you can’t find your photo then the next alternative is to use photo recovery software. Most of these software are paid but there are free ones also available.

    Research on the ones that suit your budget, and you will be good to go. Most of these photo recovery software allows you to restore almost every photo format, from .png, .jpeg, .dng, etc.

    Conclusion

    Recovering deleted photos on your Mac is very easy and straightforward. After reading this article you should be able to recover your deleted photos on your Mac easily.

  • Top 5 Best Email Apps For iPhone and iPad

    Top 5 Best Email Apps For iPhone and iPad

    Managing your emails is one of the most important things to do in this modern era. Unlike previously where most people preferred text messages to emails, now most people prefer emails to text messages.

    One of the reasons most people have attributed to this change of taste in the form of sending text messages is the fact that emails can be accessed on different devices, provided you have an active internet connection. The same could not be said about text messages since they can only be accessed on the phone in which the sim card is inserted.

    With that in mind, choosing the right email app on your iPhone and iPad will go a long way. Thankfully, there are a lot of alternatives on the App Store for you to choose from but not all of the so-called “email” apps are recommended, mainly due to security reasons.

    In this guide, I am going to recommend to you the top 5 best email apps you should use on your iPhone or iPad, or both. Please note that these apps are not listed in any particular order.

    1. Mail (Apple Mail) App

    The Mail app is also known as the Apple Mail app is the default mail app on every Apple device, being it iPhone or iPad. Usually, all new iPhones and iPads come with the Mail app already installed on them.

    Since this is the default mailing app on iPhones and iPads, it comes with a lot of amazing features and settings. Even though it is developed by Apple, you can add multiple accounts in the app, whether it is an Apple, Google, Yahoo, Outlook, Hotmail, or your organizational email account.

    Also featured in it are complete text formatting tools which help you to compose emails as if you were using your computer. You can add attachments with just a few clicks, use swipe gestures to mark, delete, or archive emails.
    Additionally, you can mute emails from a particular sender or add certain email addresses as VIP and their emails will be sent as a priority notification. Interestingly, it is completely FREE.

    2. Gmail: Email from Google

    Gmail has one of (if not) the highest number of active users. As a result, it is no wonder a surprise that Gmail: Email from Google is the number one ranked productivity app on the Apple App Store.

    Similar to the Mail app, you can add multiple accounts and switch between them whenever you wish to do so. After sending a wrong or unwanted message, you can quickly use the undo feature to unsend the email ASAP.

    Also, if there is an email containing an event, there is an option for you to add it to your calendar so that you don’t miss out on your event. There is also a swipe gesture feature available for you to use as and when necessary.

    There are also different languages available for you to choose from depending on your location and preference. Also, it is completely FREE.

    3. Yahoo Mail

    Yahoo is also one of the top email providers in the world. In the earlier days of email, most people were using Yahoo and most people still do till this day. As a result, the Yahoo Mail app is one of the best email apps available on the App Store for iPhones and iPads. Once you open the app, you are greeted with an elegant user interface which makes your emailing very fun.

    Unlike the rest of the apps mentioned earlier, the Yahoo Mail app comes with 1TB  of free cloud storage for you to use for your emails and also to keep your data safe and sound.

    Even though developed by Yahoo, you can add other email provider platforms like Apple, Gmail, Outlook, etc. The swipe gestures can also be customized to suit whatever you want them to be.

    Although the Yahoo Mail app is free, you can also subscribe to the Yahoo Mail Pro which comes with other features for $0.99 per month.

    4. Microsoft Outlook

    The Microsoft Outlook app is similar to all these apps and at the same time has its own unique features. You are allowed to view all your emails and calendars in one place without installing or opening any calendar app.

    There is also another feature for you to schedule emails to be sent at the time you set for it. Also, you can navigate through the files synced with OneDrive, Dropbox and easily attach them to your emails.

    Several languages are available for you to choose from and it is completely FREE.

    5. myMail

    The last app on my list is the myMail app. Personally, myMail app is one of the best email apps I have used on an iPhone.

    Apart from adding several accounts on the myMail app, there are tons of other settings and features available for you to choose from.

    Head towards the settings pane to navigate through all the settings available. You can assign avatar and profile photos to each email account for easy identification when using the app and also, it is FREE.

    Conclusion

    Now, you have been given a list of some of the best email apps on the App Store for iPhones and iPads. If possible download all of them and let us know your best app in the comments section below.


  • 3 iCloud Tips You Should Know to Make The Most Out Of It

    3 iCloud Tips You Should Know to Make The Most Out Of It

    iCloud is not just a cloud storage space for your Apple device. There are some cool features that are featured in it, and I am going to show some top 3 iCloud tips you should know to make the most out of it.

    Can you imagine an Apple device, i.e., iPhone, iPad, Mac, or Apple Watch without iCloud? How do you see it to be? It doesn’t look right, correct?

    iCloud is one of the several features that make Apple devices unique from some of the other electronic device manufacturers. Launched in October 2011, iCloud serves as cloud storage and cloud computing on all Apple devices.

    It enables Apple device users to store important data such as photos, documents, music, backup files on the cloud and access it whenever they need it, no matter the type of device they are using. According to Wikipedia, iCloud replaced Apple’s MobileMe service, acting as a data syncing center for email, contacts, calendars, bookmarks, notes, reminders, documents, photos, and other important data.

    Apart from all these amazing features that are available on iCloud, there are some other iCloud tips that will help you make the most out of it. Continue reading to find out these cool tips.

    1. Access iCloud on Different Apple Devices

    As I stated in the introduction, iCloud can be accessed on different devices either on the web, computer, or even mobile device. Knowing this method will help you in your times of need.

    In this guide, I am going to show only how to open it on Mac, iPhone, and iPad.

    How To Access iCloud on Mac

    1. Click the Apple logo at the upper left and select System Preference
    2. Select Apple ID from the System Preference menu
    3. Click iCloud
    4. Enable or disable your desired options

    How To Access iCloud on iPhone and iPad

    1. Open the Settings app on your iPhone or iPad
    2. Tap on your name at the top of the Settings page and then tap on iCloud
    3. Toggle on or off the various options available for you to choose from.

    2. Free Up iCloud Space by Using Google Photos

    All brand new Apple devices come with a free 5GB iCloud storage space. If you love saving a lot of videos and pictures on your device, then there is a high chance of you elapsing your iCloud storage in just a matter of days.

    Therefore, if you have a lot of photos and videos on your device, then I recommend that you use Google Photos and then use the iCloud storage for something else. You can easily do this by disabling Photos under the iCloud settings.

    The reason why I recommend Google Photos is the fact that it comes with 15GB of free storage space for your photos and videos, unlike the 5GB provided by iCloud for everything.

    3. Sync All Your Passwords With Keychain

    Memorizing all the passwords for your accounts on your Apple device can be a little difficult, especially for people with multiple accounts with varying passwords. Even though there are different password manager apps available on the App Store, not all of them can be trusted.

    Thus, using Keychain, a free password manager which you can sync with your iCloud account can do the trick. Keychain stores, protect, and encrypt all your username, email address, password, etc., and enables you to use it all your Apple device.

    To sync Keychain with your iCloud account, open the Settings app >> tap on your name at the top of the page >> iCloud Keychain and enable it. On Mac open System Preferences >> Apple ID >> iCloud >> Keychain.

    If you use Chrome on your Windows PC, install the iCloud Passwords Chrome extension and you can use all the passwords synced with your iCloud account.

    Conclusion

    There are some other cools tips you can use to make your iCloud account interesting but these three (3) are some of the “must-know” iCloud tips. The explanation is basic and the way you can carry out all these methods has been shown in the article.

    To make it easier and accessible to everyone, if you find it difficult to understand anything in the article, feel free to write it in the comments section below or get in touch with me and I will be glad to assist you.

  • Full Guide on How to Recover Deleted iMessages on Mac

    Full Guide on How to Recover Deleted iMessages on Mac

    When it comes to sending text messages, there are several messaging apps available on the internet. But unlike Android users who have several alternatives, Apple users are often limited to iMessage.

    iMessage, Apple’s very own free messaging platform where Apple users, i.e., iPhone, iPad, and Mac users send different forms of media with other Apple users. Some of the media include text, pictures, and even videos.

    Just like every other messaging platform, you are like to unintentionally delete some messages you need without reading them. That is one of the most frustrating and annoying things that could happen to you.

    But, if you are using a Mac, then this article is a full guide on how to recover deleted iMessages on Mac for free.

    There are several methods you can use to recover deleted iMessages on Mac. Some of them are free and the others are paid, but you and I both agree that our monies need to be invested in some profitable places rather than spending it to recover deleted iMessages. That’s why in this article I am going to show you the free methods you can use to recover your deleted iMessages.

    How To Recover Deleted iMessages on Mac Using iPhone or iPad

    Mostly, people who use mac either have an iPhone or iPad, and if you are one of such people then follow this method to recover the iMessages you deleted on your mac. The reason why this method is the easiest is that, once you link your Apple devices together, all your iMessages will be synced to all the other devices.

    1. Open the Messages app on your iPhone or iPad
    2. Scroll through to see if the messages you deleted on your mac are still available on your iPhone or iPad
    3. You can use the search bar to search for the conversation you are looking for
    4. You can then resend the message to someone else for it not to be deleted or you can screenshot it for future reference

    NOTE: This method might work or might not work. This is because sometimes when you delete the iMessage on your Mac, will automatically delete it on all the other devices.  But it is worth trying.

    How To Recover Deleted iMessages on Mac Using Time Machine

    Time Machine is an automatic backup system built into Mac computers while helps to easily recover files on your Mac. Time Machine makes a complete copy of all the files on your Mac at specific time intervals and luckily, iMessages are also backed up on Time Machine.

    Depending on the date you deleted the messages, you might have to restore a bunch of old unwanted files, but you can delete them after you get the message you are looking for.

    1. Log out of iMessage on your Mac and close the app
    2. Open Time Machine on your Mac
    3. Open the Finder and click on the Go menu in the Finder
    4. Find the Library section and click on Messages
    5. Locate a file with the name chat.db and a date that is before the date the message you deleted
    6. Choose that file and click Restore

    This will restore all your old iMessages and you should find the message you are looking for in there

    How To Recover Deleted iMessages on Mac Using iCloud

    Before you use this method, you need to make sure that your iPhone or iPad was backed up before you deleted your iMessage. Otherwise, you will just erase all the content on your iPhone for nothing.

    So, if the message you are looking for is not a “high priority” do not risk using this method.

    1. Open the Settings app on your iPhone or iPad >> General
    2. Swipe to the bottom and choose Reset and then tap Erase All Content and Settings
    3. Set up your device as a new device and when asked how you want to transfer apps and data to this iPhone, select Restore from iCloud Backup
    4. Choose the backup that was created before your iMessages were deleted from the list of Backups and wait for it to be restored
    5. Afterward, you can open the Messages app and you will find your iMessage right there waiting for you

    Conclusion

    When you mistakenly deleted iMessages on your Mac, do not press the panic button. Using any of the methods shown in this guide, you should be good to go.

    Have you fallen victim to not being able to recover deleted iMessages on your Mac? How was your experience like, feel free to share it in the comments section below?

  • How to Use Apple Maps in A Browser on Android and Windows

    How to Use Apple Maps in A Browser on Android and Windows

    Reading maps in the ancient years was something that only geographers and map experts could do. From just a little look, they could tell where they were at any point in time and also move to anywhere they wanted to go without getting missing.

    That is no longer the case in this 21st century, where everything is moving to the technological space. Now, maps can be found on almost every smart device, from mobile phones, tablets, laptops, desktops, smartwatches, etc.

    Thus, there is no longer the need for geographers and map experts, even a little child can now use the map with little or no supervision from their parents or guardians. That’s so cool, right?

    There are several digital maps in the world, but one of the most popular used map applications is the Apple Maps. This app can be found on all Apple devices that have ever been made, from iPhones, iPads, to MacBooks.

    Although this is good, people who do not use any of these Apple devices find it difficult to have access to App Maps on their devices. Even though there are different types of maps that can be used by such people, most of them find Apple Maps more interesting and following the release of the Beta version of iOS15, there are even more features coming in the Apple Maps, therefore, they simply can’t use any other digital map.

    If you are a non-Apple device user, then you are aware of the inability to use most of Apple’s applications even though there are some that can be used on Android devices, like Apple Music. Thanks to DuckDuckGo, Android and Windows users can now use Apple Maps on all their devices, and it’s completely FREE.

    How to Use Apple Maps in a Browser on Windows

    For you to be able to use Apple Maps in a browser on Windows, you first need to have an active web browser installed on your device. I recommend that you use Google Chrome, Safari, Firefox, or Microsoft Edge.

    Once the installation is completed, then follow the steps below:

    1. Open the web browser on your device and type in DuckDuckGo.com in the address bar and hit enter
    2. Enter your location (where you are going) in the search bar and click on the magnifying glass icon
    3. Choose Maps from the options that appear below the search bar
    4. Click on the Directions tab to get driving or walking distance from your current location

    NOTE: You need to turn on your location in the settings of your PC for the map to pick your current location.

     How to Use Apple Maps in a Browser on Android

    Similar to Windows, before you can use Apple Maps on your Android device, you need to have a web browser installed. Usually, most Android devices come with Google Chrome already installed on them, but you can also download any other browser of your choice.

    After that, follow the steps below:

    1. Open the web browser on your device and type in DuckDuckGo.com in the address bar and hit enter
    2. Enter your location (where you are going) in the search bar and click on the magnifying glass icon
    3. Choose Maps from the options that appear below the search bar
    4. Click on the Directions tab to get driving or walking distance from your current location

    NOTE: You need to turn on your location in the settings of your PC for the map to pick your current location. Also, since you are not using iOS, the navigation will automatically be redirected to either Google Maps or any other maps app on your device.

    Restrictions on Using Apple Maps in a Browser on Windows and Android

    While using the Apple Maps in a browser on your Windows or Android device, there are some restrictions. These limitations are:

    1. You cannot use Navigation
    2. You cannot plan a route
    3. There is no traffic or public transport support

    Currently, all these features are available in the original Apple Maps app, but they are not featured in the browser version. But it is my hope that in some months or years to come, these features will be available on the browser version as well.

    Conclusion

    Apple Maps is a very popular map app in the world. Using it on an Android or Windows device can sometimes be difficult but this article has shown you how to go about it easily.

    Follow each of the steps listed carefully and you will enjoy Apple Maps on your Android or Windows device for free.

  • How to install Windows 3.1 on an iPad

    How to install Windows 3.1 on an iPad

    Do you love both Windows and Apple at the same time? Do you miss your olden days Windows 3.1 when you were using your desktop machine?  If you do, then continue reading this article to find out how you can revisit that moment right on your iPad.

    Windows 3.1, one of the earliest versions of the Windows operating system was released on the 6th of April 1992 (this is a long time right ?). Probably most of us were not having our own PCs by then.

    But thanks to iDOS you can be able to re-live this moment right on your iPad or iPad Pro. With iDOS, you are given the chance to install Windows 3.1 and enjoy all the amazing details that come with it.

    A Brief About Windows 3.1

    Windows 3.1 is a series of 16-bit operating environments produced by Microsoft for use on personal computers, released on April 6, 1992. The series began with Windows 3.1, which was first sold in April 1992 as a successor to Windows 3.0. Subsequent versions were released between 1992 and 1993, notably Windows 3.11 until the series was superseded by the Windows 9X series starting in 1995 with Windows 95. During its lifespan, Windows 3.1 introduced several enhancements to the still MS-DOS-based platform, including improved system stability, expanded support for multimedia, True type fonts, and workgroup networking.

    On December 31, 2001, Microsoft declared Windows 3.1 obsolete and stopped providing support and updates for the system. However, OEM licensing for Windows for Workgroups 3.11 on embedded systems continued to be available (despite the OS no longer being officially supported) until November 1, 2008.

     How To Install Windows 3.1 on iPad

    The process of installing the Windows 3.1 OS on an iPad is a little bit tricky, therefore you need to read this article very carefully otherwise you will not understand the process properly.

    NOTE: THE IDOS APP COMES AT A PRICE ($4.99)

    1. Download and install the iDOS app on your iPad

    On your iPad, go to the App Store and search for iDOS 2. Once you are done with the installation, run the app, and check your Files app to see if it has created a new folder under the name iDOS in the On My iPad.

    2. Set up your Bluetooth accessories (Mouse, Pen, Keyboard)

    To enable you to enjoy Windows 3.1 on your iPad to the fullest, it would be better if you connect Bluetooth accessories to your iPad. This will make you feel the reality of the interface. But if you don’t have any Bluetooth accessories, feel free to go on to the next step.

    3. Prepare the setup files for the Windows 3.1

    With this step, it depends on the type of PC you have. Go to the internet and search for the setup files for Windows 3.1.

    4.Copy the setup files from the PC to the iPad

    You can use whatever transfer method to transfer the setup files from the PC to your iPad. Upon successful completion, make sure to copy all the files into the iDOS folder in the Files app. (If you need help make sure to let me know in the comments section below).

    5. Install Windows 3.1. in iDOS 2

    Launch iDOS 2 app and type in w3setup\setup at the C:\> and then press Enter. A welcome screen will be shown, press Enter again >> Select Express Setup and wait for the setup files to finish copying.

    Once it is done, the installation screen will be displayed, wait for the installation to finish. When the installation is done, click on Exit Setup.

    6. Quit iDOS 2 and restart the app to start enjoying Windows 3.1 right on your iPad

    Conclusion

    The main purpose of this article is to help you enjoy what the earlier version of Windows looked like. Although the steps seem confusing, once you follow the steps listed in the article, you will be able to do it.

    In conclusion, if you come across any challenge please feel free to write it down in the comments section below, and will check it out as soon as I can. Also, make sure to share this with all your friends and Windows OS lovers.

  • Things to look out for before buying a used iPhone 

    Things to look out for before buying a used iPhone 

    iPhones are the most popular phones in the world. They have arguably been the best brand of mobile phones since they launched in 2007.

    They have provided users with amazing features every year with each product they release. Their amazing features and functions are what make them very popular.

    And this is the reason why for anyone looking to buy an iPhone, you need to make sure you check every part of the phone to make you get all the features for which you’re buying the phone.

    Using an iPhone without these features like the Face or Touch ID, good battery health, their very large memory size, amongst other amazing the iPhone provides, is just like using a normal phone. 

    Battery health

    iPhones batteries are known to be very strong.

    They perform very well when taken gold care of and charged fully. However, a used iPhone cannot have 100% battery health as the owner may have used it for months or years unless they bought a new battery into the phone before they placed it on the market. When buying a used iPhone, one of the most important parts is checking how strong the battery is.

    There’s a battery health feature in the settings that determines the battery state. It tells you how strong the battery is according to the percentage of the battery.

    As I said earlier, A used iPhone cannot have a 100% battery unless a new battery was bought. So checking the battery of the used phone, you might see 90% or around 80% and above.

    That’s not so bad for a used iPhone. Normally people prefer buying used phones at 87% to 96% battery health.

    The battery’s performance is very good within such ranges but below 80%, and your battery is nothing but just an existence in your phone.

    Check whether it’s locked or unlocked

    The creators of iPhones built the phone so that it’ll be impossible for whoever stole it or found to use it when you lose it.

    They have factory unlocked phones, temporarily unlocked phones and locked phones. All these types can be used. Software developers also came up with ways to use iPhones even if they are locked.

    When buying the phone, you can decide if you want to buy the locked, factory unlocked or temporary unlocked ones. But if you decide to buy the factory unlocked ones, you need to check to be very certain you’re buying the factory unlocked phone.

    This is because iPhones are very complex phones designed to help the users from any theft. To check if the phone is factory unlocked or not, you need to reset the phone, and when you still have access to every feature on the phone after resetting it, then you’re good to go.

    Memory size

    The memory die of iPhones is best around the world. iPhones have a memory size of 16GB to 512GB. So buying, you specify which memory size you want and make sure you get exactly that.

    Normally you’re asked to make sure you get what you asked for because that might be your first time using an iPhone. So you make sure you ask the seller to open the phone settings and show you what the memory of the phone is to be sure.

    Check if some features are working or not

    There are features in an iPhone that make using the phone fun and simple that you need to make sure you are functioning when buying the phone. Features like the Face ID feature, which was introduced for the iPhones without the home button like iPhone X, XR, XsMax, iPhone 11 Pro, 11 Pro Max, 12 Pro, 12 pro max and 12 pro mini.

    Touch ID also for phones with home buttons like iPhone 5,5s, 6,6s,6s Plus,7, 7plus,8, and 8 plus and the functioning of the home button.

    These features are very important in the usage of an iPhone. To check if the Touch ID and Face ID are working, open your settings and go to passwords, and tap adds a Face or a fingerprint each for phones with Face ID and Touch ID, respectively.

    You also need to check the mouthpiece of the phone. Make a call to make sure everything is intact, both at your end and the person you called. Also, check the charging port and make sure it works. The speaker, too, plays some music or a tune to test the speaker.

    Check to see if the phone is an original

    Many sellers sell refurbished phones to users out there. It would help if you made sure you don’t fall victim. Luckily for iPhones, there’s a way you can check to make sure you’re buying an original iPhone.

    Open Settings on your iPhone and choose “general. “Tap on “about” after you choose “general.” In this section, you’ll see everything about the phone you’re buying. You’ll see the model of the phone, that is, iPhone 12 Pro Max or whichever one you’re buying. Also, the serial number and model number of the phone. You copy the serial number and model number and check them on google to make sure it’s an original phone. After checking, your phone is ready for you.

    Conclusion

    Because of the complex nature and how expensive these phones are, one needs to take absolute caution when buying such phones.

    Check for the battery health, make sure it’s the one you prefer, and check to make sure it’s an unlocked phone, check the memory size, and make sure all phone features are working perfectly. Above all, check to make sure it’s an original phone.

    If you don’t have enough knowledge of iPhones, you can ask a friend you think knows much about iPhones to accompany you to avoid wasting your money. 

  • How To Turn Off Find My iPhone Without Password

    How To Turn Off Find My iPhone Without Password

    Generally, iPhones are seen to be one of the most secure smartphones in the world. This is as a result of many factors and one of them includes the closed-source operating system.

    Unlike most of the other smartphones and operating systems in the world, penetrating an iOS device is very difficult. For example, you cannot turn off your Find My iPhone when you forget your password.

    But if you are reading this article right now, then you are among the lucky ones because I am going to show you exactly how to turn off Find My iPhone without a password.

    Just like I stated earlier, turning off Find My iPhone without a password is not possible. That is the reason why Tenorshare 4MeKey was created to help ease the burden on people who have forgotten their passwords.

    What Is Tenorshare 4MeKey?

    Tenorshare 4MeKey is a software package that was created to help smartphone users with their everyday unlocking problems. Unlike most software that ends up causing damage to your device, Tenorshare 4MeKey is the exact opposite of that.

    The team at Tenorshare 4MeKey has over 10 years of experience in the smartphone solutions field and has helped several people with software solution needs.

    During the over 10 years of existence, there has been over 78.9 million downloads and currently has over 63 million+ satisfied clients.

    Some of the products Tenorshare 4MeKey has to include UltraData – iPhone Data Recovery, UltraData – Android recovery, iCareFone – Free iOS Backup Tool, 4uKey – Password Manager, 4uKey – iPhone Passcode Unlocker, 4MeKey – iPhone Activation Unlocker, 4uKey – iPhone Backup Unlocker, iAnyGo – iOS Location Changer, etc.

    What is Find My iPhone and How Does Tenorshare 4MeKey Help To Turn It Off Without Password?

    Find My iPhone is a tool developed by Apple to help locate iPhones whenever you cannot find them. Find My iPhone comes in very handy when you misplace your iPhone or when someone steals it from you.

    What you might be thinking is that, if this tool is very useful, why then do I need to turn it off. One of the reasons why you need to turn it off is that it drains your battery faster when your phone is being tracked. Also, you will not be able to restore your iPhone even when you really need to do that.

    If you remember your password then this wouldn’t be a problem but if you can’t remember your password then Tenorshare 4MeKey comes in. What it does is, locates the loophole in the tool and then bypass it in just a few minutes.

    This way, you don’t need any password to be able to turn it off. As long as you have Tenorshare 4MeKey, then you are good to go.

    How To Turn Off Find My iPhone Without Password Using Tenorshare 4MeKey

    By default, whenever you try to turn off Find My iPhone on your iPhone, you’ll be asked to enter your Apple ID password. If you could remember then this wouldn’t be a problem but due to one or two issues, we sometimes forget our passwords, especially for those with many Apple accounts.

    To be able to use Tenorshare 4MeKey to turn off Find My iPhone, you must have an iPhone 6s, 6S Plus, 7, 7 Plus, 8, 8 Plus, or X. If you have any of these devices, then you can follow the steps below to turn off your Find My iPhone without a password.

    1. Download the Tenorshare 4MeKey on your Windows PC or Mac. Once you have finished the download, install the software on your PC
    2. Open the Tenorshare 4MeKey and choose Turn Off Find My iPhone
    3. Connect your iPhone to your PC and wait for the software to recognize your device
    4. The next thing is for the device to be jailbroken
    5. Wait for some time while the jailbreak tool is downloading on your device. Do not remove the iPhone during the download otherwise, it will interfere with the jailbreaking process
    6. Once the jailbreak is done, confirm your device info and then wait for Tenorshare 4MeKey to turn off the Find My iPhone
    7. Upon completion, the Find My iPhone will be successfully turned off on your device
    8. Also, your device will go back to factory reset and the activation lock will not appear again on your device

    Conclusion

    Before reading this article, it seemed impossible to turn off Find My iPhone without a password. But after reading this article, I am confident that you now know how to turn off Find My iPhone without a password.

    Although iPhones are one of the secured smartphones in the world, some technical loopholes are only penetrable by Tenorshare 4MeKey. And in this article, I have shown you how you can use Tenorshare 4MeKey to bypass that security and turn off Find My iPhone.

  • How To Turn On/Off Your Apple Watch, Force-Restart It For Troubleshooting

    How To Turn On/Off Your Apple Watch, Force-Restart It For Troubleshooting

    Do you want to know how to turn on/off your Apple Watch, force-restart it, or troubleshoot it? If yes, then this article is going to answer all the questions.

    In these past few years, smartwatches have become very popular and useful in the world. Unlike ordinary watches that are only able to tell the time and nothing more, smartwatches have been able to do more than that.

    One of the most popular smartwatch series in the world is the Apple Watch series. Not only is the Apple Watch able to tell the time, but it can be used to listen to music, track your sleep, check your heart rate, and a whole lot of other amazing stuff.

    Just like all electronic devices, the Apple Watch needs to be put to rest at a point in time. Although the Apple Watch doesn’t need to put off regularly, knowing how to put it off is very helpful, and can be equally useful when the need arises.

    Also, there might be a problem with some apps on your Apple Watch that you might need to troubleshoot. Therefore, you need to know how to do this beforehand so that you will be informed should incase, such a thing happens to your Apple Watch.

    In this article, I am going to show you how to turn on/off your Apple Watch, force-restart it for troubleshooting. So enough of the plenty talk, let’s jump right into it.

    How To Turn Off Your Apple Watch

    Press and hold the side button until the three (3) sliders option appear on the screen of your Apple Watch. The options are POWER OFF, MEDICAL ID, EMERGENCY SOS.

    Swipe the POWER OFF button to the right to turn off your Apple Watch.

    NOTE: You cannot turn off your Apple Watch while it is still charging. To put it off, you must first of all disconnect the charger from your Watch before you put it off.

    How To On Your Apple Watch

    To turn on your Apple Watch, all you need to do is to press and hold the side button until the Apple logo appears on your Apple Watch’s screen.

    Once you turn on your Apple Watch, it may take some time before the Watch will be fully turned on. Once it does, you will be prompted to enter your passcode (if you have any).

    How To Force-Restart Your Apple Watch

    On some occasions, the Apple Watch may be facing some difficulties in the updates or some of the apps. This is usually displayed by an Apple logo and a progress wheel below it.

    When this happens, you need to force restart your Apple Watch. To force restart your Apple Watch;

    Press and hold the side button and the Digital Crown simultaneously.

    As soon you see the Apple logo, release both buttons.

    Apart from turning on and off your Apple Watch, you need to know some other important stuff about the Apple Watch.  Below are some of them.

    How To Wake Your Apple Watch Display

    Once you turn on your Apple Watch, you may need to use it to do something. To do this, you need to wake your Apple Watch’s display. There are several ways you can do that and below are some of them.

    Raise your wrist like you are watching the time. Due to the available sensors in the Watch, it will pick up the movement and turn it on.

    Tap the screen of the Watch or you can press the Digital Crown.

    For Apple Watch Series 2 and above, you can turn the Digital Crown upwards and you will see the display glowing gradually.

    Conclusion

    The Apple Watch is one of (if not) the best smartwatches that has ever been made in the world. Most of the other smartwatches in the world try and mimic the Apple Watch.

    As compared to the other types of smartwatches, the Apple Watch is relatively expensive. But if you compare the features of the Apple Watch the others, then you will realize that it is worth that amount.

    I hope this article was helpful? If you have any questions concerning this article, feel free to write it in the comments and I will attend to you as soon as possible.

  • Best Apple AirPods Pro Tips and Tricks

    Best Apple AirPods Pro Tips and Tricks

    In October 2019, Apple added the AirPods Pro into their AirPods models. This type of AirPods has a lot of updated features that make it stand out from all the previous models that were already in existence.

    Some of the updated features include noise cancellation, a new design, and a silicone customizable ear tip. None of these were available in the previous models of the Apple AirPods.

    The price tag that was given to the AirPods Pro was very high but people who really wanted it were able to buy it. After some months now, the price has reduced to a little to make it easy for most people to buy it.

    Aside from that, one sad thing is that most people are not aware of some of the various tips and tricks in the AirPods Pro; all they are know is how to connect it to their device and listen to music.

    As such, I have written this article to explain to you some of the best AirPods Pro tips and tricks you need to be aware of. After reading this article to the end, you are going to appreciate the AirPods Pro and make the most of it.

    Change The Name Of Your AirPods Pro

    The first tip on my list is how you can change the name of your AirPods Pro in less than a minute. By default, Apple will give an assigned name to it, but that is not permanent, you can always change it to fit the name you like.

    Simply go to Settings >> Bluetooth and then tap the info icon for your AirPods Pro. Tap on the current name and then revise the existing name or delete and create a new name for it.

    Enable Noise Cancellation

    The first-ever headphones to have an Active Noise Cancellation (ANC) was the Apple AirPods Pro. The AirPods Pro adapts to the shape of your ear and blocks, the noise coming from the outside to enable you to focus on what you are listening to alone.

    The ANC relies on a feature called Ambient EQ,  according to Apple, adjusts the sound signal 200 times a second to optimize audio for your specific ear shape through the use of an internal microphone.

    As such, whenever you turn off the noise cancellations, the Ambient EQ automatically goes off and so, the quality of your sound reduces slightly. Pressing and holding either of the AirPods Pro’s stem will cycle between Transparency and Noise Cancellation.

    Additionally, you can do this on your iPhone or iPad by:

    Open Control Center >> Press and hold the volume bar >> Tap Noise Cancellation in the strip at the bottom of the screen.

    Ear Tip Fit Test

    Unlike the regular AirPods, the AirPods Pro comes with a three-set of replaceable tips for all the ear canal sizes. The sizes range between Small, Medium, and Large (depending on the size of your ear canal).

    This way, you are sure that your AirPods Pro is not going to pull out of your ear while going for a run or while walking on a busy street. By default, the AirPods Pro is fitted with a medium-size tip, but you can change it to your preferred size at any time.

    To do this, all you have to do is simply pull the tips firmly until they detach from the base. After that you can then position the new tips so that the center white circle meets the center black circle on the base of the AirPods, then you push until they are intact.

    If you are wondering how to choose the best size, then you don’t have to worry at all. Simply go to Settings >> Bluetooth >> [Your AirPods info icon] >> Ear Tip Test. Tap Continue and then tap the Play button.

    Short music will be played for you, afterward, you will be told whether to adjust the tip or to change the size of the tip. Follow the advice and then try again. Once you choose the right size or adjust the tip well, you will be told by the app.

    Control Music With Just A Press

    One other amazing trick on the Apple AirPods Pro is the ability to control music with just a press. You can do so by just pressing the stem of either of your AirPods Pro (right or left) by your thumb or forefinger until you hear a click.

    You can single press it if you want to pause/play the song, double press to skip to the next song or triple press to go back to the previous song.

    Conclusion

    The AirPods Pro is indeed one of the best headphones that have ever been made in the world. Not only in its design, but it is endowed with a lot of features that have never been seen in a headphone.

    Some of the tips and tricks have been discussed in this article and there are a whole lot of others. But these ones are some of the easy and simple ones to do.

    In conclusion, I will like to advise you to be very careful when you are removing your AirPods Pro from your case. Because, if you don’t remove it very well, you may end up destroying your AirPods Pro in just a few months after buying it.