Category: Apple

  • Some Hidden Tips Inside The Safari Browser

    Some Hidden Tips Inside The Safari Browser

    The Safari browser is one of the most popular web browsers in the world. This browser was developed by Apple Inc. mainly for their Apple devices; iPhones, iPads, and Mac.

    This browser contains a wide range of features, tools, and settings that help users to surf the internet like no other browser. Personally, Safari is not the best browser in the world but some Apple users might debate that.

    By default, the Safari browser is the default browser on all Apple devices; from iPhones to iPads, and Mac. But most Apple users just use it for the mere fact that, it is the default browser that has been provided to them by Apple.

    As a result, I have written this article to give you some of the important and hidden tips inside the Safari browser. After reading this article, you will enjoy using your Safari browser in a different way than what you used to.

    Some Hidden Tips Inside The Safari Browser

    Some of the tips that will I will discuss in this article applies to only devices that have the latest versions of iOS, iPadOS, and macOS, i.e. iOS 14 , iPadOS 14, and macOS 11 Big Sur.

    Translate A Foreign Language Website into Your Preferred Language

    With the latest OS versions, Safari users can now translate foreign language websites into their language of proficiency. The supported languages are English, Spanish, German, Brazilian Portuguese, French, Chinese, and Russian.

    All you need to do is to visit a website that appears in any of the languages above and then you will see a translate icon appear briefly near the Address bar. Also, you can tap on the aA icon and select Translate to [your preferred language].

    If you want to send it back to the original language, all you need to do is to click on the Translate icon or the aA icon on Mac and iPhones respectively.

    View Compromised or Reused Passwords

    Also, you can see any password that has been saved in iCloud Keychain and has been leaked in a data breach or is being reused for multiple logins. Also, passwords that are regarded as weak can be viewed.

    This works for only iPhone and iPad users. To view these, go to Settings >> Passwords >> Security Recommendations. If you want to delete or change the password, you tap on a specific entry.

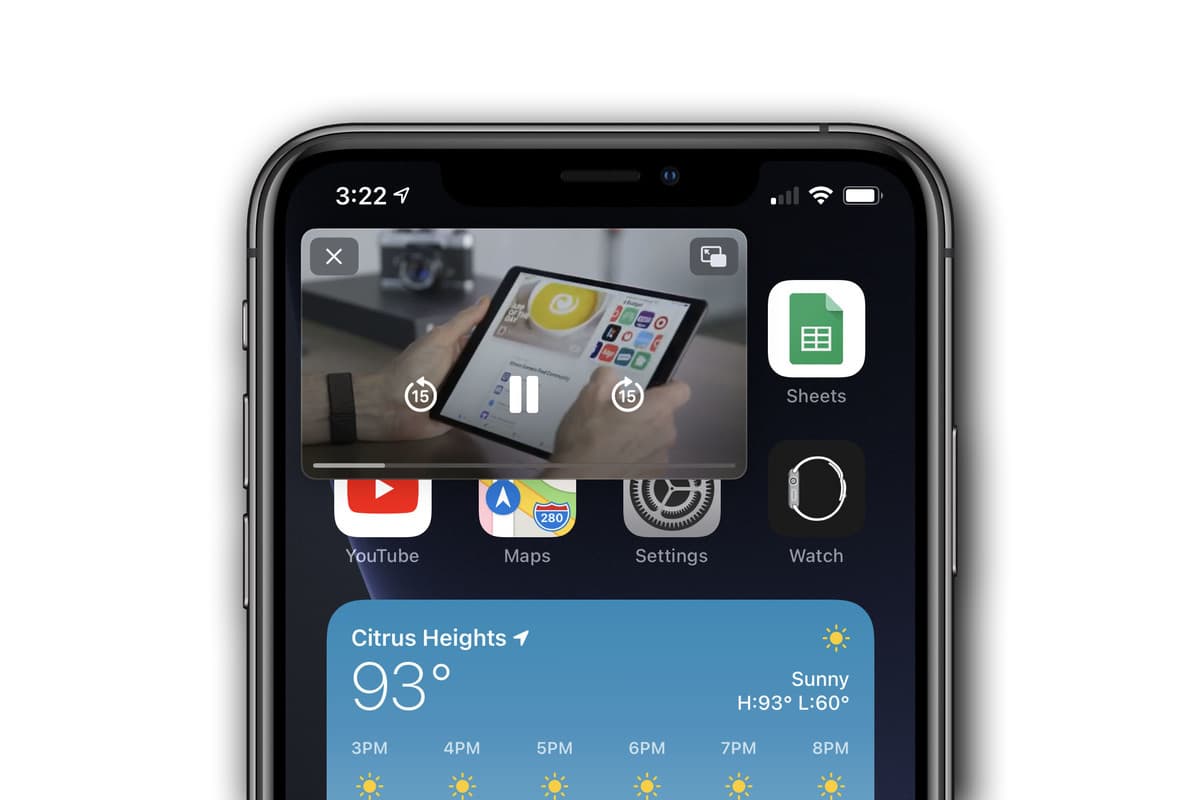
    Watch Picture-in-Picture Videos

    You can also watch videos using the Picture-in-Picture whenever you are using the Safari browser. A detailed article can be found here.

    Auto Close Tabs

    This works for all the users with devices that have iPadOS/iOS 13 and above. With this feature, you can set a time for the tabs in the Safari browser to automatically close after some period of not using it.

    Visit Settings >> Safari >> Close Tabs and then choose your preferred frequency. You can choose between manually close, automatically close after one week, one month, or one day.

    Save Open Tabs As Bookmarks

    This feature also works for devices that have iPadOS/iOS 13 and above. Unlike previously where you had to save all tabs as bookmarks one by one, you can save all the opened tabs as a bookmark.

    Simply tab the Bookmark icon at the upper or bottom of your screen (depending on the device you are using). Go to the menu tab and then tap Add Bookmarks for [X] tabs and the tabbed pages will all be saved as a bookmark.

    Read Offline

    You can also read a web page offline. All you have to do is to tap the Share icon at the bottom of the screen and then tap Add to Reading List.

    After the page, it will automatically delete by default. But you can tap the Show All icon at the bottom of the menu >> Show Unread and all the pages you’ve read already will be shown.

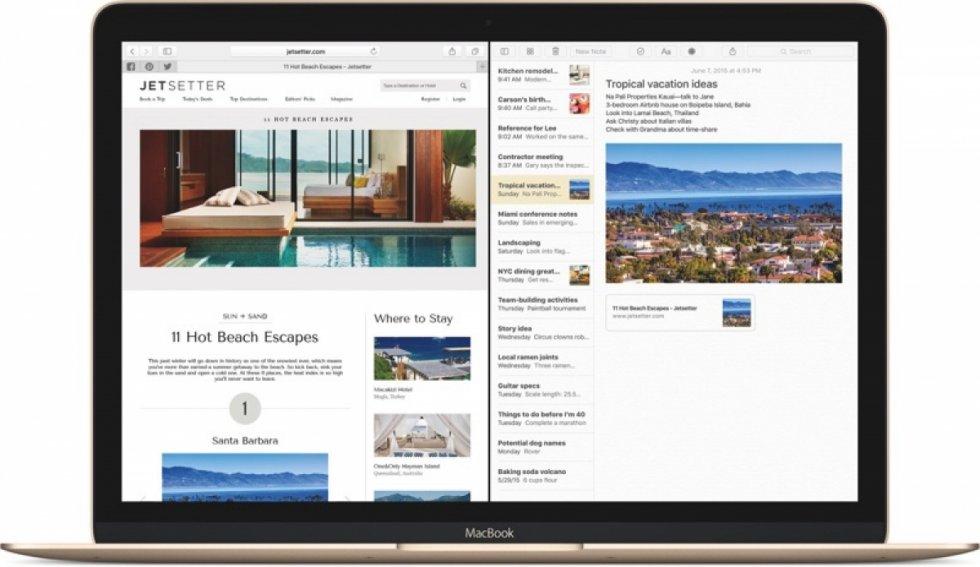
    View Two Webpages At The Same Time

    For iPad users with devices that have iPadOS 13.1 and above, you can view two pages at the same time.

    To do this, just open two pages and then drag one to the right and the other to the left until it opens in Slide Over view. Afterward, you can position them in such a way that the screens will be equally split.

  • How To Disable Siri Suggestions On iPhone, iPad, and Mac

    How To Disable Siri Suggestions On iPhone, iPad, and Mac

    Siri, a service by Apple Inc. is one of the best voice assistants in the world. For several years, people have been comparing Google Voice Assistant with Siri but Siri always seems to be on top.

    The main reason for which Siri was developed was to help make every Apple device user’s life easier. For example, with Siri, you can make calls or send text messages to any contact on your list without moving a single finger; all you need to do is to talk and Siri will do the rest for you.

    Just like your personal assistant, Siri studies how you use your Apple device and then make suggestions when the need arises. This is very interesting, right?

    But that is not always the case, Siri suggestions can become frustrating and annoying. This especially happens when you use different applications almost every day. This way, Siri finds it difficult to make the right suggestions for you in your time of need.

    Each day, Siri makes suggestions in places like Search and the Lock Screen based on what the AI thinks you need. Not always is this a good thing because the suggestions can sometimes be way out of the line.

    If you have been frustrated with Siri’s suggestions, then all you need to do is to disable it or customize which apps on the device can take advantage of Siri’s suggestions.

    Since Siri is a machine, it keeps on learning as the days go by. According to Apple, you can teach Siri how to spell unusual words to help them recognize it in the future.

    Therefore, in this article, I am going to show you how to disable Siri suggestions on iPhone, iPad, and Mac.

    How To Disable Siri Suggestions on iPhone

    1. Open the Settings app on your iPhone
    2. Scroll down and click on Siri & Search just below Wallpaper
    3. Under SIRI SUGGESTIONS, toggle off the Siri suggestion you want to disable. There are three (3) main Siri suggestions, i.e. Suggestions in Search, Suggestions in Look Up, and Suggestions on Lock Screen.

    How To Turn Off Siri Suggestions for Specific Apps

    If you would love to keep on Siri suggestions turned on but just tweak how some apps react with Siri, then follow the steps below:

    1. Open the Settings app on your iPhone
    2. Scroll down and click on Siri & Search just below Wallpaper
    3. Scroll through the apps and modify how Siri will interact with these particular apps

    How To Disable Siri Suggestions on iPad

    1. Open the Settings app on your iPad
    2. Scroll down and click on Siri & Search just below Wallpaper
    3. Under SIRI SUGGESTIONS, toggle off the Siri suggestion you want to disable. There are three (3) main Siri suggestions, i.e. Suggestions in Search, Suggestions in Look Up, and Suggestions on Lock Screen.

    How To Disable Siri Suggestions on Mac

    1. Choose System Preference from the Apple menu
    2. Select Siri from the list of options available
    3. Choose Siri Suggestions & Privacy or About Siri & Privacy
    4. From the apps installed on the device, select which apps Siri can learn from
    5. Once you are done, click on Done

    Conclusion

    Siri as a voice assistant was designed to protect your information; this means that your personal information will not be shared with any third-party.

    It monitors how you use your device and the apps on it, this is how it can provide your suggestions based on how you often use your app. All the suggestions made by Siri may be used to personalize some Apple services, but these are not stored on any Apple servers.

    If you use more than one (1) Apple deviceSiri’sri suggestions will be synced on iCloud to all the other devices. Therefore, if you disable the Siri suggestions on your iPhone the suggestions will be limited on your iPad, Mac, or vice versa.

    In this article, I have included everything you need to know about how to disable Siri suggestions on iPhone, iPad, or Mac. Take your time, read and practice and you will be able to do it.

    In case you face any difficulty or challenge, feel free to write it in the comments section below and I will attend to you as soon as possible.

  • How To Track Your Sleep On Apple Watch

    How To Track Your Sleep On Apple Watch

    Are you wondering how your sleep cycle is going? Do you have a hard time sleeping and was wondering about your sleep cycle? If so, then you can do so with your Apple Watch’s built-in sleep tracker.

    In this article, I will be showing you how to track your sleep on your Apple Watch without installing any third-party apps.

    Previously, tracking your sleep and sleep cycle wouldn’t have been possible unless you use a third-party app. But with the release of the Apple watchOS 7, Apple introduced a new built-in sleep tracker.

    Although the Apple Watch’s sleep tracker can get the job done, it doesn’t have all the needed features to track your sleep.

    So, if you really want to know the details of your sleep then you can go ahead and download a third-party app. But basically, the Apple Watch can perform this task very well.

    All you have to do is to wear your watch when you are going to sleep and it will go ahead and monitor your sleep, the duration of your sleep and how deep you sleep during this period.

    The apps will automatically transfer the chart to your iPhone that you have connected to your Apple Watch. This way, you can view your sleeping cycle and pattern the next morning and then make your own analysis of it.

    How To Track Your Sleep On Apple Watch

    Before you can track your sleep on Apple Watch, you need to make sure that your Watch has watchOS 7. Also, your connected iPhone must be an iPhone 6s or later and running iOS14. You can update your iOS if it doesn’t meet the requirements.

    Also, you need to power your battery before you go to bed. (You don’t want your watch to go off in the middle of the night). Afterward, you can follow the steps below to track your sleep on your Apple Watch.

    1. On your iPhone, open the Watch app.
    2. Scroll through and then tap on Sleep.
    3. Toggle the switch next to Track Sleep with Apple Watch to start monitoring your sleep.

    How To Set Up Sleep On Your iPhone

    After turning on the Track Sleep with Apple Watch, you need to set up the sleep and sleep goals on your iPhone. Follow the steps below to do that:

    1. Open the Health app on your iPhone.
    2. Under Set Up Sleep, tap on Get Started >> Next.
    3. Follow the prompts to establish your sleep goals, bedtime and wake-up times, sleep mode, track sleep with Apple Watch.

    Conclusion

    Because the Apple Watch has a tracker, you need to make sure that your Apple Watch is worn comfortably. If you choose to wear it loose, it will track more movements than normal in your sleep.

    Also, make sure that you have turned on charging reminders so that you will not forget to charge your watch before bedtime.

    The sleep chart is a complete one and it tracks the times you wake up during your sleep. You can even set up a reminder for your Watch to wake you up whenever it’s time to wake up.

  • How To Set Up A New iPhone

    How To Set Up A New iPhone

    Have you decided to buy a new iPhone? Or have you already bought a new iPhone but you are thinking of how to set it up?

    if your answer is yes, then this article is the right fit for you. This is because, in this article, I will show you how to set up a new iPhone or switch to a new iPhone from your old iPhone.

    After buying your new iPhone from the store, one of the most important mandatory things you need to do when you buy a new iPhone is to set it up.  

    Without setting up your iPhone, there’s no way you can be able to use your iPhone. For those who are switching from an old iPhone to a new iPhone, the process is a little straightforward unlike those who are using it for the very first time.

    Once you switch on your new iPhone, the next thing you will see after the Apple logo is the Setup Assistant. It is through the Setup Assistant that you will establish essentials like your Wi-Fi network, your Apple ID and iCloud account, etc.

    It is not compulsory to establish all the essentials, some of them can be skipped and performed later. For example, Face ID or Touch ID (depending on the type of iPhone), the passcode can be skipped during set up and performed later.

    All these may sound like a lot of work to do in a few minutes but in reality, all these are straightforward and can be completed in just a few minutes. Upon completion, you can then make the most out of your new iPhone.

    How To Set Up A New iPhone

    1. Remove your new iPhone from the box and turn it on.
    2. Choose Hello from the different language’s greetings.
    3. When asked, choose your language from the list of languages and then select the region and country you are located at.
    4. Tap on Set Up Manually.
    5. Connect your new iPhone to a Wi-Fi network, cellular network or iTunes to activate your iPhone.
    6. Set up your Face ID or Touch ID or you can skip this step and set it up later.
    7. If you choose to set up the Face ID and the Touch ID, then you need to enter a six-digit or four-digit passcode. This is what you will use to unlock some features in case your Face ID or Touch ID is not working.
    8. If this is your first time using an iPhone, tap on Don’t Transfer Apps & Data.
    9. If you have an old iPhone, choose from Restore from iCloud Backup, Restore from Mac or PC, Transfer Directly from iPhone, or Move Data from Android. if you choose this option, your remaining steps will be different from the one below. All you have to do is to follow the instructions to complete your setup.
    10. Sign in with your Apple ID (if you have) or you can tap on Forgot password or don’t have an Apple ID to create a new one.
    11. You can choose to Turn on automatic updates and set up other devices.
    12. Set up Siri and other services. (Not compulsory)
    13. Set up Screen Time and more display options. (Not compulsory)
    14. After, skipping or setting up all the other options, tap on Get Started to begin using your new iPhone.

    Conclusion

    As stated above, it is not important to set up all the options and features at once. You can always skip some of them and complete them later.

    But for security reasons, I will recommend that you set up either the Face ID or Touch ID. Siri and the other display options can always be done later.

    Now that you know how to set up a new iPhone, make sure to follow the steps closely to avoid errors. Welcome to the new world of iOS. Make sure to check out all our iPhone articles to make the most out of your new iPhone.

  • How To Take Screenshot on iPhone, iPad, Apple Watch, and Mac

    How To Take Screenshot on iPhone, iPad, Apple Watch, and Mac

    Do you want to know how to take screenshots on iPhone, iPad, Apple Watch, and or Mac? I guess the fact that you are here answers the question asked earlier.

    Anyways, if you don’t, there is no need to worry because in the article, I am going to show you how you can take screenshots on iPhone, iPad, Apple Watch, and Mac.

    If your daily work or online life requires information (including photos) then a screenshot is very helpful in many ways. In our daily lives, we come across some important information we just can’t resist saving.

    Unfortunately, we cannot save some of this information directly on our Apple device. Especially for those of us who are fond of buying items online, we always like to save the picture for future reference.

    For example, you cannot save an Instagram photo directly to your Apple device. In situations like this, the best thing we can do is to take screenshots.

    When you take the screenshot, you are even given the chance to edit it to suit your preference in your Photos album on your device.

    Even though screenshots are important, most Apple device users find it very difficult to do. That is why I wrote this article to guide you on how you can do that. If you forget, you can always come back here for reference.

    How To Take Screenshot on iPhone, iPad, Apple Watch, and Mac

    Because we have different Apple devices in the world, we decided to write about almost all the Apple devices. That is, iPhone, iPad, Apple Watch, and Mac and below are the steps to take a screenshot on all the devices:

    How To Take a Screenshot on Your iPhone

    Since iPhones are of different classes and versions, each of them has specific ways of taking screenshots. Below are the steps for each class of iPhone

    How To Take a Screenshot on iPhone Models With Face ID

    1. This class of iPhones starts with the iPhone X. All the iPhones in this class has no home button.
    2. Press the Side Button and the Volume Up button at the same time.
    3. Release both buttons quickly and at the same time.
    4. After you have taken the screenshot, a thumbnail will be displayed in the bottom left corner of the screen. Tap on it and edit it to your preference. If you don’t want to edit it, swipe left to dismiss.

    How To Take a Screenshot on iPhone Models With Touch ID and Side Button

    1. Press the Side Button and the Home button at the same time.
    2. Release both buttons quickly and at the same time.
    3. After you have taken the screenshot, a thumbnail will be displayed in the bottom left corner of the screen. Tap on it and edit it to your preference. If you don’t want to edit it, swipe left to dismiss.

    How To Take Screenshot on iPhone With Touch ID and Top Button

    1. Press the Top Button and the Home button at the same time.
    2. Release both buttons quickly and at the same time.
    3. After you have taken the screenshot, a thumbnail will be displayed in the bottom left corner of the screen. Tap on it and edit it to your preference. If you don’t want to edit it, swipe left to dismiss.

    How To Take a Screenshot on Your iPad

    Similar to iPhones, we have different classes of iPads and we have given you steps for each of them below:

    How To Screenshot on iPad Models Without Home Button

    1. Press the Top Button and the Volume up button at the same time.
    2. Release both buttons quickly and at the same time.
    3. After you have taken the screenshot, a thumbnail will be displayed in the bottom left corner of the screen. Tap on it and edit it to your preference. If you don’t want to edit it, swipe left to dismiss.

    How To Take Screenshot on iPad Models With Home Button

    1. Press the Top Button and the Home button at the same time.
    2. Release both buttons quickly and at the same time.
    3. After you have taken the screenshot, a thumbnail will be displayed in the bottom left corner of the screen. Tap on it and edit it to your preference. If you don’t want to edit it, swipe left to dismiss.

    How To Take Screenshot on Apple Watch

    Unlike iPhones and iPads, before you can take a screenshot on your Apple Watch, you need to turn on the screenshot setting.

    How To Turn On Screenshot Setting On Your Apple Watch

    1. To do so, open the Apple Watch App on your iPhone.
    2. Tap the My Watch tab and then tap on General.
    3. Scroll through to the bottom and Enable Screenshots.

    How To Take Screenshot On Your Apple Watch

    1. Press the Side Button and the Digital Crown at the same time with two fingers.
    2. The screen will flash to confirm that you have successfully taken your screenshot.
    3. The screenshot will be saved in the screenshot album on the Photos app on your iPhone.

    How To Take Screenshot On Mac

    1. With three fingers, press and hold Shift, Command, and 3 keys.
    2. If you see a thumbnail at the bottom of the screen, click on it to edit your screenshot. Other than that, wait for the screenshot to Save to your desktop.

    How To Take A Screenshot Of A Portion Of Your Screen

    1. With three fingers, press and hold Shift, Command, and 3 keys.
    2. Drag the crosshair (square box) to select the area to capture. If you want to move the selection, press and hold the Space bar while dragging.
    3. To take the screenshot, release your mouse or trackpad button.
    4. If you see a thumbnail at the bottom of the screen, click on it to edit your screenshot. Other than that, wait for the screenshot to Save to your desktop.

    In conclusion, you can now take screenshots on any Apple device using the steps provided above in this article. Make sure to try your hands on it anytime you come across an Apple device.

  • How To Split Screen On Mac

    How To Split Screen On Mac

    Are you tired of not being able to split-screen on your Mac? Do you always have to resize or manually move windows before you can use two (2) apps at the same time?

    In case your answer to these two (2) is YES, then I know you are going to find this article very useful. Thus, in this article, I am going to show you how you can split screen among your Mac.

    Split screen is one of the most useful settings you can ever make to your computer, being it Windows, Mac, or Chromebook.

    If you are someone who likes multitasking with their PC, then I think you are going to agree with me. Otherwise, you might challenge me, but I know after reading this article and you practice it you will come back and agree with me.

    Because of the split screen option, you can be able to watch your movie and at the same time reply to your emails or watch a movie and at the same time reply to your Facebook messages.

    For some time now, most Mac users were not aware that they could also use a split screen. But this article is going to prove to you that it is also possible on Mac.

    With the Split View on your Mac, you can be able to fill your Mac’s screen with two (2) apps without having to manually move or resize the windows.

    How To Split Screen On Mac

    As I earlier stated, a split screen is very helpful for persons who love to multitask. Due to the different types of macOS, I have classified the steps into two (2) different categories; depending on your macOS version, follow the steps listed below.

    How To Split Screen On Mac With macOS Catalina or Later

    If you are using macOS Catalina or later:

    1. Hover your pointer over the screen button (the 2 arrows with the green background) in the top-left corner of a window. Alternatively, you can click and hold the button.
    2. From the menu, choose Tile Window to Left of Screen or Tile Window to Right of Screen. Automatically, the window will fill that side of the screen.
    3. Afterward, click a window on the other side of the screen to begin using both windows side by side.

    How To Split Screen On Mac With macOS Mojave, High Sierra, Sierra, or El Capitan

    1. Click and hold the full-screen button (the 2 arrows with the green background) in the top left corner of a window.
    2. Once you hold the window, the window will shrink and you can then choose to drag it to the left or the right side of the screen.
    3. Afterward, release the button and then click on a window on the other side of the screen to enjoy the split screen mode.

    Conclusion

    On certain occasions, the split might not work. In such circumstances, choose the Apple menu (the apple logo) >> System Preferences >> Mission Control, and then make sure that Display has separate Spaces is selected.

    Once you are done, you can then follow the steps listed above and the split screen will start working on your Mac.

    Finally, if you face any challenge, free to write it in the comments section below and I will attend to it as soon as possible.

  • How To Use Picture in Picture Mode on iPhone

    How To Use Picture in Picture Mode on iPhone

    Are you tired of not being able to multitask on your iPhone? Have you always wanted to use the Picture in Picture mode on your iPhone?

    If you have any of the questions above, then you have found the right article. In this article, I am going to show you exactly how to use Picture in Picture mode on your iPhone.

    One thing that iPhone users have always wanted was a way to multitask on their iPhones. This was very frustrating and annoying at the same time.

    This is because some of iPhone’s Android competitors were able to use the Picture in Picture feature but iPhone didn’t have this feature.

    As a result, Apple added a Picture in Picture mode to the iPad when the iPad OS 13 was released. Later somewhere in 2020 when the iOS 14 was released, Apple added the Picture in Picture feature on iPhones.

    The Picture in Picture works with applications that play video contents. But, when you are using third-party apps, the app needs to have support for this feature.

    How To Turn On The Picture in Picture Mode on Your iPhone

    Before you can also use the Picture in Picture, you need to turn on the Picture in Picture feature on your iPhone. To do so, follow the steps below:

    1. Open the Settings app on your iPhone.
    2. Tap on General.
    3. From the list of available options, tap on Picture in Picture.
    4. Next, you need to make sure that Start PiP Automatically is turned on. If not, make sure to do that.

    How To Use The Picture in Picture Mode on iPhone

    To use the Picture in Picture mode on your iPhone, you need to make sure that your iPhone can support iOS 14. If it can, then you need to upgrade it to the latest version.

    Next, you need to make sure that the app you are about to use also accepts Picture in Picture. If so, then follow the steps listed below:

    1. To begin with, open a video player application on your iPhone. For example, Apple TV or Twitch.
    2. Start playing a video in the application. For example, if you are using the Apple TV tap on a movie or show.
    3. Next, tap on the Picture in Picture logo on the upper part of the screen. (This depends on the application. For some of the apps, you can just press the home button or swipe on to go home and it will automatically start playing).
    4. Once you swipe to go home or press the home button, the video will start playing on a floating screen.
    5. Now, you can do whatever you want to do while the video is still playing.

    Conclusion

    As you can clearly see, the process of using the Picture in Picture mode on your iPhone is very easy and very helpful. With this feature, you can now be replying to your emails while watching favourite movie or TV show.

    Interestingly, all the methods and steps you need to be able to access this feature has been outlined in this article. Read through and you will be able to use the Picture in Picture feature on your iPhone.

    Aside from that, if you face ant challenge while trying to use the method stated in this article, make sure to write it in the comments section below.

  • How To Set up Family Sharing on Your Apple Device

    How To Set up Family Sharing on Your Apple Device

    Thinking of setting up family sharing on your apple device? Do you want to set up family sharing on your Apple device with your family members? Do you even know what family sharing is at all?

    If your answer to any of the questions asked above is YES, then this article is the best fit for you. This is because in this article, I will show you everything you need to know about Family Sharing and how to set it up on your Apple device.

    What is Family Sharing?

    Family Sharing is a feature that allows you and up to five (5) other family members to share access to some Apple services. Some of the services that can be shared are Apple Music, Apple TV+, Apple News +, Apple Arcade, iCloud storage plan, Apple Books, iTunes, and a family photo album.

    Also, if one person loses his/her iPhone, any member in the family sharing can locate where the device is at any time.

    To begin with, one person in the family i.e. the organizer, invites all the family members in the group. Once the remaining members join, they automatically gain access to the subscriptions and contents.

    Interestingly, each member’s private photos, files, and documents cannot be seen by any other member in the group. Thereby, giving total privacy to all the family members in the group.

    How To Set Up Family Sharing On iPhone, iPad, or iPod Touch

    As stated earlier, to begin, one member of the family needs to start the family group. That person is assigned the name, Organizer by Apple.

    Open the Settings app on your device and then tap on your name.

    Scroll a little to the bottom and then tap on Set Up Family Sharing.

    Next, tap on Get Started.

    After that, choose the first feature you’d like to share with your family.

    Follow the on-screen instructions to set up your family and afterward, invite your family members.

    How To Set Up Family Sharing On Your Mac

    Choose Apple menu (Apple logo) >> System Preferences and then click on Family Sharing.

    Next, confirm the Apple ID that you want to use for the Family Sharing. Also, make sure that Share My Purchases is also selected.

    Follow the on-screen instructions to complete the process.

    How To Invite Family Members Into Your Family Group

    Now after setting up the family sharing you can invite your family members to join. To do so, you need to follow the steps below.

    How To Invite Family Members Into Your Family Group on iPhone, iPad, or iPod Touch

    Open the Settings app on your device and then tap on your name >> Family Sharing.

    Tap on Add Member.

    Enter your family member’s name or email address and then follow the onscreen instructions.

    Finally, you choose whether to send the invite via Messages or in person. Afterward, follow the onscreen instructions.

    How To Invite Family Members Into Your Family Group On Mac

    Choose Apple menu (Apple logo) >> System Preferences.

    Click on Family Sharing.

    Click on Add Family Member. Afterward, follow the onscreen instructions to complete the process.

    Conclusion

    For persons with multiple Apple IDs in the iTunes and App Store, you can invite each of the Apple IDs to enable you to share purchases from your other Apple IDs with your family members.

    After the invitation, you can go to the family sharing menu and check whether the person has accepted the invite or not.

    In terms of any challenge, feel free to write it down in the comments section below.

  • How To Set Up An Apple Watch for Someone Who Doesn’t Have An iPhone

    How To Set Up An Apple Watch for Someone Who Doesn’t Have An iPhone

    Is it your hope to buy an Apple Watch sometime soon but you are wondering how you are going to use it without having an iPhone? Don’t worry because I know of the perfect way you can use your Apple Watch without you having an iPhone.

    Previously, Apple Watch could only be used by persons with iPhones. That is not the case anymore, now everyone can use an Apple Watch; whether you have an iPhone or not. This is as a result of the latest watchOS 7 and the iOS 14 releases.

    But, before you do this, you need to have a friend or relative who has an iPhone and for that matter an Apple ID. So in this guide, I am going to show you how to set up an Apple Watch for someone who doesn’t have an iPhone.

    Before you can do this, you need to make sure that your iPhone has or supports iOS 14. Otherwise, this is not going to be possible.

    With the introduction of iOS 14, Apple has added a lot of features that weren’t available on the previous iOS versions. Some of which include how you can actually hide the hidden photos album, and a whole lot of others.

    Another feature that was introduced in the watchOS 7 and iOS 14 is a feature called Family Setup that allows an iOS 14 user to set up an Apple Watch for their family relatives who doesn’t have an iPhone.

    Also, if the person you are setting up the Watch for is a student, you can add school time to limit the period within which he/she can use the watch. Once you set it up, the Watch can make and receive calls, send and receive messages, a variety of Apple Watch features.

    Some of which include Health, Activity, App Store, Emergency SOS, Fall Detection, and Noise Notifications.

    How To Set Up An Apple Watch For Someone Who Doesn’t Have An iPhone

    To set up an Apple Watch for someone who doesn’t have an iPhone, you need to follow the steps listed below:

    1. First of all, you need to update your iPhone to iOS 14 and your Apple Watch to watchOS 7. On your iPhone, go to Settings > General > Software Update. On the watch app on your iPhone, go to General > Software update.
    2. Once you have successfully updated your iOS and watchOS versions, you then have to pair the iPhone to your relative’s Apple Watch. To do this, all you need to do is to power up the Apple Watch, place it near your iPhone and Wait until you see Use your iPhone to set up this Apple Watch. When you get to the next screen choose Set Up for a Family Member.
    3. Follow the remaining steps to set up the Apple Watch. From here, you choose the orientation of the Digital Crown and which hand you will wear the watch on.
    4. Once you are done with the setup, you can customize the watch based on the person’s preferences. That’s all the Apple Watch is now set up for the person without the iPhone.

    Conclusion

    As easy as that, you can set up any number of Apple Watch for your relatives and family members who don’t have an iPhone.

    In the future when they get their own iPhone, you can visit the Watch app on your iPhone, select all watches, and then unpair it with your iPhone.

  • How To Sign Up For Apple Beta And Try Out New Software

    How To Sign Up For Apple Beta And Try Out New Software

    Apple is one of the leading software developers in the world. They develop applications for the Apple iPhone, Watch, iPad, Mac, and TV.

    In addition to that, they also develop software for the Apple iPhone, Watch, iPad, Mac, and TV.

    In their quest to develop quality software and apps, Apple has launched the Apple Beta to help individuals try out pre-release software on all the Apple devices and then share their feedback on this software.

    In this article, I am going to show you how the Apple Beta works, and how you can also join to test new software directly from Apple. But before we proceed, you need to have an Apple device before you can join the Apple Beta program.

    Apple is known to be releasing new software almost twice or more in a year. If you have ever wanted to be among the first people to try out any new Apple software, then this is your chance to do exactly that.

    What is the Apple Beta Software Program?

    The Apple Beta Software program is a program that was introduced by Apple Inc. for volunteers to download a beta version of the new operating system for their device and test it before it is officially released.

    The signing up process is completely free and accessible to everyone, everywhere. The software that are available include:

    • iOS
    • iPadOS
    • macOS
    • tvOS

    The whole idea behind this program is for you to install the pre-release software and use it on your device and then give your feedback to Apple using the built-in Feedback Assistant. The feedback includes (but not limited to) crashes or other behavioural challenges you encounter.

    There are two options available, the Public and the Developer. The only difference being that the Developer options have some technical options for the developers. The Developers are registered developers on Apple’s Developer Program and you can enroll on that for $99 every year.

    How To Sign Up For Apple Beta And Download Your Beta Software

    To sign up for the Apple Beta program, you need to be above 18 years and must have an Apple ID. Also, you need to have any of the Apple devices listed above. Finally, you need to accept the confidentiality agreement where you agree not to share any screenshot with anyone.

    Once you are done, follow the steps listed below:

    • Go to the Apple Beta program page and click the Sign Up icon.
    • Next, you’ll be asked to enter your Apple ID, after which you will reach the page for the Guide for Public Beta.
    • Select the device you use and then scroll down the Get Started section and click on the Enroll your device option.
    • Next, click on Download the Profile and wait for it to install.

    Whenever there’s new beta software, Apple will send you a notification for you to download and then give your feedback.

    At any point, if you decide to unenroll, you can visit the Unenroll page and then end your participation.