Author: Godwin Gabla

  • Google Picasa Alternatives For Editing Pictures

    Google Picasa Alternatives For Editing Pictures

    Whatever your age, gender or race, photography is one thing we all have in common. Whether you own an expensive iPhone or a cheap android phone, one thing you use your phone for is photography.

    Though you may not be a professional photographer, smartphones have made us all ‘photographers’. You want to have the best DP amongst your friends and colleagues. You want to show off how elegant you are in the classy photos you post on your social media accounts.

    One application which helps smartphone users to edit their photos for best quality and appearance is Picasa. Over the years, this application has made a lot of ‘rough’ faces look smooth on social media.

    But what if you don’t want to use Picasa? What alternatives are there for you? Worry not. This article gives you a list of Picasa alternatives you can use to edit your photos.

    Google Photos

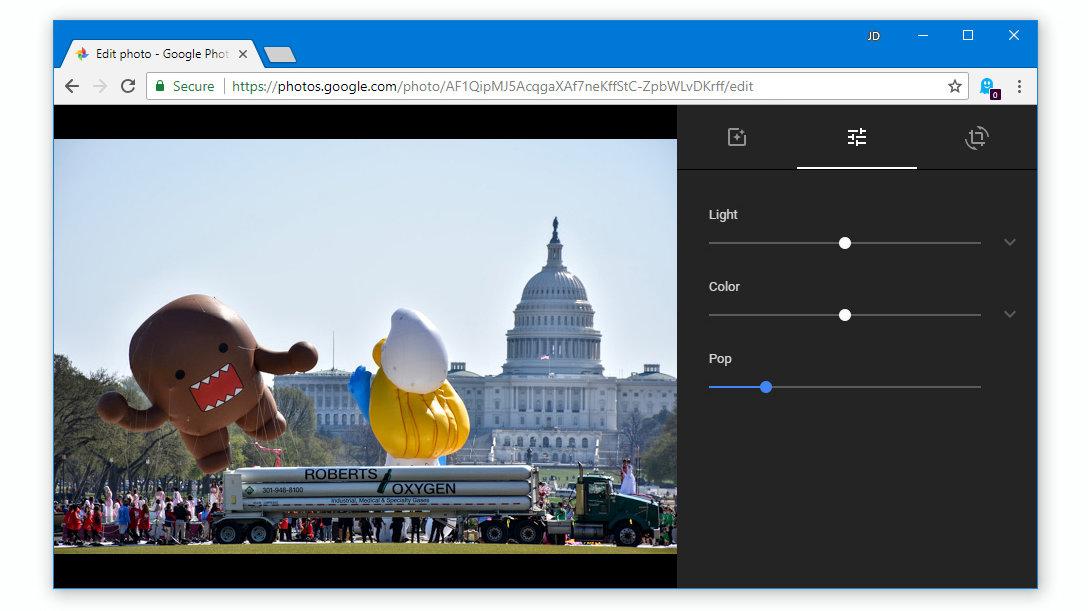
    Your best bet for a direct Picasa replacement should be Google Photos. Google photos is a free tool from Google for organizing and editing photos on their popular android systems. However, the app is also available for IOS users and Windows.

    It is one of the best free photo editing applications available on the internet today. You can use the Google Photos app to change the display of your photos. You can touch the colours, the warmth and texture of your photos. You can also apply filters, crop your photos and rotate your photos using this application.

    What’s more, the application also automatically backs up all your photos to your google account so you can be sure of the safety of your images.

    You can get your Google Photos app for your Android system here. For IOS users, you can get yours here.

    Adobe Lightroom

    The Adobe Lightroom CC is a beautiful and feature-filled software for managing and editing photos across various operating systems.

    The free version of the application enables users to set watermarks, change photo colouration, apply filters and adjust exposure among many other things.

    However, for a premium version which comes at 10 USD per month, users get to sync their photos across various devices and platforms. You can also get other premium features with 10 USD per month.

    This is certainly a good replacement for the popular Google Picasa photo editor. You can get a copy for your android phone here. For IOS users, it is available here.

    Snapseed

    Maybe it’s just coincidence that we are replacing a google product with many other Google products. But yes, Snapseed is another google product for managing and editing photos.

    This is another free application which enables users to change the appearance of old and ugly photos into superfine master crafts of photography.

    Snapseed has tools such as healing brush, crop, curves, colour adjustments, filters and many other tools.

    It is a professional photo editing app that can be used by both pros and newbies. You can get the IOS version here. The android version is available here.

    Picsart

    Very popular software for editing photos, Picsart is the last app on this list. It is definitely a high-end application for editing photos professionally. If you want your photos to look all professional and standout of the numerous photos on the internet, you should think Picsart.

    With Picsart, cloning, cropping, changing a colour grade, adding text to photos and adding filters to your photos has become much easier. You can do all these from one place – your picsart application!

    You can download the IOS version here. For android users, yours is here for free.

    You Can Also Check Applications That Have Nice Filters To Make Your Photo Beautiful.

    Conclusion

    The challenge of social media today is about the best photos. Whether it is a smile challenge on Facebook or a natural face challenge on twitter, you definitely want to show off your best photos.

    The only way to ensure that you get the best results for your social media is by touching up your pics after taking them. One app that comes to mind for this purpose is ‘Picasa’.

    But maybe you want to use some new features and tools to bring some extra touch to your photos, Picasa may not really make the cut for you. So which other applications can you use to edit your photos?

    In this article, we talked about 4 replacement apps for Google Picasa.

    I hope this list was helpful to you. Kindly do well to share with your friends and family.

    If you have any comments, reservations or questions regarding this article, kindly share them in the comment box below or get in touch with us.

  • How To Change The Colour Of Folders In Windows 10

    How To Change The Colour Of Folders In Windows 10

    Windows 10 is one of the most used versions of the Windows Operating system. This is mostly because of its beautiful design and ease of accessibility.

    Owning a computer operating on the Window Operation System can be a bit energy-sapping at times.

    One of such instances is when searching for a file or folder in a catalogue of many other files and folders. As organized as you may think or claim to be, the more folders you have, the more difficult it is to find a single one on your computer.

    This has been a point of concern to most Windows 10 users. For those using Macbook, this has been made a lot easier with the ability to give colour labels to files and folders on the computer.

    On Windows 10, the only way you can organize your files and folders is by naming them separately. And this is not enough categorization for those who have thousands of files and folders on their computers.

    In this article, we shall teach you how to change the colour label for folders in Windows 10.

    You can also check out, How To Update Your Windows 10 Laptop

    Changing Folder Colours In Windows 10

    Unlike the Apple Operating System, Windows 10 does not have a ready feature for changing the colour of its folders. However, users can rely on a tonne of other external tools to perform the function.

    Some of these tools are Folderpainter and Foldermarker

    To use Folderpainter, download the folder painter tool and extract the file to a new folder.

    Then, follow the steps below:

    1. Run folder painter if you own a 32-bits system. Or, run the folderpainter_X64 for 64 bits systems.
    2. Click install on the next window that appears.
    3. Once the installation is complete, you are now ready to change the colour of your folders.
    4. To change the colour of an icon, right-click on the icon and point your most pointer to ‘Change Folder Icon’
    5. Select the colour you want from the list to your right.
    6. Voila! Your folder Icon changes colour immediately!

    Very easy and simple right? Well, interestingly, the developer of Folderpainter believes strongly that the colour change remains permanent. Meaning even if you copy the folder to another computer or location, the colour remains that way. We could not test for this but with how efficient the tool is, we should just take the developer’s words for it.

    Conclusion

    Organizing and managing data, files and folders on a computer can be very tedious and time-consuming. For those with fewer data and files on their computer, this wouldn’t be much of a problem.

    However, those with thousands of folders and files find it difficult organizing their files and folders appropriately. This is further complicated by the Windows operating system which only gives you one way of identifying folders; by the name!

    While other operating systems such as the Macbook Operating System allow users to naturally identify and separate folders based on their colouration, even the latest version of Windows doesn’t have this feature.

    In this article, we looked at how to use external tools such as Folderpainter and Foldermarker to change the colour of your folders in Windows 10.

    I hope this article was helpful to you and that you will share with your friends and relatives.

    If you have any questions, suggestions or reservations regarding this article, kindly let us know in the comment box below or contact us.

    Once again, please do well to share with others. They may need it.

  • How To Record Whatsapp Calls On Android And iPhones

    How To Record Whatsapp Calls On Android And iPhones

    Tiktok may be the new video and trends app, Zoom may be the new home for all meetings but Whatsapp still remains what it is. The world’s leading chatting app.

    Be you a child, a teenager or an adult, Whatsapp is one application you use every single day, so long as you have a smartphone.

    Despite the fact that most users prefer to use Whatsapp for text and video chats, quite a number of them still go for the now better Whatsapp Voice Calls.

    Whatsapp voice calls, just like normal phone calls can be for various reasons. For security reasons or for record-keeping sake, you may need to record some of your Whatsapp calls.

    You may also read about How To Secretly Record All Your Phone Calls

    Unfortunately, Mark Zuckerberg and his team haven’t come up with an in-born feature for recording WhatsApp calls.

    However, this shouldn’t be your headache. This article solves this problem perfectly.

    In this article, we shall discuss how to record your Whatsapp calls.

    How To Record Whatsapp Calls On Your Android Phone

    For android users, this ‘all difficult’ task of recording Whatsapp Calls is a little bit easier and more possible.

    Your best bet for recording a Whatsapp call on your android phone is by using the Call Recorder – Cube ACR application.

    Follow the procedure below to learn about how to use the app to record your Whatsapp calls:

    1. Download the Cube ACR Call Recorder application from the google playstore and install it on your phone.
    2. After successfully installing the application on your android phone, you need to grant permissions for the application to access your contacts, record your calls and access other parts of your phone. For those using android versions 10 or higher, you may need to grant the Cube ACR recorder, you have to enable app connector permission in your Accessibility settings menu.
    3. Open your Whatsapp application after granting all the required access and permission to the Cube app. Make a call to any Whatsapp contact you wish to call. If your App is set up properly, you should see the Cube Recorder Widget on your screen. If it isn’t well setup, you would get an error message on your screen.
    4. If you keep getting error messages on your phone, then it’s a problem with your app. To resolve this, open the Cube App and go to recording settings. Under ‘VOIP’ recording settings, turn on ‘Ignore VOIP-Support check’. Then, select ‘Voice Call’ option in the VOIP recording source settings.

    Note: The Cube Recording App only works on some android phones so it is likely that this application may not work on your phone. This shouldn’t be a worry to you. Check here for the list of phones that support this application.

    How To Record Whatsapp Calls On Your Iphone

    Apple is very keen on security and privacy-related issues, especially across its devices.

    As such, it is a bit difficult to perform the Whatsapp Call recording functionality on an iPhone. However, it is not entirely impossible. Actually, there is nothing impossible in the computing world.

    So here, follow these steps to record Whatsapp Calls on your Iphone:

    1. Connect your phone to an Apple Macbook using a lightning cable.
    2. For the first time connections, select ‘Trust this computer’ on your phone.
    3. Launch Quicktime on your Macbook.
    4. Next, choose ‘new audio recording’ under the file menu.
    5. Click on ‘record’ in your Quick Time application window.
    6. Using the iPhone, call your phone via Whatsapp. Then, click on the ‘add user’ icon.
    7. Choose the person whose call you want to record and connect them.
    8. Your call will be recorded automatically after connecting the person.

    When you’re done with the call, stop the recording in your Quick Time window and save the audio on your Macbook.

    Old But Gold

    If these methods used above do not work for your phone, you may have to rely on this strategy which has existed for years.

    To do this, you first of all need to be in a very quiet room where there is little or no noise.

    You must also have an external recorder such as a different phone from the one you’re using to make the Whatsapp call or an audio or mp3 recorder.

    1. Call the person whose call you want to record via Whatsapp.
    2. Once they answer, but the call on handsfree mode and turn on your sound recording device.
    3. Record the whole conversation from a close distance.
    4. Save the file on your recorder and send it to your phone later.

    Conclusion

    There are times when calls must be recorded for personal reasons, security reasons or for record-keeping sake. For any of these reasons, such calls may either be normal phone calls or Voice Over Internet Protocol (VOIP) calls such as Whatsapp calls.

    Interestingly, there are apps readily available on most phones for recording voice calls. However, WhatsApp doesn’t come with the in-built feature of recording calls.

    So, there is a need for reliance on third-party software for this purpose. In this article, we looked at some ways of recording Whatsapp Calls On your iPhone and Android phones.

    We hope this article was helpful to you and that you will share with your friends and relatives.

    Kindly do well to leave your comments, views, questions and reservations in the comment box below.

  • How To Backup Passwords Saved In Mozilla Firefox Browser

    How To Backup Passwords Saved In Mozilla Firefox Browser

    Passwords remain a key privacy and security feature on most websites and applications on the internet today.

    With various platforms requesting different types of passwords for security reasons, one may have a whole lot of passwords to keep in mind.

    This can get extremely difficult especially for people who use tens and hundreds of website accounts with different passwords.

    To safeguard you from the stress, most browsers including Mozilla Firefox, Google Chrome and the others have features to help save your passwords for future use.

    While this feature may sound like a cool solution to the problem of having to handle and keep so many passwords, there are instances where your computer may crash or your browser may develop problems. How then do you get back all those passwords saved in your browser?

    One word that comes to mind in this instance is ‘Backup’! So how do you backup your passwords saved in Mozilla Firefox browser?

    If this is your query, then you are at the right place. This article seeks to teach you how to backup your firefox passwords.

    Before we go into details about how to backup your passwords in Mozilla firefox, let’s look at how to automatically save all passwords on your Mozilla Firefox browser.

    You can also read on How To Run Google Apps In Google Chrome

    How To Save Passwords On Your Mozilla Firefox

    To enable your Mozilla Firefox to save all your passwords in an automated fashion, you have to follow the steps below:

    1. Launch your Mozilla Firefox browser.
    2. Click on the ‘Menu button’ to open the menu list.
    3. Select ‘Logins and Passwords’.
    4. Click on the 3 dots on its right and click on options
    5. Mark ‘Ask to save logins and passwords for websites’ to enable the automatic password saving option.

    Backing Up Your Passwords

    To backup your Firefox passwords for future reference or in order to aid you to export your passwords to a new site is very simple.

    To do so, you must first install the Firefox Password exporter. The exporter is an add-on from the producers of the firefox browser. So if you are wondering how safe it is, the answer is 100%.

    After successfully downloading and installing the Add-on, you can then follow the steps below to backup your passwords.

    1. Restart your Firefox browser after the add-on installation.
    2. Click on tools.
    3. Click on security and select ‘Import/Export password’
    4. To export your passwords, check the box next to ‘encrypt usernames and passwords’ and click on ‘export’ passwords.
    5. Type the name you wish to save your passwords with and select the file type. Either XML or CSV file.
    6. Select the location for saving the file and click on save.

    Now, your backup file is ready as an encrypted file. You can either export it to a new computer or you keep it on a safe drive or location on your computer as a backup just in case your browser malfunctions.

    Conclusion

    Passwords can be very difficult to keep and remember. Even the four-digit codes to our mobile phones and ATM cards, we sometimes forget them. So when it comes to more complex passwords such as the ones we use on various websites, the stakes are high.

    For some good reasons, however, most current internet browsers come with password saving features. However, this is not entirely enough. Your computer could malfunction and your browser can do the same. What happens to your passwords and usernames when such happens?

    In this article, we talked about how to backup your Mozilla Firefox passwords for export. We also spoke about how to set up automatic password saving option on your Firefox browser.

    When backed-up properly and saved in a safe location, you can go to bed every day knowing that you don’t have to worry about keeping your passwords in mind.

    I hope this article was helpful to you and that you find it very interesting. Please do well to share with your friends and family.

    If you have any questions, reservations or comments regarding this article, kindly share them with us in the comment box.

  • 4 Apps That Support Self Destructing Messages

    4 Apps That Support Self Destructing Messages

    Chatting applications have multiplied over the years with numerous newbies joining the tonnes of already existing users, every single day.

    While chat and messaging apps have become an important part of our lives, there is one main thing that has been of major concern to most users.

    Security on the internet is one key thing that the internet infrastructure has not been able to guarantee 100 per cent of. As such, people keep finding ways of ensuring their safety and security online.

    This insecurity is also present in the chat or online messaging world. With what has now become known as ‘receipts’ or in common terms, screenshots pulling up here and there, the security of parties having chats on messaging apps has become an immense concern.

    You could send a message to someone, hoping it’s just between you two and the next thing you know is that the person has shared that information with the whole world via the power of social media.

    Also, kids and other minors may want to avoid people having access to confidential information on their phones, especially in their chat apps.

    With all these and many other instances taken into consideration, the concept of self-destructing messaging apps was introduced.

    Also, Checkout Some Apps On Your Partner’s Phone Which Shows They Are Tracking You.

    What Are Self-Destructing Messaging Apps?

    Self-destructing messaging apps are applications that automatically deletes messages from both the receiver and the sender’s devices upon the expiration of a certain pre-defined time by the sender. So, just like Whatsapp chats where you can delete messages from both devices after sending, in this case, you’ll time the message such that if the time elapses after the recipient had read the message, then it gets deleted on both devices.

    Apps That Support Self-Destructing Messages

    Now, let’s get into details of the various chatting apps that support self-destructing messages.

    Snapchat

    Snapchat is arguably the world’s leading photo and videos sharing app. Millions of people share various photos, texts and videos on this app that has brought about a social media craze over the years.

    For most Snapchat users, the main reason they spend their entire day on the app is that they could send photos and videos to people with the assurance that it’ll be deleted as soon as the recipient views them. This has been the prime reason for the introduction of the app and so users are always excited about it.

    It is only right therefore that Snapchat finds its way as the number one app on our list here.

    Wickr

    Wickr is one unique brand in the messaging industry. It comes with extra security features which make it difficult for any other person apart from the intended recipient to have access to the message sent by the sender.

    Wickr makes use of data encryption or cryptography to encrypt messages from the sender with 5 different security layers which make it impossible for any other person to have access to your message or for it to be forwarded to another contact.

    So wickr is the second app on this list of self-destructing messaging apps. Wickr is mostly used by secret agencies and other security forces in their works but can also be used by individuals as well.

    Bleep

    One of the finest seld-destructing messaging apps available on the internet today is Bleep. Bleep offers a wide range of login methods including mobile number, email and or incognito mode.

    Aside from the self-destruction and end-to-end encryption features available on Bleep, the platform also offers a feature called ‘Whisper’. When you Whisper a message to another person on Bleep, they cannot forward the message nor can they screenshot or do any other thing apart from reading and replying.

    Also, Bleep has an anonymous messaging feature which only shows the Initials of the sender to the recipient.

    Telegram

    Telegram is one of the most-used chat applications in the world currently. Aside from the fact that it enables users to send files, documents and applications unlike most other chat applications, Telegram also has a self-destructing feature.

    Messages sent to users on Telegram can be timed to self-destruct after the recipient has viewed the message.

    This function is available in the Secret Chat feature of Telegram.

    For more security, Telegram uses end-to-end encryption to prevent external bodies and applications from having access to messages sent between users on the platform.

    Conclusion

    Safety and privacy on the internet is one thing most people and security companies have advocated in favour of. Over the years, various people have raised concerns about the safety of data and messages on various chat platforms due to the intrusion of third parties.

    In this article, we looked at four chat applications which support self-destructing messages. These apps are responsible for preventing third-party involvement in chats.

    I hope you find this article interesting and that you would share with your friends and relatives.

    Please do share your comments, reservations and questions about this post in the comment box below or get in touch with us.

  • How To Use GBoard App To Scan Your Face And Create Your Personal Facebook Stickers

    How To Use GBoard App To Scan Your Face And Create Your Personal Facebook Stickers

    Expressing oneself during chats or in comment sections on various social media platforms has over the years improved and become less difficult.

    In the past, it was purely text and photos. There was nothing like Emojis. So one had to try so much to put out the right text to convey a message and the exact emotions they had at the time of putting out the text. This however changed when the emoji era came.

    People shared their emotions with various emojis here and there. It was easier to understand how people felt with emojis. It also made conversations more beautiful and colourful.

    And then came to the master move called stickers. Stickers became the biggest chat elements on social media when they were introduced. Barely could anyone read comments on social media without stickers? It has become a widespread element of the global chat culture. People of all races and genders use stickers now to express humour and other emotions on social media.

    However, Google’s Gboard keyboard has the icing for the global ‘Sticker cake’. With Gboard, anyone can create mini avatar stickers of themselves using their real face. It is very simple and can be customized as well.

    In this article, I shall teach you how to create your own Gboard avatar sticker from your smartphone – both android and IOS.

    But before we get into the steps involved, you first need to install the Google Gboard on your smartphone. For android users, you can get your Gboard for free here. If you are an IOS users, the Gboard keyboard is also available for free. Get it here.

    You can learn more about how to add, edit or customize android keyboards here.

    How To Create Your Personal Mini Avatar Sticker On Android

    1. Open any application which requires the use of Keyboard. So, it can be your normal text app or Whatsapp, Facebook messenger or any other app in that category. Select the emoji icon beside the Space bar on your Gboard Keyboard.
    2. Click on ‘Stickers’ and click on the Green Plus (+) sign on the right.
    3. Select ‘Create’
    4. Next, the face scanner will pop up on the screen. When asked to permit the scanner to access your camera, kindly grant the permission and fit your face into the space provided on your screen, using your front camera. Click on the camera icon to snap your face.
    5. The keyboard will automatically come up with a list of stickers based on the photo you took. To edit them, you can select any of them and start customizing. Otherwise, just press ‘Done’ on your screen to add them to your list of stickers.
    6. You can either start using your stickers by selecting the ‘my minis’ button on your stickers menu or you can customize each of them.

    How To Create Your Personal Mini Avatar Sticker On Your Iphone

    1. Open the Gboard app on your iPhone.
    2. Select the stickers link and click on ‘create’ from the ‘Browse’ tab.
    3. Next, the face scanner will pop up on the screen. When asked to permit the scanner to access your camera, kindly grant the permission and fit your face into the space provided on your screen, using your front camera. Click on the camera icon to snap your face.
    4. The keyboard will automatically come up with a list of stickers based on the photo you took. To edit them, you can select any of them and start customizing. Otherwise, just press ‘Done’ on your screen to add them to your list of stickers.
    5. You can either start using your stickers by selecting the ‘my minis’ button on your stickers menu or you can customize each of them.

    How To Customize Your Mini Stickers

    After successfully creating your Mini stickers with your Gboard keyboard, the next thing you want to do is to be able to customize it to fit your preference. Here, in this section of this article, I will take you through how to customize your mini stickers.

    1. Click on stickers in your Emoji list on your Gboard Keyboard.
    2. Click on My Minis
    3. There are a list of categories displayed. Click on ‘Customize’ beneath the category you wish to edit.
    4. You can then change the appearance of your mini sticker by changing the face shape, hair, hair colour, eye shape, eyebrow shape and size, nose shape, facial hair and colour, Facial marks, Glass frames and style, Shirt colour, Piercings and earring positions.

    Note: This app does not provide a perfect shape for your head, ears or nose so your sticker may not look exactly as you do. It is still worth the effort though since it still produces a near-perfect result.

    Conclusion

    Social media is interesting because people are able to share their opinions and views freely and it provides various perspectives on issues. This is more so because of the use of emojis and stickers to convey various emotions and expressions.

    What if you can further customize those stickers and emojis to look just like you? Yes, it’s possible with Google’s Gboard keyboard. And in this article, we took you through how to create your own sticker with this application as well as how to customize it further.

    I hope you found this article very interesting and helpful. If you have any questions, comments or reservations regarding this post, kindly leave them in the box below this post or contact us.

    We write because you read. And we appreciate your presence on this blog daily. Kindly share this article with people within your network.

  • Okay Google: How To Let Google Assistant Tell You A Story

    Okay Google: How To Let Google Assistant Tell You A Story

    Bedtime stories or normal stories for the road are always good for you and your kids or family. With Google Assistant’s new feature, your smartphone can now read a story to you.

    Google Assistant can now tell you a story via your smartphone. This is a new feature developed by Google in 2017 for google home devices and recently extended to smartphones in 2019.

    What this means is that Google Assistant now has the ability to read pre-written and curated stories by google to you and your kids on your request.

    These stories can either be funny bed-time stories or action-packed high-quality dramatic stories that spark various emotions as you listen.

    If you are a fun of story-time but wouldn’t love to do the reading by yourself, then Google Assistant’s all-new feature is here for you. Let your Google Assistant read some stories to you!

    This article is aimed at teaching you how to let your Google Assistant read or tell you a story.

    But, before we dive into the details of how to let Google Assistant read for you, let’s look briefly at what Google Assistant is and what other features it has.

    What is Google Assistant And What Features Does It Have?

    Google Assistant is an artificial intelligence software created by Google Incorporation to help users take care of daily tasks by communicating with their Google devices or devices running on the Android systems, using voice commands and voice controls.

    What this means is that if you have the Google Assistant on your device, you tend to become friends with that device. And you can communicate with your device using voice commands and your device would respond accordingly and perform the various tasks you assign to it.

    The Google Assistant enables users to set commands such as reminders, answer calls, make calls, play music, search for things online, play movies and many other actions using voice commands.

    Find Out How Your Google Assistant Can Help You Locate Songs Playing Around You

    How To Let Your Google Assistant Read For You

    To let your Google Assistant read for you, you must ensure that you have the Google Assistant feature installed on your smartphone. If you don’t have one yet, you can cop yours here for your android device.

    Then, after installing your Google Assistant on your phone safely, you need to install and update Google Play Books on the same phone. Without Google Play Books on your phone, this feature will not work. The Read A Story feature is connected with the Play Books app so without it, that feature cannot be used on your Google Assistant. You still don’t have the Play Books app yet? Get yours here.

    Now, you are ready to use the Google Assistant’s Tell Me A Story feature on your smartphone with ease.

    Just go ahead, open your Google Assistant application and say ‘Hey Google, tell me a story’ or ‘Okay Google; tell me a story’. Your new Artificial Intelligence buddy should start reading a story to you in a few seconds.

    Note: You can use the Google Assistant application on your IOS devices as well.

    Conclusion

    Sometimes, we feel we could go back to our childhood and have our parents read to us some bedtime stories while we snuggle in bed. Well, for various reasons, this only remains a thought or a want.

    But, Google Assistant has the magic to make that dream a reality for anyone reading this. You only need to install the Google Play Books and Google Assistant on your smartphone to turn your phone into that storytelling buddy you really wish for.

    In this article, we took you through what Google Assistant is, Its features and how you can let your Google Assistant tell you a story right from your smartphone.

    If you have any questions, comments or reservations regarding this article, kindly share them with us in the comment section below.

    Please, don’t forget to share this article with your friends and family. We write because you read and we live to write for your reading pleasure.

  • How To Update Your Windows 10 Laptop

    How To Update Your Windows 10 Laptop

    Whether you are a student using your laptop for studies or a business owner using it for carrying out transactions or just an everyday computer user, you need to keep your laptop in good shape all the time.

    One way to ensure that your laptop is in good standing is by ensuring that your software component is always up-to-date. For older versions of the Windows laptops, it is very easy for anyone to update their windows.

    However, this becomes a little bit difficult with Windows 10. Many people running the Windows 10 operating system on their laptops find it quite difficult to deal with windows update.

    In this article, we shall discuss simple and easy ways to update your windows 10 Laptop without so much hustle.

    Before we go into the details of setting up an update for your windows 10 laptop, let’s first look at the importance of Windows Updates.

    Importance Of Windows Updates

    Updating your windows helps to keep your laptop software component in good shape and form. This is further confirmed by the fact that whenever you update your windows, there is an increase in your laptop security system which includes Virus definition updates, firewall updates and other major security system checks.

    Also, updating your windows means fixing bugs that may previously form part of the original version of your windows. Most times, after software is developed, there are various gaps and loopholes within the software which causes glitches to the end-users. These glitches are fixed by means of updates so if you keep using the basic version of your windows 10 without these updates, you are very likely to be a victim of such glitches in the system.

    Finally, updating your windows regularly means you are connecting your laptop to the latest features available for all Windows computers and you can be able to run the latest software on your computer based on such updates.

    Read here about The Importance Of Upgrading To Windows 10

    How To Updates Your Windows 10 Laptop

    Now, let’s go into the details of setting up your windows 10 laptop update in order to keep your computer in good shape and ready to explore current software trends and computer usage.

    Manually Updating your window

    To manually update your Windows 10 laptop, kindly follow the steps below:

    1. Click on ‘start button’ from the bottom-left corner of your laptop screen.
    2. Search for and click on ‘settings’ (it usually appears as a gear icon)
    3. Scroll through the list on the next page and select ‘ Updates and security’ icon.
    4. On the next page, look on the left sidebar and select ‘Windows update’ from the list.
    5. Click on ‘Check for updates’ from the next list that appears on the right side.

    If there is any update available for your window, it should start downloading after the last step in the list above. However, if your computer is not compatible with the latest windows updates available, you’ll get a notification right on the same page after performing the last step in the list provided in this article. In the notification, you’ll be informed that your computer may not be compatible with the updates and that you will be notified when there is a version for your computer.

    How To Setup Automatic Updates For Your Windows 10 Laptop

    If you want your computer to automatically search for updates and deliver them to you whenever they are available, then you should follow the steps below:

    1. Click on ‘start button’ on the bottom-left corner of your Windows 10 desktop.
    2. Click on ‘settings’ in the list of programs which shows up next.
    3. Click on ‘Updates and security’ from the next page.
    4. Click on ‘Windows Update’
    5. On the next page, click on ‘Advanced Options’.
    6. On the advanced options page, select ‘Automatic’

    Conclusion

    When new windows such as Windows 10 are developed by the software team at Microsoft, they put the system through series of tests over several months to ensure that everything is working perfectly before they finally release it for the general public to use.

    However, efficiency is always less than 100% so there are usually some glitches in the system after it has been released. This is usually reported back to the software firm by users. The engineers then produce solutions for the various problems in what is called ‘updates’. So, if you fail to update your windows, you are missing out on new improvements which usually cover security, drivers, new features and others.

    So, in this article, we spoke about how to update your windows 10 laptop from the comfort of your home without the help of any other person.

    I hope that the steps listed and spoken about in this article were helpful to you in your quest to update your Windows 10 laptop.

    If you have any questions, comments or reservations regarding this article, kindly let us know in the comment box below. We shall respond to them as promptly as possible. You can also contact us for more enquiries.

    Kindly do well to share this article with friends and relatives who may also need it.

  • List Of Mobile Money Payment Processors For Your Ecommerce Business

    List Of Mobile Money Payment Processors For Your Ecommerce Business

    Businesses today have a better chance of making sales and gaining profit than at any other time in the past.

    This is especially because of the rapid growth of the eCommerce business and the voracious increase in online shopping interest.

    In between work breaks, people shop online today. Between sleeping time and waking up, people shop online today. And even while eating, people still shop online today. Meaning, the shopping experience has become more of an online thing that it is an offline thing.

    Therefore, any business seeking to make good returns and establish a firm brand amongst its customers and future ones must learn to operate both online and offline.

    And that raises the question of payment options. How do you get paid if you run an online business or an eCommerce site?

    For this question, the idea of this article was developed. So throughout the entirety of this article, I shall try to give you a list of reliable Mobile Money payment processors you can use for your eCommerce business here in Ghana.

    Hubtel

    Hubtel is arguably one of Ghana’s finest internet and payment service providers with over a decade of experience in the industry.

    With Hubtel, Ghanaian businesses operating eCommerce sites can receive mobile money payments from all available mobile money service providers in the country (MTN, Vodafone, Airteltigo). Hubtel also enables the vendor to receive debit and credit card payments through their online stores.

    To make the process easier for website owners, Hubtel has a WordPress plugin which can be installed on all Woocomerce WordPress sites.

    To find out more about Hubtel, kindly click here.

    Slydepay

    Slydepay is another trusted payment platform which enables business owners to process payments on their websites with ease.

    If you are an eCommerce business owner in Ghana seeking to receive payments via mobile money or any other online payment right on your website, then you should consider using Slydepay.

    Slydepay has an easy-to-install API which fits perfectly into most eCommerce websites and does not affect the beauty of your website design at all.

    This platform allows and processes payments from Vodafone Cash, MTN Mobile Money, Airteltigo cash and other E-payment systems known and accepted globally.

    With Slydepay, you only have to worry about driving buyers to your website. Slydepay will deal with your payment issues and you can rest in the comfort of your home, thinking of new products to add to your catalogue and how to drive more sales. Never would you worry about payment issues.

    Rave

    Another wonderful alternative for online payment processing in Ghana and the world over especially Africa is Rave. Rave comes with a wonderful set of tools and features which makes it one of the best choices any business owner can make is selecting an online payment processor.

    With Rave, you can receive and process payment from VISA cards, Debit Cards, Bank Accounts, Mobile Money accounts and other digital payment systems throughout the world.

    Rave also comes with an option for business owners to add their bank account details to their Rave accounts so they could receive payments directly into their bank accounts through Rave.

    If you own a wordpress Woocomerce site, you can install the Rave Plugin on your site to make your paymemt processing easier and less stressful by clicking here.

    For further information about how the Rave Payment Processor works, kindly check here.

    IpayGh

    Ipay is a one-stop payment processing application which deals with everything that has to do with payments for online businesses.

    With Ipay, you can process payments from customers and to suppliers right from your account and have access to other wonderful features such as sending invoices to your customers and keeping track of your sales records and expenses – all from one place.

    Ipay Gh makes selling and buying very easy for both businesses operating locally and those operating internationally. With payment methods such as Mobile Money, Debit and Credit card, Visa and Mastercard, you can process payments to and fro any account in or outside Ghana.

    Also, you don’t necessarily need to have a website before you could use Ipay. You can just create a payment link at no cost and start receiving payments for your products or services.

    Very interesting, right?

    For more information about IpayGh and how it works, click here.

    Paystack

    It is true what they say about icing on cakes. Paystack is to this list what icing is to cake.

    Paystack is an integrated payment system which operates both offline and online to ensure that business owners receive and process payments from their clients or customers with ease.

    Paystack covers different payment methods ranging from Mobile money, Visa Card, Debit Card, Credit Cards, Bank Transfer, Bank Account, USSD (shortcode), and POS systems.

    With this payment processor, you can receive one-time or recurring payments from your customers and keep track of your customers’ identity while at it. You can make and receive instant money transfers using this platform.

    What’s more, Paystack works all over Africa and is a trending brand in the payment industry.

    Find out more about Paystacks here.

    Conclusion

    As a business owner hoping to capitalize on all available opportunities to maximize gains and double your profit, it is important that you try to include eCommerce sites in your marketing plans.

    Majority of the world’s buying and selling happens online today and the market keeps growing every single day.

    As such, it is important that business owners create functional eCommerce sites with trustworthy and fully-functional payment processing systems to enable them to make sales and receive payments promptly online.

    This article focuses on four of the best online and mobile money payment processing systems available for Ghanaian eCommerce business owners to use for their day to day business activities.

    I am sure this article was helpful to you and that you will share with your friends and family as well.

    If you have any comments, reservations, questions or any other information, kindly leave them in the comment session below or contact us for more information.

  • Features Of The My Vodafone Ghana App

    Features Of The My Vodafone Ghana App

    Like many other telecommunication companies in Ghana, Vodafone, formerly known as Ghana Telecom or Onetouch has gathered for itself many customers in Ghana.

    With effective and cheap data packages, text packages, reduced call tariffs and unrivalled international call rates, Vodafone has maintained a strong bond with its users over the years.

    To further make the administration of the Vodafone Ghana sim cards easier for users, the company decided to launch the My Vodafone Ghana App just as has been done by some other Telcos in the past.

    In this article, we shall look at the features of the My Vodafone Ghana App and what you can use them for.

    If you are an existing Vodafone Ghana subscriber seeking an even more interesting way of enjoying your Vodafone experience, then this is for you. Also, if you are thinking of switching from another network to Vodafone, you should jump on the content of this article too as it tends to grow and polish your interest in Ghana’s finest Telecommunication network.

    Features Of The My Vodafone Ghana App

    Vodafone Cash Option

    The My Vodafone Ghana app has the Vodafonecash feature which enables users to check their Vodafone cash balance, transfer money to other people and also pay bills, buy airtime and perform other primary and secondary Vodafone cash transactions right from the app with very few clicks and selections.

    If you are a frequent user of Vodafone Cash, you know how annoying the shortcode method can be sometimes. The long wait for it to load sometimes and also how soon the timeout is in most cases.

    The App should solve these problems for you and make you more comfortable using your most-reliable electronic payment method.

    In-built Store Finder

    Locating a customer care office nearby is one thing that becomes usually difficult for most network users especially in times of urgent needs.

    It is okay to call the customer care line to chat with representatives regarding your problems but sometimes, you could further be directed to visit the nearest centre for your problem to be solved and this becomes a big problem for many people.

    To resolve this challenge, the My Vodafone Ghana app comes with an in-built store finder feature which enables the user to see in real-time the nearest Vodafone Offices in their locality and enable them to connect and book an appointment where need be.

    An Exciting Vodafone TV Feature

    How about some extra features to an already exciting Vodafone app? Sounds interesting right? The Vodafone Ghana app has just the right features to keep its users on the platform for so many hours.

    Aside from performing basic Vodafone Cash functionalities and purchasing data and other products from the Vodafone Ghana app, a user can also actually watch wonderful and educational content with the Vodafone TV feature on the Vodafone app platform. The Vodafone TV feature provides the user with contents such as the Vodafone Healthline experience and many others.

    You get to watch promotional contents about new and existing Vodafone offers and services as well! What’s more interesting than this?

    Offers And Extras

    If you are an existing Vodafone Ghana subscriber, then you already know that when it comes to juicy offers and packages, there is none other compared to Vodafone Ghana.

    The likes Of Deewa Offer, Vodafone red and many other wonderful offers are very competitive and user-friendly offers that have existed for a while to make the Vodafone experience an even better one compared to the other networks.

    As such, it is only right and beautiful that Vodafone includes the Offers and Extras feature in its app to give users an easy approach to accessing all their existing and future offers.

    Help And Support

    Once in a long or short while (depending on how you use your Simcard), you may be required to contact your service provider for some enquiries regarding certain issues.

    While this could be done by simply dialling the Vodafone Customer care line on your mobile phone, it sometimes gets laborious. In fact, not everyone likes to be typing numbers here and there.

    With the Vodafone app, there is a help and support option where users can easily get in touch with their service provider for help with just a single click.

    Truly, the Vodafone app gives the user a wonderful experience worth the time.

    Conclusion

    Owning a Vodafone sim card is in itself so much joy and pride. It doesn’t only come with that cheerful and colourful red look but it comes with a wide range of products and offers that always keep your smile broad and beautiful.

    But, administering your Simcard and accessing such products and offers can be particularly stressful especially for those using ‘Yam phones’.

    To make the Vodafone experience more interesting, Vodafone Ghana has launched the My Vodafone Ghana app to be used by customers for all transactions.

    This app can be used on almost all Smartphones – both android systems and IOS.

    In this article, we spoke about the features of this great app designed by Vodafone Ghana for its multitude of users. I hope you find this article appealing and helpful in your quest to enjoy the new Vodafone experience.

    Kindly do well to leave your comments, questions, remarks or reservations regarding this post in the comment box below.

    Please share with your friends and family as well, they may need it.