Items purchased from Jumia Ghana can be delivered via two alternative means. They can either be delivered via home/office address or picked up by the customers at any Jumia pickup store or shops close to them.
In this article, we shall take you through a list of jumia pickup stores across the nation, their locations and contact numbers.
Check the list below for the one closest to you, for your next jumia order.
ACCRA
There are for now at least 6 pickup stations in Accra and its vicinity.
Location : Cape Coast, Pioneer Road, University of Cape Coast Ghana Post office
Phone number: 055 009 1035
Sunyani
Sunyani Main Pick-Up Station
Location: Sunyani, Adjacent Ghana Revenue Authority, Post office Road
Phone number: 030 274 0630
Volta Region Pickup Station
Aflao – Happy Enterprise, near Vodafone Ghana office.
Contact information: 0554400005
Note: Each Jumia Pickup station comes with a specific price tag. So, the delivery price to Kumasi May be different from the price of delivery to Aflao. Your delivery cost would however be listed and displayed to you long before you make payment. So you’d be aware of what to pay. I hope this article was helpful to you.
Have you ever hit the buy now button on your Jumia app, only to realise that you may not need that item anymore or you may not be able to afford it anymore?
Have you asked yourself this question: How do I cancel an order from Jumia Ghana?
Well, if you answered positively, then this article is definitely a must-see and must-read for you. Sit down quietly and enjoy this painless session with me.
So, we shall look at three possible ways of cancelling an order on Jumia Ghana.
1. Filling Out The Jumia Order Cancelling Form
To use this option in cancelling an order, you need to login to your Jumia Ghana account either on the app or via your browser.
Go to your orders.
Select the order you wish to cancel
Navigate to “cancel order”
Fill in the dialogue boxes provided and state a tangible reason for the cancellation.
Submit your order cancellation form.
Patiently wait for feedback from the ever-working support team.
2. Call Customercare To Process Cancelation
The second option here is for you to give a call to the Jumia Customer care line, telling them why you wish to cancel your order.
Usually, getting in touch with Jumia Ghana via phone calls have become a bit tedious because of the large number of orders and their corresponding calls that they receive daily.
But for something as important as order cancellation, it’s still worth the try.
You may call Jumia Ghana’s customercare Via 0302740630.
◦ Call the number listed above
◦ Follow the prompts to be connected to an agent.
◦ Provide the agent with the order number, amount paid, transaction ID, ID cards for verification and date and time of order.
•
• If the item hasn’t left their warehouses, cancelation will be easy and fast
• If it is already on the way, the Agent will notify you of necessary action depending on whether the package will attract shipping fees or not.
3. Messaging them on Facebook or sending an email
It’s a social media age and we can’t disintegrate social media from a digital commerce brand like Jumia. As such, one of the ways one could cancel an order on Jumia is by chatting them up on Facebook or sending an email to their customer service.
2. Indicate your order number, your refund method, your transaction ID, your phone number, your invoice number and date and time of order in your mail.
3. Wait patiently for feedback from Customer service.
Note: As much as jumia may try to respond to your mail on time, remember that as many people as possible may have sent mails to them. Therefore, yours may either go down the list and get attended to later or you may be lucky to receive an instant response. Hopefully, you get your issue resolved and your order cancelled.
Not that it may take up to a week or more for order to be cancelled and refunds made. The actual time frame will be communicated to you by customer care.
Every blessed day, thousands of dollars are being made online thanks to the internet. Influencers and online gurus always show off the possibilities available when operating a dotcom business. Due to that, most people are eager to also make some cash online but don’t have the money to invest for quick returns. With the increase in demand for simple work at home jobs, many scams and get quick rich schemes have evolved online.
In some cases, people might have some cash that can aid them to quick start an online business, but because of the increasing number of frauds, they fear to do so. Each day, people search for the term how to make money online without paying anything. These keywords are always popular, most especially among the Ghanaian searchers.
A lot of Ghanaians want to make money online without investing. In one of our previous posts, we talked about how to make money online as a newbie in ghana. In that article, we listed about three most active ways to make money online.
Some of these ways of making money discuss in that article require some prior investment which has become a barrier to many. We get many of replies from people around who are still looking to make money online without paying anything and thus the focus of today’s post. There hundred plus ways to make money online without paying anything, but in this post, we have limited to a few.
Content Writing
If you are good at writing, or you have the skills to draft a selling ad copy that can compel prospective customers to take action on whatsoever is being offered on the chosen market, then you can make some decent amount of money online.
Today businesses and individuals are looking for the best copywriters for their agency. These companies will pay you to draft a business letter, proposal or a winning ads copy for them. As a content writer, you can get your talent and writing skills known to the general market by creating and listing your job on your own personal blog or through a blog contribution.
Having a copywriting skill, you don’t need to invest/spend anything before you can make money online. All you need is exposure and getting the right forum to showcase your writing skills for the world to see.
Writing and Selling ebooks
Most people make thousands of revenue from their published ebooks. With the amazon kindle publishing platform, one doesn’t need to pay a penny to get his or her books to the market. As a kindle publisher, you only need to get the book to adhere to the kindle platform terms of usage and then you are good to go.
Once you write your book, you can submit it to the amazon kindle platform for your target audience to buy. You don’t need much for the promotion of the book once it’s accepted on the kindle platform. Here you just have to make sure the ebook help to solve what it intended to.
Writing an ebook is not all that difficult. You only need some small guide on some of the elements of great and best-selling books on amazon kindle. These can be found on the YouTube platform which is free of charge.
Start a free YouTube Channel
YouTube platform as i always says today is the leading video sharing platform in the world. It is a hub for video creators and consumers. With the coming into been of the YT platform, a lot of opportunities have been created.
YouTube has helped many to gain financial freedom using their God gifted talents. Today, video creators are living a six-figure income life with their Channel proceeds. But it’s sad to know that a lot of people do not know how the platform works.
Many people especially in ghana and some of the African countries think YouTube is just for watching Movies and listing to video clips. Little do they know that they can make money on the platform with less effort. On the YouTube platform, you can create a free channel and then start to create videos on anything you have passion for.
It’s simple and easy to create a channel on the YT platform. You’ll only need a Gmail account to have your channel set up. Once you have the channel, you can start to upload the videos of your choice. These videos will get you some decent amount of passive income in the long run. There are many ways through which one can make money on YT. This we’ll discuss in our subsequent articles.
Take online survey
Don’t have writing skills? No problem!. There is an option for you. You can take some simple tasks online which does not need any spending. You only need a smartphone/laptop with internet connectivity for you to start taking the surveys. Companies and businesses will pay you to give feedback on their products. Agencies need to know what’s new in their field of operations and for that matter, they are looking for individuals to answer or feed them with the new information in the market. Taking an online survey will not make you rich, but it will be more than enough to make a few bucks online.
Become a Business Affiliate
Most businesses today need customers and they are willing to pay you to bring these customers to purchase their products. As an affiliate, your job is to drive traffic to those business products and have the customers purchase the products.
There are two levels of an affiliate as per my stands, local affiliate, and international affiliate. If you don’t want to spend a dime online, then you ought to start the local affiliate since that’s the simple and ad-free way of making money online today.
With the local affiliate, you’ll need to figure out which product is in high demand in your locality and also find out where you can easily get those products to make them easily accessible by the general public within your community. In this case, you can either strike a deal with the producer/bulk seller of such a product, or you’ll have to add a profit margin to the product once it gets to the general public.
I used to do this type of affiliate during my undergrad studies and still doing the same to date. Here, I help people to easily get what they are in need of for a commission. Most People from my local community don’t know much about online businesses, so whenever they need to purchase something online, they depend on me.
As a business-oriented person, and someone whose goal is to make a profit from his online business, I always charge them an extra amount for that. In most cases, I do negotiate with the producer/seller of that product for a price reduction. So in the end, I end up getting some profit from the deal without extra cost to the third party.
You can also do the same. Most online shops in ghana have affiliate offers. You can signup with them and begin promoting their products for a commission. Jumia Ghana today is the leading online shops and the good thing is that they have this affiliate program that anyone can signup for a commission. I have a friend who is making hundreds of cedis from the Jumia affiliate.
Screenshot for Two of My Recent Sales
I’ve been making some cash from this kind of business and still affiliate marketing continues to be among my primary sources of income online. We shall discuss in detail how to start an affiliate marketing business in ghana in our coming articles. Make sure to bookmark this page and also like and follow mfidie.com on all the social media platforms so that you’ll not miss this article when it’s published.
In a fully technological world, paperwork has drastically decreased and most people prefer to do things digitally now.
As such, vital documents such as contracts have evolved to becoming electronic files. PDFs and .docx files are now very common than at any time in the lifetime of the world. However, most people are confronted with the problem of signing documents electronically.
In this article, we shall take you through three trusted and tested ways of signing documents digitally without the use of a light pen.
Sign On A Plain Paper And Insert Into The Document
To sign a document using this method, you need to have a black pen and a white piece of paper or any paper which matches the background colour of the document.
So let’s quickly move through the steps involved.
Sign on the piece of paper with your black pen. (make your signature legible and clean)
Take a photo of your signature via your phone or digital camera.
Send the photo to your computer and save it in a location you can recall.
Open the document you wish to sign and click on the space where you wish to sign (Make sure your cursor is present at the location)
Click on insert tab in the document windows and select picture.
Select the location of your image and click open.
Select your location and click ok.
Resize your image to fit the space provided for your signature.
Save your document.
Use Paint Application To Sign
The other way of signing your document digitally is by using the paint application. Though this one is a bit tricky, everything is done digitally and you don’t need so many devices to be able to complete this one.
So let’s go through the steps involved in this:
Open the paint application on your computer
Select pencil in the brushes column.
With your mouse on a smooth surface, start writing your signature on the canvas given you.
You can use the eraser to clean the portions you’ll like to edit.
When you’re certain of what you’ve done, launch the “snipping tool” on your computer.
Using your mouse, resize the snipping tool to cover the exact image you wish to use as your signature.
Click on save as and choose the location where you wish to save.
Open the document you wish to sign and repeat step (e) to (I) in the previous method.
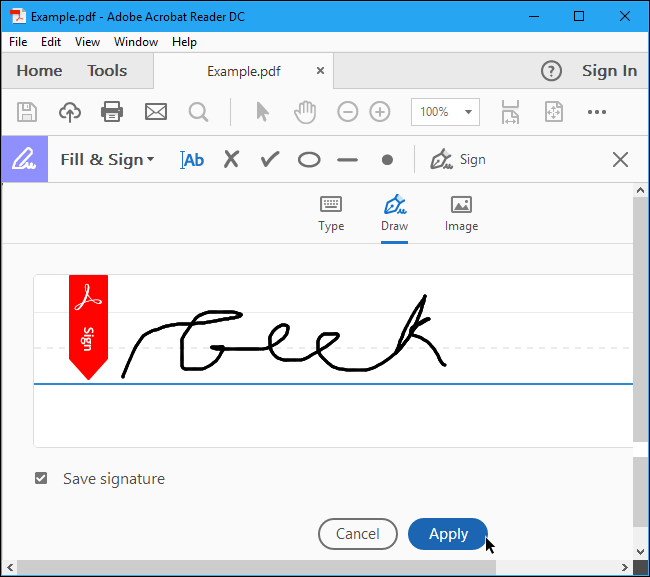
Using Adobe Acrobat Reader
Our final method for signing a document digitally without so much stress is by using Acrobat Reader.
The Acrobat reader works as an editing tool for PDF files. To use this app for adding a signature to a document, follow the steps below:
Open the PDF file in Adobe Acrobat Reader.
Click on Fill & sign in the tools pane on the right side.
Select sign and select “add signature”
You’ll see a Popup on your screen. You’ll be provided with three options which are: Type, draw and image. Select either Type or Draw.
Click “apply” when you’re done. Drag the signature and position it at the right location where you wish to sign.
Conclusion
Choose the method which best suits you. One of them should at least work for you. Enjoy your new found way of signing your documents digitally.
One of the most annoying moments anyone can endure is when your phone or laptop wouldn’t connect to the internet, in the middle of something important.
You’re probably watching your favorite movie online or probably watching a live stream or perhaps, checking out some new sites. Then, all of a sudden, your phone won’t connect to the internet. Or better still, it comes on but with a lot of lagging.
The obvious question is: What do I do now To restore my connection?
1. Check your data balance
One thing you don’t want to overlook when your phone is lagging behind, is the volume of data bundle you have left.
In most cases, once your data bundle is near finished, you’ll begin to feel your internet speed reducing.
To check your data, simply dial *124# across all networks.
2. Perform A Bandwidth Test
You want to be sure if truly your internet access has slowed down completely or not. So the next thing to do after checking your internet bundle is for you to do a bandwidth test which tests the upload and download speed of your network. This enables you to determine if there’s a more serious problem with your device, the website you tried visiting or if it’s just a network issue. You can perform a bandwidth test on Fast.com, testmy.net and speedtest.net.
3. Turn Off Your Data Or Wifi
If after checking your data balance and internet speed , you’re sure that you have enough data and so should not be having issues with your internet, the next thing you should do is to turn off your data or wifi.
Turn it off for a minute or two and turn it back on again.
Usually, if your problem is as a result of prolonged use of the network, everything should begin to work fine from here.
4. Restart Your Device Completely
If after trying all the above three steps, your internet still crawls like a tortoise, you should consider warm-booting your device.
If you’re using a laptop or your mobile phone, you should consider restarting at this point.
Some devices begin to misbehave once they’ve had a certain hour of use cycle without break. And this tends to affect the internet activities of the phone as well.
So, restarting the phones re-establishes a new connection with your network, which should be the solution you’ve yearned for.
Note: If all the above don’t work for you, you should consider replacing your router, or change your sim card and if possible, give a call to your Internet Service provider, seeking their help. They should be in position to relieve you of the agony associated with this.
Facebook has become a leading social platform connecting friends and family on the world wide web. With the introduction of this social media platform, a lot of opportunities and businesses have been created. Most people use the platform to find business partners and also socialize with new friends.
When you take a look at how life was before Facebook, you’ll realize that this platform has really come to stay. Each day, hundreds of accounts are created on the Facebook platform. But its unfortunate most of these newly created accounts either get deactivated, blocked or deleted by the Facebook Bot due to one or more issues.
It sometimes hurt to see an account with thousands of friends and followers being deleted accidentally by the user or the FB bot. When that happens, most people lost hope because they don’t know how to get these accounts back.
If your account has been deleted from Facebook for some reason and you are looking for a way to recover it back, then this article will be of help to you. In today’s post, we are going to see How to Recover deleted Facebook Account. This is possible if the account deletion still falls within the time range set for every account retrieval.
Every deleted account has a time limit within which the account can still be recovered. A Facebook account that has been deleted either by the account owner or Facebook has a period of 30 days to be recovered otherwise the account will be gone forever.
Facebook stores all the Account Deletion Requests for a limited period of time so that one can easily retrieve it in case he wants to do so. To retrieve a deleted account, you:
First, have to visit facebook.com and then enter your Facebook login details in the Facebook sign in box
Now click on the login button to access your Facebook account.
Once you enter the right login credentials, (your ID & Password is accepted), you’ll get a prompt with options to choose from:
Cancel Deletion
Confirm Deletion
Source: quora.com
Since your goal is to retrieve the account, you click on the first option (Cancel Deletion).
Here you may be asked to further prove your identity, by either Identifying your friends based on their images, provide the date of birth, name or answer other security questions. These depend on the level of security available at the time of retrieval of the FB account process.
Once you are able to pass through all the account recovering requirements and the account deletion is not more than 30days, your account will be retrieved in a few minutes and from there you can start using your Facebook account.
After a successful recovering of the account and is ready for use, all your Facebook posts, images, and videos will also be recovered with no changes.
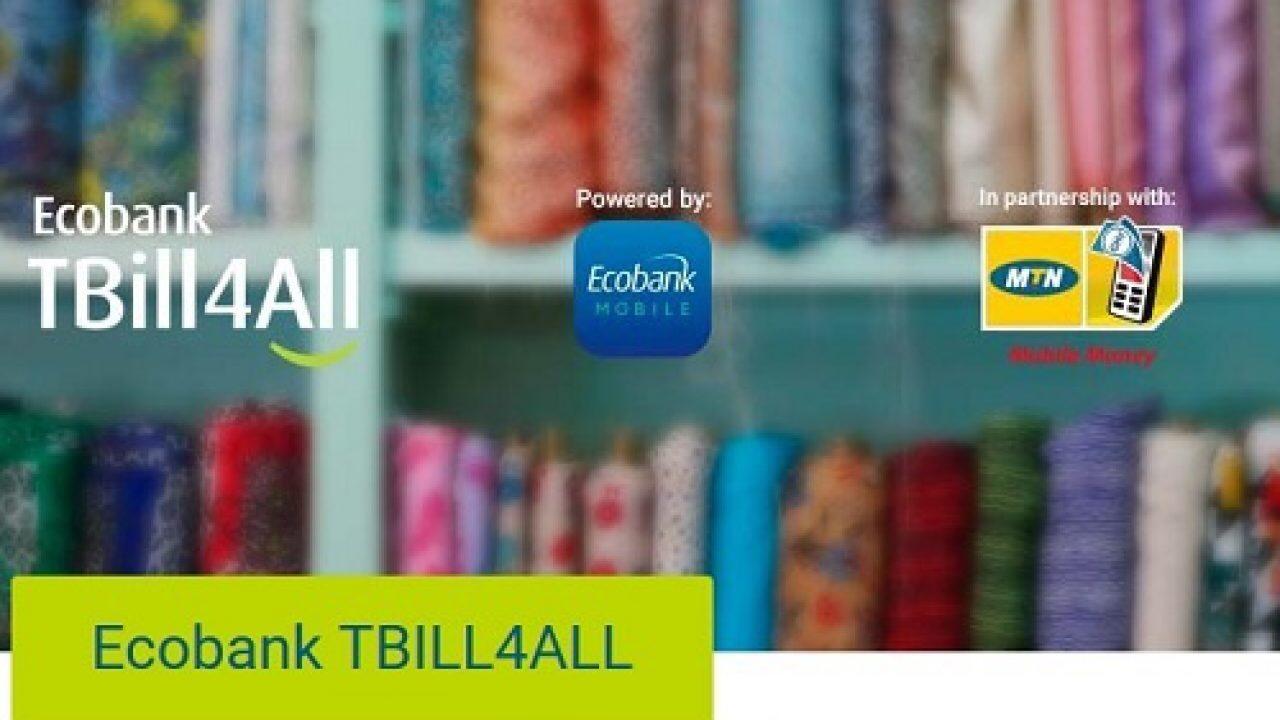
MTN mobile money has made purchasing of treasury bill a lot easier and more convenient for all.
Under the financial services option of the MTN Mobile money portal, one could see Treasury Bills listed among other services.
To access this service on your phone, follow the following steps:
How to Register for a Treasury Bill Account with MTN Mobile Money
Dial *170#
Press 5 for financial services
Select 4 for pensions and investment
Select 2 for treasury bills
Select 1 to register
Enter your full name and send
Enter your next of Kin’s name
Enter your next of Kin’s phone number
How to buy Treasury Bill with MTN Mobile Money
The steps below work only if you have already registered for a treasury bill. To buy a Treasury Bill in Ghana directly from your Mobile Money, follow these steps:
Dial *770#
Enter option 2 for Tbill4all
Follow the next set of prompts to finish up your purchasing
NOTE: From as low as 5 Ghana cedis, you can purchase a treasury bill. It’s completely affordable and very easy too.
The Tbill4all service is a collaboration between Ecobank and MTN Mobile Money. However, one does not need to have an account with Ecobank to access this feature as everything is hosted on the MTN mobile money platform.
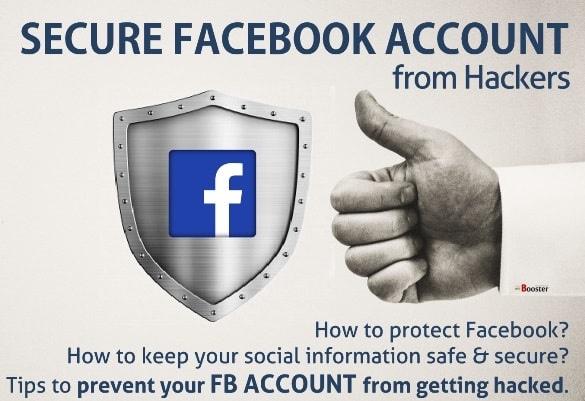
Safety on the Internet is now a top priority for most users following the thousands of hack cases reported lately.
One of the key areas of concern to internet users is how to secure their Facebook accounts from the prying eyes of Hackers who fancy using other people’s accounts for fraudulent activities.
In this article, we shall look at ways of ensuring the safety of your Facebook account.
Use Super Strong Password
One of the first things you should do to secure your Facebook account is for you to use a very strong password.
There goes the question: What is a strong password?
A strong password should include the following features:
Contain at least one uppercase letter
Contain at least one special character (@,/,(,),£,&)
Contain at least 8 characters in total
Contain at least one number
Again, your password should be something people can’t guess easily. That’s to say, the following may be bad ideas for a password:
Your phone number
Your date of birth
Your first name
Your surname
Any other password easy to be guessed
Enabling Second Factor Authentication
Second Factor Authentication also is known as 2 Factor Authentication or 2FA is a security system used by websites and applications to ensure that users provide at least 2 evidence of ownership before they are allowed access to their accounts.
Usually, the 2FA includes entering your password and then dialling a unique code you receive through email or text message or via a call.
So virtually, if you have 2FA enabled on your Facebook account, you, first of all, get to type your email and password as has always been the case when you’re trying to login.
But, after successfully entering your password, you’ll have to choose another means of authentication which is either email or text message. Depending on the method you choose, you receive a one-time code which you have to enter to access your account.
Setup A List Of Friends To Contact When You Are Locked Out Of Your Account
Facebook knows that there may be times when you’re genuinely locked out of your account so their team developed a way of dealing with that situation.
You can set up a list of trusted friends whom you’ll like Facebook to contact when you’re genuinely locked out of your account. You need at least 3 trusted friends’ account to be able to set this up.
Remember that this could be a little bit tricky. So only add people you can truly trust and be sure to remember their names.
Whenever all your entry trials fail, you’ll have to fall on these people for access to your account.
So, here is how to set it up:
Locate and click on settings and privacy on your Facebook app
Click on settings
Click on Security and Login
At the extreme top of the next window, you shall see “Add trusted friends. Click on that
Click on add friends.
Enter the names of your friends and add them.
Click on done
Enter your password to confirm.
Your security feature for trusted friends is set and ready to be used.
NB: You are responsible for choosing someone to be added on this list. Failure to think through it may go against you as anyone you add on this list possesses some amount of power over your account.
Second Factor Authentication also is known as 2 Factor Authentication or 2FA is a security system used by websites and applications to ensure that users provide at least 2 evidence of ownership before they are allowed access to their accounts.
To set up two-factor authentication on your account, go through the following processes:
1. Go to settings and privacy on your Facebook app or Facebook webpage.
2. Select Settings
3. Locate Security And Login under the security heading.
4. Click on it
5. Under Two-Factor Authentication, click on “Use Two-Factor Authentication”.
6. Click on Turn on
7. Select Your Preferred Method (Mobile Phone or Email.)
8. Write your mobile number and confirm.
9. Dial the code sent to your phone for confirmation
10. You’ll be required to enter your current password for confirmation.
11. Your 2FA is setup.
Note: Setting up 2FA requires some level of precision. Be sure to select a method more appropriate to you. Select a method you’re sure of getting regular access to. If you chose text message as your verification method, be sure that the number you used will always be available. Because anytime you have to log in, you’ll need that number for verification.