Author: Gabriel Agbobli

  • How To Watch Movies Together With Your Friends On Facebook Messenger

    How To Watch Movies Together With Your Friends On Facebook Messenger

    Did you know you can watch movies together with your friends on Facebook Messenger? I guess not. Anyways don’t worry because I am going to show you exactly how to watch movies together with your friends on Facebook Messenger.

    Mostly, we have a movie we would like to watch with our friends who don’t live closer to us. Also, the size of some of these movies does not permit us to send them over to our friends who live away from us.

    Even for those who live closer to each other, this coronavirus pandemic has become a barrier for allowing our friends over to our house. As a result, the only way possible is to watch it together with our friends online.

    To make this streaming more fun and have real-life reactions, we are going to use Facebook Messenger’s Watch Together feature.

    What Is Facebook Messenger Watch Together

    Facebook Messenger Watch Together is a new feature introduced by Facebook to make streaming movies together with your friends easier and fun. With this feature, you can see your friend (s) reactions as you watch the movie together.

    According to Facebook, they created “Watch Together to make spending quality time with friends and loved ones feel as close to an in-person experience as possible. Whether it’s watching a trending video, a movie, a sports, highlight, a makeup tutorial, or a Facebook Watch original, the feature allows you to watch your friends’ reactions at the same time.”

    How To Watch Movies Together With Your Friends On Facebook Messenger

    Just as the name suggests, before you begin the entire process, you need to have Facebook Messenger installed on your device. You can download it for free from the Google Play Store or the Apple App Store.

    Once you are done with the installation, follow the procedure below:

    Open the Facebook Messenger App

    After opening the Facebook Messenger app, select the person or group chat you would like to watch the movie with. In case you want to invite friends also, you can tap on Create Room and invite your friends over to join.

    Tap on the “Phone” or “Video” icon next to the name of the individual or the group.

    Because you are going to stream the movie together with your friends, you need to call them on “Phone” or “Video”. The best recommendation is by making a video call instead of a voice call.

    Drag the toolbar up for more options.

    As soon as your friend (s) accept the call, you need to drag the toolbar up for more options. This is where you will find all the options you need for the Watch Together.

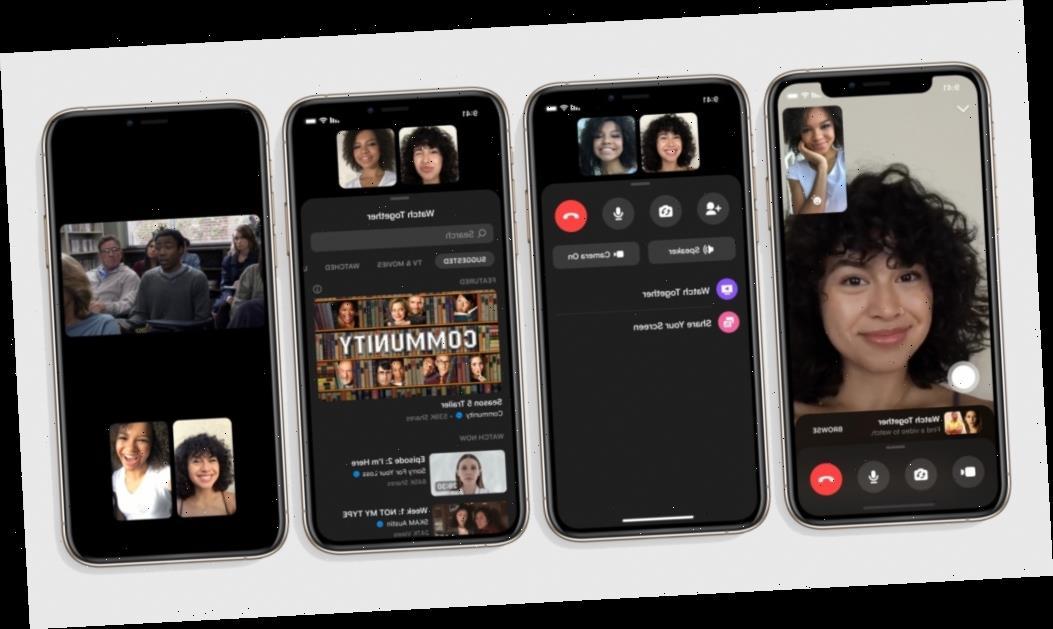
    Select “Watch Together” from the options available.

    From the list of options that will pop up after dragging the toolbar, select Watch Together to start watching the movie together.

    Select your preferred movie from the Suggested list.

    Facebook automatically suggests movies for you to watch with your friends; these movies can be found in the Suggested list. Scroll through and select the one that you would like to watch with your friends and loved ones.

    • When you are watching the movie, the movie is synced to all the contacts, and pausing it at your end will pause it for all the people in the Watch Together. Likewise, stopping the movie will stop it for everyone.
    • For those in a video call, you can see the members in the Watch Together and the movie you are watching together.

    When you tap on the video, a Search icon and the option to close the video will pop up on top of the screen. If you wish to change the movie, you can do so with the search bar.

    Additionally, persons with phones that support Picture-in-Picture, you can leave the Messenger app and still watch the movie with your friends.

    Conclusion

    Facebook Messenger Watch Together is the perfect way to watch movies together with your friends over the internet with little data charges. Because the streaming is done over the internet, you need to have a stable network to make the streaming smooth, i.e. no buffering.

    This guide was written in the simplest way possible to make reading easier and understandable for everyone. That being said, in case you find any difficulty following the procedure, make sure to write it down in the comments section below.

    Do you have any method that was not talked about in this article, feel free to share it in the comments section below?

  • 5 Signs That There Is A Spy App On Your Phone

    5 Signs That There Is A Spy App On Your Phone

    Did you know someone can spy on your mobile phone without you noticing it? I am going to show you in this article, 5 signs that there is a spy app on your mobile phone.

    I know people still don’t believe that someone can spy on your mobile phone without you noticing. Well, that can be true or not but as the saying goes, it’s better to be safe than sorry.

    Spy apps were created in the beginning to help persons track their friends and relatives; mostly children and older parents or relatives. But, as technology advanced and people started using technology negatively, spy apps became something else.

    Now, spy apps are used by people to monitor what is happening on the phone of someone. This includes text messages, emails, bank statements, and some personal information that are meant to be kept secret.

    Because of that, it’s better to follow these five signs and perform an inspection on your mobile device to know if there is a chance that someone is spying on your phone.

    5 Signs That There Is A Spy App On Your Phone

    NOTE: Having these signs does not guarantee that there’s a spy app on your phone but it increases that chances that there might be one.

    Increase In Data Usage

    One thing that we seem to give a blind eye to is data usage on our mobile phones. These settings wouldn’t have been placed on the mobile phone if it was not important.

    Data Usage gives you analytics of how your mobile data has been used over a specified period of time and which apps used such amounts of data. Thus, you need to check the data usage for each of the apps you see on your mobile device.

    In case you see an app you have never used before but has used an amount of data on your phone, you need to delete that app as soon as possible. Most of these apps are a replica of original apps, so if you see two apps with the same name, delete all of them.

    Also, perform gradual analysis on your data usage in the frequency you will be cool with; weekly, monthly, or daily. This is because spy apps upload your information onto a server and this involves the use of data.

    Is someone spying on my phone?

    Phone Gets Hot Even When Not In Use

    When you use your phone while charging it or play games with your phone, they get “hot” that is totally normal. But if you observe that your phone gets hot often when they are not in use, then it could mean your phone is being spied on.

    This is also because spy apps run continuously without stopping and this makes your phone battery hotter than usual. First of all, check if your battery is functioning properly before you make your conclusions.

    Battery Drain Quickly

    Spy apps as said earlier, run constantly and this involves using your phone’s battery. Because of that, they drain your battery quickly and rapidly.

    If you see that your battery is lasting very shorter than what it used to be, then it could be a red flag that someone is spying on your phone. Here also, you can check your phone’s battery usage to see if there’s an app that is consuming a higher percentage of your battery.

    Most importantly, check if your battery is functioning properly before you decide on what to do next. For those whose phones allow you to check the battery’s strength, check if the strength is high enough before you conclude that you are being spied on.

    Phone’s Screen Comes On Without You Touching It

    Normally, when your phone is on standby mode, the screen is supposed to go off, except for those that still display the clock and other widgets. Even for those phones, the screen is supposed to fade out.

    When you notice that your phone’s screen automatically comes on even without touching it or getting any alert that is also another red flag. Meaning your phone could be spied on by an unknown person.

    Due to the continuous activities of the spy app, there is always a chance that the screen will automatically turn on, even without you touching it.

    Unknown Screenshots And Recordings

    Finally, when you find unknown screenshots and recordings on your phone, it could also mean your phone is being spied on. Most of the spy apps make screenshots and upload them into their online server, this could include your personal information and chats.

    As a preventive measure, always check the screenshot folder for unknown screenshots and recordings and remove them as soon as possible from your device.

    Conclusion

    We have learned some 5 signs that there is a spy app on your phone. All the steps were listed together with what you could also do to prevent your phone from being spied on.

    Although these methods are not 100% accurate, it is better to perform these checks on your phone gradually than to sit idle and wait for something to happen before you take an initiative.

  • How To Permanently Delete Facebook Messages

    How To Permanently Delete Facebook Messages

    Do you want to permanently delete some Facebook messages? Don’t worry, I have you covered on that. In this article, I am going to show you step by step on how to delete Facebook messages.

    There are times that we really need to delete some unwanted and old Facebook messages. Some of these messages are either spam or messages that are out of date.

    The entire process of deleting messages on Facebook permanently is very easy and straightforward. The only requirement needed is an active internet connection and the rest of the process is listed below.

    How To Permanently Delete Facebook Messages

    There are three (3) main methods of permanently deleting Facebook messages. The method you use will depend on the device you are using; Android, iOS or Windows.

    Either ways, you can use the method used for permanently deleting messages on the web to delete it on your Android or iOS device.

    How To Permanently Delete Facebook Messages On Web

    This method is mainly used for deleting messages on computers and devices that does not support the installation of Facebook and Facebook messenger. With this method, the entire process of deleting the message is done on the web.

    To permanently delete Facebook messages on the web:

    • Visit the official Facebook website (www.facebook.com).
    • Log in to your Facebook account with your email/phone and password.
    • Click on the messaging icon and wait for a list of all your recent messages to pop up. At the end of the list, you will find the option to “See all in Messenger”, click on it and wait for all the messages to load in the window.
    • Scroll down and search for the intended conversation or message you would like to delete.
    • If you want to delete an entire conversation, select the conversation and click on the gear icon next to it and look for the “Delete” option.
    • Otherwise, select the conversation and click on the menu icon (the three dots) to delete that particular message.

    How To Permanently Delete Facebook Messages On Android Devices

    There are two ways of permanently deleting messages on your Android device; by using the web and by using Facebook Messenger.

    How To Permanently Delete Facebook Messages On Android Devices Using The Web

    This method follows the same procedure as “How To Permanently Delete Facebook Messages” stated above. Therefore, if you intend on using this method to delete messages on your Android device, follow the steps listed above.

    How To Permanently Delete Facebook Messages On Android Devices Using Facebook Messenger

    • Download the Facebook Messenger app from the Google Play Store. Once it has been installed, launch it.
    • Scroll through the conversations and choose the one you wish to delete. Once you find the conversation you would like to delete, tap and hold and then select on the delete option.
    • If you wish you delete a message in a conversation, open the conversation, scroll through the messages then tap and hold the message you would like to delete.
    • Similar to WhatsApp, if you mistakenly send a message to someone, you can quickly delete it for everyone; i.e. you and the receiver.

    How To Permanently Delete Facebook Messages On Your iOS Device

    Permanently deleting messages on iOS device is very similar to that of Android devices. Before you begin, you need Facebook Messenger.

    • Download the Facebook Messenger app from the Google Play Store. Once it has been installed, launch it.
    • Tap on the home button.
    • Scroll through the conversations and select the one you wish to delete.
    • To delete an entire conversation, swipe left over the conversation and tap on Delete > Delete Conversation.
    • To delete a message, open the conversation > tap and hold the message > tap on more and then select “Remove.”

    Conclusion

    In this article, I have taken my time to explain all the methods involved in permanently deleting Facebook messages and after reading this article carefully, you should be able to do it.

    But, in case you find any difficulty, feel free to write it down in the comments section below and I will attend to you as soon as possible.

  • How to send Confidential Email

    How to send Confidential Email

    Are you afraid of sending your sensitive information or sensitive document via email? Do you have a second thought of what if the wrong person receives the email with your sensitive information? Worry no more, I have a way that can help you.

    Sending your sensitive information or document through email is one of the risky things you could do on the internet; especially, now that there are hackers everywhere.

    Sensitive information could range from your social security number, Taxpayer Identification Number (TIN), or even your bank statements. There are many circumstances that could make you send your sensitive information via email.

    In this article, I am going to show you three (3) main ways you how to send a confidential email in order to minimize the risk of your sensitive information getting hacked or used for something bad.

    What is Confidential Email?

    A confidential email (also known as encrypted email) is an email that has been encrypted or contains restrictions on how the email can be used or viewed.

    In most cases, the encryption is in the form of a password or a question, and it can be opened once the receiver knows the answer to that question.

    There are several ways you can send a confidential email. But this article is going to cover three (3) of the most trusted and verified methods.

    How to Send a Confidential Email via Gmail

    Almost everyone who has an email probably has a Gmail account; and as a result, I decided to bring how to send a confidential email via Gmail first on my list. Gmail is used by over a billion people around the world and is also one of the most hacked email platforms.

    With the Gmail confidentiality mode, you can send messages and attachments with the assurance that your sensitive information is protected from unauthorized access.

    To send a confidential email via Gmail:

    • On your computer, visit Gmail.
    • Click on Compose.
    • Click on Turn on confidential mode. (This can be found in the bottom right of the Gmail compose window).
    • Set an expiration date and passcode for your confidential email. (This setting will impact both the message text and any attachments attached to the email).
    • Click on Save and then Send.

    NOTE: If you choose “NO SMS passcode”, recipients using the Gmail app will be able to open the email directly. Recipients without Gmail will be emailed a passcode to the confidential email.

    If you choose “SMS passcode”, recipients will be texted the passcode to the confidential email via SMS on their mobile phone number (make sure to enter the valid phone number of the recipient). This will apply to both Gmail and non-Gmail users.

    Once you send a confidential email through Gmail, the recipient will be restricted from the permission to forward, copy, print, and download the email or the attachments. Also, due to the expiration date added, the recipient will not be able to access the email once the expiration date is due.

    How to Send a Confidential Email via Outlook mail

    Sending confidential emails via Outlook mail is very simple and straightforward. The steps involved in this are:

    • Open Outlook on your computer.
    • From your draft email message, click File and then Properties.
    • Select Sensitivity from the list and then select Settings.
    • From the Settings menu, select Confidential after that select Close.
    • When you’re done composing your message, select Send.

    The sending of confidential email via Outlook mail is not that much protected as Gmail and I will advise you to try the other alternative methods.

    How to Send a Confidential Email via ProtonMail

    Were you wondering if we have an email platform called ProtonMail? That’s not the case, ProtonMail is not an email platform but rather a third-party app used for sending a confidential email.

    To send confidential email using ProtonMail,

    • Download the ProtonMail app on your Android or iOS device.
    • After installation, open the app, and select your preferred subscription package (free or paid).
    • In your ProtonMail app, open a new draft.
    • Input the recipient’s email address and the message or attachments you want to send.
    • Tap on Encrypt for Outside button below the subject of the email.
    • Set a password for your email and confirm it by re-typing it.
    • Add a hint to the password or call the recipient and give the password to him/her. (It’s advisable to make the hint a question whose answer will be the password, and that only the recipient will be able to answer that).
    • Click on Apply and check to see a green checkmark next to the lock icon.
    • Tap on send.

    Please note that your email sent through ProtonMail has a 28-day validity period.

    Conclusion

    Now that you have learned how to send a confidential email, feel free to try it as often as you can to minimize the risk of your sensitive information being hacked.

    Also, make sure to confirm the details of your recipient and always make sure to type the correct mobile phone number of the recipient when using Gmail because a wrong phone number could cost you a fortune.

  • How to turn off iPhone Activation Lock without access to the previous owner

    How to turn off iPhone Activation Lock without access to the previous owner

    One of the most difficult things that could happen to you is turning off an Activation Lock on an iPhone without the previous owner.

    When you buy a new or old iPhone, one of the significant things you need to check is whether or not there is an Activation Lock on it. Though the process can be very difficult, I am going to show you some ways you can turn off Activation Lock on an iPhone without access to the previous owner.

    When you reset your iPhone without signing out of your iCloud account, Activation Lock might still be available on the device. To remove this feature you need to have access to the user, but in this article, I am going to show how to do it on your own.

    What is Activation Lock?

    Activation Lock is a security feature that is designed on Apple devices (iPhone, iPad, iPod touch, Apple Watch, and Mac) to keep them secured once they get lost or stolen.

    If Activation Lock is turned on, it will display a message to the user that the device is for you and that he/she should call you on your mobile number. To turn on Activation Lock, you need to open my device (iPhone, iPad, iPod touch, Apple Watch, and Mac) and mark it as lost or stolen.

    How to turn off iPhone Activation Lock without access to the previous owner

    Many methods are available for turning off Activation Lock without access to the owner. But, I am going to show you some of the best ways to go about it.

    • The DNS method uses a loophole in the WiFi DNS and tricks the iPhone into thinking that it has been unlocked. To begin this, you first of all need to factory reset the iPhone and then follow the steps listed below:
    • Set up the iPhone as a new device until you reach the WiFi settings page.
    • Once you reach the WiFi settings page, connect to a WiFi, and then tap on the “i” icon next to the name of the WiFi.
    • Tap on Configure DNS ad turns off the Automatic option.
    • Choose the Manual option at the top and then type one of the following DNS values (depending on where you are located):
      • North America: 104.154.51.7
      • South America: 35.199.88.219
      • Europe: 104.155.28.90
      • Australia and Oceania: 35.189.47.23
      • Asia: 104.155.220.58
      • Elsewhere: 78.100.17.60
    • After you are done entering the DNS values (IP), tap the WiFi button, and reconnect to the WiFi network normally.

    By using DNS bypass

    DNS bypass on iPhone usually works on older versions of iPhones but, if you have the latest version, you can still give it a try. After all, there’s no harm in trying to turn off Activation Lock on your iPhone.

    By using a third-party software

    Apart from the first method, you can also turn off Activation Lock using third-party software. The only thing about these third-party apps is that you may need to jailbreak your iPhone.

    I did a lot of research online and found one of the best software that can help you do this. The name of the software is Tenorshare 4MeKey. The reason why I selected this particular software is that it has all the features that can be used to turn off the Activation Lock and more.

    To use Tenorshare 4MeKey to turn off Activation Lock without access to the previous owner,

    • Download the free Tenorshare 4MeKey on your Windows PC or Mac.
    • Click the Start button, read and accept all the terms and conditions. After, click on Next.
    • The next page will require that you jailbreak the iPhone.
    • For Mac users, the jailbreaking will be downloaded and Tenorshare 4MeKey will jailbreak the iPhone for you.
    • For Windows users, Tenorshare 4MeKey will give a tutorial on how to jailbreak the iPhone yourself.
    • Upon successful completion of the jailbreak, click on Next and your iPhone details will be shown.
    • Check and confirm the details and then click on Start Remove.
    • The removal process will commence and the Activation Lock will be removed from the iPhone.

    By visiting an Apple Shop

    When you buy a refurbished iPhone though rare, there’s a chance that there might be an Activation Lock on it. In situations like that, you can take the documents that show that you bought the iPhone from the Apple shop and submit it together with the iPhone to the shop.

    If the documents you submitted are genuine, they might end up giving you a new iPhone or the Activation Lock will be removed for you.

    Conclusion

    Activation Lock removal can be very difficult but once you follow the methods that I have shown in this article, it shouldn’t be a big problem.

    I hope this article was helpful? If you have any method that you think might work very well, please write it down in the comments section below and it will be added to our subsequent write-ups.

  • How to send cryptocurrency without creating a crypto account

    How to send cryptocurrency without creating a crypto account

    Do you want to send bitcoin and other cryptocurrencies without creating any cryptocurrency account?

    I’m sure you are here because you are interested and I am going to show you how to send cryptocurrencies without creating any cryptocurrency account.

    Cryptocurrencies are one of the most used digital currencies in the world. The most common among them are bitcoin, bitcoin cash and ethereum. The reason why they are used is because of the anonymity.

    This means that once you make a cryptocurrency transaction the location and name of the sender and the receiver cannot be traced. This has made it easier for a lot of people to make secured transactions online.

    Usually, before you can send cryptocurrency, you need to create a crypto account and then make a deposit using your credit or debit card or other payment methods. I was doing research online and found out a method that can be used to make crypto transactions without creating a crypto account.

    How to send cryptocurrency without creating a crypto account

    To send cryptocurrency without creating any crypto account:

    • Download the free Moolre mobile app from the Google Play Store or the Apple App Store, or visit the official Moolre website.
    • Once the app has finished its installation, create an account if it’s your first time or logs into your account with your email, password, and the four-digit passcode if you are an existing subscriber.
    • Click on the Pay Out option. Enter the required details. The required details are:

    The cryptocurrency address of the receiver.

    The amount you want to transfer to the receiver (Pay Out amount).

    The fees for the transaction will automatically be added for you to have a look before proceeding with the transaction.

    • Confirm your Pay-Out and tap on Submit to make the transaction.
    • Wait a while for all the confirmations to be made before you contact the person to check whether the transaction has been successful.
    Some of the most popular cryptocurrency coins

    How to deposit/top up your Moolre wallet

    Now that you know how to send cryptocurrency on Moolre, the next thing to learn is how to deposit money into your account before you make the transaction.

    To deposit or top up your Moolre wallet, you need to follow the steps that are listed below.

    • Open your Moolre mobile app or visit the official Moolre website.
    • Scroll through the options and tap on Top Up Wallet.
    • Select your preferred payment method. The available payment methods are Moolre, Bitcoin, AirtelTigo Money, Litecoin, MTN Mobile Money, Ethereum, Vodafone Cash, Bitcoin Cash, and Dashcoin. After that tap on Continue.
    • On the next window, visit your payment methods platform and make the payment to the mobile money number, agent ID, or crypto address provided.
    • Once you have made the transaction on your payment method’s platform, go back to Moolre and enter the transaction ID and the exact amount you transferred.
    • Finally, tap on Continue and wait for the transaction to reflect in your Moolre wallet.

    Conclusion

    I hope this article was helpful and that it served its purpose.

    Feel free to write your comments and suggestions in the comment section below and make sure to share with your friends and loved ones.

  • How to transfer your contacts from Android to iPhone

    How to transfer your contacts from Android to iPhone

    Do you want to transfer your contacts from your Android device to an iPhone? Read on and find out how you can transfer contacts from Android to iPhone.

    Whenever we buy a new or additional phone, the first thing we are concerned about is how to get the contacts on the other phone. In the olden days when technology was at its minimum before you can do that you needed to re-save the entire contacts on your phone.

    That is not a situation anymore due to technological advancement and upgrades. Now, there are many ways you can transfer contacts from one phone to the other, no matter the type of phone you’re using.

    Mostly, there’s a narration that Android and iOS devices do not interact with each other easily due to the completion that has been established between these two brands. Actually, that is not true to some limits because they interact on certain occasions.

    How to transfer contacts from Android to iPhone

    There are several methods we can use to transfer contacts from Android to iPhone. But, in this article, we are going to look at just a few of the trusted and most effective methods.

    How to transfer contacts from Android to iPhone Using Google Sync

    This is one of the easiest and probably one of the most used methods. To use this method, you need to sync your contacts to your Google account first and then continue with the remaining steps listed below.

    • Open your iPhone (if locked) and open the Settings app.
    • Tap on Passwords and Accounts and enter your Gmail account details and make sure to turn on the Contacts checker.

    That’s all, you are done with transferring contacts from Android to iPhone using Google Sync. The contacts will be automatically updated on your contact list.

    How to transfer contacts from Android to iPhone using the Move to iOS mobile app

    The Move to iOS app is one of the few Apple apps that is made available to Android users on the Google Play Store. The other Apple apps that are available on the Google Play Store are the Beats and Apple Music apps.

    Move to iOS can move contacts, messages, photos, videos, bookmarks, email accounts, etc. from your Android device directly to any iOS device.

    To transfer contacts using this method, you simply need to open the app on your Android device and when are ready, the iOS device will create a WiFi network and find your Android gadget.

    Enter the security code that is attached to the network and the transfer process will begin.

    How to transfer contacts from Android to iPhone using the SIM card

    The most popular method of transferring contacts is by using the SIM card. With this method, you just need to copy the contacts from your Android device to the SIM card and then insert the SIM into the iPhone.

    A brief breakdown of the entire process is as follows:

    • On your Android device, open the Contacts app and then locate the Settings option.
    • From the Settings menu, tap on Import/Export and then Export to SIM card. All the contacts on your Android device will be exported to the SIM card; after that insert the SIM into the iPhone.
    • Turn on your iPhone and open the Settings app.
    • Tap on Contacts and then Import SIM Contacts.

    Your contacts will then be updated and added to the contact lists on your iPhone.

    How to transfer contacts from Android to iPhone using VCF file

    The last method on my list today is by using the VCF file. The entire process is very easy and could be done in less than 2 minutes if done properly.

    • On your Android device, open the Contacts app.
    • Tap on the three dots to open the Settings and then select Import/Export.
    • Choose Export to Storage and a VCF file will be created and saved on your Android device.
    • Send the file over to your iPhone. (The best way is by sending it through email or maybe WhatsApp).
    • Open the file on your iPhone once the transfer is completed and a prompt will be shown asking you to Add All Contacts.
    • Reply to all the subsequent commands and then your contacts will be successfully added on your iPhone.

    Conclusion

    Wrapping up, one of the most interesting things about these methods listed in this article is the fact that they are all easy and most importantly free.

    There’s no fixed number of times you can transfer contacts from your Android device to your iPhone, you can do it for as many times as you want. Therefore, browse through all the methods and select the one that fits you best.

    Kindly share with your friends and loved ones and also write your comments in the comment section below.

  • Camera apps you can use for Android phones for better photo quality

    Camera apps you can use for Android phones for better photo quality

    Due to the increased number of photographs that are taken each day, getting the right camera for your phone is always important. But, what will you do if you are not able to meet some of the requirements you want from your phone?

    The answer to that question is by using camera apps that are available on the Google Play Store for all Android devices. This article is going to show you some of the recommended camera apps you can use for Android phones for better photo quality.

    Camera and photo quality are some of the main features that phone manufacturers focus on every year when making upgrades. But are they able to achieve exactly that? The answer is NO!

    Most of the time they are not able to meet exactly the demands of the user and this is when camera apps come in to enhance the quality of your photos. Some of these camera apps have unique features that are not available on the phone’s original camera.

    Camera apps you can use for Android phones for better photo quality

    A Better Camera

    A Better Camera just like all the camera apps on my list today is a free camera app that is available for download on the Google Play Store. The name of the app, A Better Camera suggests something strong to you and that’s exactly what it does.

    Some of the features of this app support HDR images, multi-shot modes, night mode, video recording, and more interestingly, a 360-degree panorama. Also, there are some extra features such as object removal that remove objects from your photo.

    Camera MX

    One of the oldest camera apps on the Google Play Store is Camera MX and though it is old, it is regularly updated by its developers. This makes it even more fun and good to use for your photos on your Android phone.

    The app has several features; some of which include several shooting modes, and also the ability to create your GIF. Camera MX also has a built-in photo editor that can be used to perform some basic photo editing.

    Google Camera

    Just as the name suggests, this app is an official product of Google Inc. and is the one that is usually found on most Google devices. Google Camera is a “small boy danger” because it has small but powerful features that stand out from the other apps.

    Some of these features include a lens blur mode, slow motion (depending on your device), photospheres, etc. Considering the manufacturer of the app and the feature it has, this app is worth trying.

    Camera 360

    We can never talk about camera apps without talking about Camera 360. The app is known in recent times as a sticker creation camera app with no significant features but that is not the case. It has some cool features.

    Apart from the stickers that it is highly associated with, Camera 360 also has different shot modes, posterior, tilt-shift-blurs, and a list of others. Also, the selfie camera has some pretty cool and nice features as well; especially the skin tone ambiance.

    Snap Camera HDR

    The last camera app on my list today is Snap Camera HDR. This app is perfect for persons who want close to nothing top-notch quality photos. Especially, professional and amateur photographers who use mobile phones for their activities.

    Snap Camera HDR supports 4K video recording, manual camera contents, RAW support, HDR, and some file size options. You can also switch between fun shooting modes, colour effects, borders, etc.

    Conclusion

    Please take your time, read through the different apps recommended in this article, and choose the one you think fits your preference. In case you are confused about what to choose, you can download more than one app and try out both to see the best one.

    Although these apps are free, to enjoy more advanced settings you need to upgrade to the pro versions for a fee (monthly or annually depending on the app).

    Do you know of any other camera apps you can use for Android phones for better photo quality? Feel free to write it down in the comments section below and I will add it to my subsequent articles.

  • How to wipe or reset your iPhone

    How to wipe or reset your iPhone

    Are you planning on selling your iPhone or gifting it to someone? Or are you finding some problems on your iPhone and thinking of wiping or resetting your iPhone? No problem hang on I am going to show you some of the best ways to wipe or reset an iPhone.

     Before you can sell your iPhone to someone, you need to remove all your files and accounts from the iPhone. You cannot sell your iPhone to someone and leave your files and your iCloud accounts on the device.

    In order to do this, you will have to wipe or reset your iPhone and all the settings, files, and iCloud accounts on the device will be removed and restored to factory settings.

    Also, there might be times that you may be having some problems on your iPhone and the solution will be to wipe or reset your iPhone. This method has been used by several people who confirm that it works perfectly.

    How to Back Up your iPhone

    To wipe or reset your iPhone, you first of all need to back up the files and data on your iPhone to the Cloud. This will help you reinstall these documents once you log into a new iPhone or the old one.

    • Open the Settings app on your iPhone.
    • Tap on your name (first option in the Settings window).
    • From the list of options available, select iCloud.
    • Scroll down and tap on iCloud Backup and enable the feature.
    • If you need it urgently, tap on Back Up Now for the iPhone to back up immediately (you need to connect to a WiFi).
    • Additionally, look under the Back Up Now option to find out the last backup date and time.

    How to wipe or reset your iPhone

    There are several ways of wiping your iPhone but I am going to talk about only three (3) of the safest methods.

    How to wipe or reset your iPhone directly using Settings on your iPhone

    • Open the Settings app.
    • Scroll down and tap on General.
    • Swipe to the button of the window and tap on Reset.
    • From the different options displayed, select Erase All Content and Settings.
    • If you have an iCloud backup set up on your iPhone, you will be asked to update it to avoid loss of data. But since we have already done that, we just need to decline the update option.
    • If you have a passcode on your iPhone, you will be asked to enter it and after that tap on Erase iPhone.
    • Enter your Apple ID’s password to confirm your command.
    • After that, all the data, settings, and anything on the iPhone will be totally wiped and you’ll be sent back to the fresh iPhone setup screen.

    How to wipe or reset your iPhone using iTunes

    To wipe your iPhone using iTunes, you need to install iTunes on your PC and then follow the steps listed below.

    • Go to Settings on your iPhone and turn off the Find My iPhone option.
    • Open iTunes on your PC and connect the iPhone to the PC using the original Apple USB cable.
    • Trust the computer on your iPhone and then select your iPhone on the computer.
    • Click on Summary from the options on the screen.
    • Select Restore iPhone and wait for the wiping to complete successfully.

    The effects will be successfully applied on your iPhone.

    How to wipe or reset your iPhone using third-party apps on your PC

    The final method of resetting your iPhone is by the use of third-party applications that are available on the internet. Each application has its own way of resetting your iPhone.

    To find some of these apps, search for “Third-Party Apps that can be used for resetting iPhones” on Google or any search engine. Read through each of the recommended apps and select the one that fits you best.

    Install the app on your PC and follow the instructions laid down by the developers of the app to successfully reset your iPhone.  Please note that most of the apps will involve the use of iPhone USB cables.

    I highly recommend that you use the first two methods stated earlier.

    Conclusion

    Once you have finished reading this article carefully, you should be able to reset your iPhone all on your own without spending money at the repairer’s shop.

    In case you find any difficulty or you have a suggestion, make sure to write it down in the comments section below.

  • How to block text messages (SMS) on your iPhone

    How to block text messages (SMS) on your iPhone

    Do you want to block someone from sending you messages on your iPhone? Have you been receiving spam messages from an unknown person and you have thought of blocking that person?

    In this technology age, some spammers usually send unnecessary messages to unknown numbers all the time. Some of these messages come from unsubscribed mobile network offers while others come from individual spammers.

    A list of spam messages

    Sometimes, we may end up deleting messages from spammers thinking that it will never come again but in the end, they end up coming back again. Therefore to prevent any future unwanted messages, you need to block the sender.

    Most of the time, iPhone users find it very difficult to block text messages (SMS) on their iPhones due to the slight difference between how to block messages in iPhones and Android phones. Blocking text messages (SMS) on iPhones is a lot easy than we think.

    To help you block text messages on your iPhone, I have decided to write this article and guide you on how to block text messages (SMS) on your iPhone.

    NOTE: Once you block text messages (SMS) from a certain number, it will also block regular calls and FaceTime calls.

    How to block text messages (SMS) on your iPhone

    Due to the availability of different iOS versions, blocking a text message on iOS 12, iOS 13, and iOS 14 are slightly different from each other. So, I am going to show you how to block text messages on iOS 12, iOS 13, and iOS 14.

    How to block text messages (SMS) on your iPhone with iOS 12

    • Open the Messages app on your iPhone.
    • Tap on a message from the person/number you want to block.
    • Tap on the name of the sender at the top on the screen.
    • Tap the info (“i”) icon.
    • Tap on the arrow to the right of the phone number/name of the contact.
    • Scroll to the bottom and choose Block this Caller.

    How to block text messages (SMS) on your iPhone with iOS 13

    • Open the Messages app on your iPhone.
    • Tap the Contact icon just above the number at the top.
    • Select info below the name of the contact.
    • Tap the arrow to the right of the number.
    • Scroll to the button and tap on Block this caller.

    How to block text messages (SMS) on your iPhone with iOS 14

    • Open the Messages app on your iPhone.
    • Tap the Contact icon just above the number at the top.
    • Select info below the name of the contact.
    • Tap on info again.
    • Scroll to the button and tap on Block this caller.

    How to manage blocked contacts on iOS 12

    • Open the Settings app.
    • Scroll down and tap on Messages.
    • Scroll down again and tap on Blocked.
    • A list of all the blocked contacts will be shown.
    • To remove someone from the blocked list, tap on Edit in the top right corner and click on the red minus sign in front of that particular number.
    • After that click on Unblock and then Done.

    How to manage blocked contacts on iOS 13 and iOS 14

    • Open the Settings app on your iPhone.
    • Swipe down and tap on Phone.
    • Swipe down again and choose Blocked Contacts.
    • A list with all blocked contacts (both SMS and call) will be shown.
    • To remove someone from the blocked list, tap on Edit in the top right corner and click on the red minus sign in front of that particular number.
    • After that click on Unblock and then Done.

    Conclusion

    In this article, I have shown you how to block text messages (SMS) on iOS 12, iOS 13, and iOS 14. Also, I showed you how to manage blocked contacts on all the IOS versions stated above.

    Blocking text messages (SMS) as I said earlier is very easy and fast. So, now that you have read this article make sure to understand it very well and do not hesitate to block unwanted contacts from texting you via SMS.

    Make sure to share this article and also feel free to write your comments and suggestions in the comment section below.