Category: Guides

  • How to Bookmark a tweet

    How to Bookmark a tweet

    If you are like many people, you use Twitter to stay up-to-date on the latest news, find out what people are talking about, and join in on conversations. But with the ever-growing stream of tweets, it can be hard to keep track of all the interesting conversations and content that you come across. That’s why it’s helpful to know how to bookmark a tweet so you can revisit it later.

    Bookmarking a tweet is a great way to keep track of important or interesting tweets you’ve seen. It makes it easy to refer back to a specific tweet later without having to search through your timeline. Bookmarking is an incredibly useful feature on Twitter and one that more people should be taking advantage of.

    How to bookmark tweets on a web browser

    1. Open Twitter in a web browser and then find the tweet you want to share.
    2. Click the Share button at the bottom right of the tweet.
    3. In the pop-up menu, click “Add Tweet to Bookmarks.”
    4. To find your bookmarks, tap the bookmarks icon on the page.
    5. To remove a tweet from your bookmarks, tap the Share icon and then in the dropdown menu, tap “Remove Tweet from Bookmarks.”

    How to Bookmark a tweet on an iPhone app

    1. Launch Twitter app on your iPhone.
    2. Tap on a tweet you want to save. This opens the tweet in a new window.
    3. Select the “Share” button. On an iPhone, it appears like an upside-down bracket with an arrow pointing upward.
    4. To add a tweet to your bookmarks, tap “Add Tweet to Bookmarks.”
    5. Your saved tweets will be accessible via Twitter’s mobile and web browser versions.
    6. To access your bookmarked tweets, tap on your profile image which is mostly located at the upper left corner of the app.
    7. Cick the “Bookmarks” tab. It’s located in the left-hand menu bar.
    8. To remove a tweet from your bookmarks, just tap on it, click the “Share” button, and then select “Remove Tweet from Bookmarks.”

    How to Bookmark a tweet on an android device app

    1. Open the twitter app on your android device.
    2. Select a tweet you want to bookmark by tapping on it. This opens the tweet in a new window.
    3. Tap on the “Share” button. It looks like three circles that are joined by a V-shaped line.
    4. To add a tweet to your bookmarks, choose “Add Tweet to Bookmarks.”
    5. Go to the “Bookmark” tab to review or remove your bookmarked tweets.

    How boomarking a tweet can be useful

    1. Bookmarking tweets can be a great way to keep track of important information, such as breaking news, helpful tips and advice, or other valuable resources.
    2. Bookmarking helps you organize your Twitter feed in an efficient manner. You can group tweets based on topics, helping you quickly find the tweet you are looking for.
    3. Bookmarking tweets can also be a great way to store reference material for later use. This could include research, industry news, and more.
    4. Bookmarking tweets that have already been shared can help you re-engage with users who might have missed the original post.
    5. Bookmarking makes it easy to share content with friends and colleagues who might find it useful.

    Bookmarks and Lists: Are they the same?

    Bookmarks saves tweets you select to the “Bookmark” tab. Twitter Lists are collections of tweets from other accounts organized by group, topic, or interest, and they are searchable. So Bookmarks and Lists on twitter are not the same.

    Can you Bookmark a twitter space?

    Yes, if you’re hosting or speaking on a Twitter space, you can use Bookmarks to arrange and queue up your Tweets or future shares.

    Conclusion

    Bookmarking tweets can be a great way to save content that you find interesting or valuable. Bookmarking is simple and easy, and requires only a few clicks of your mouse. Once the tweet is bookmarked, you will be able to access it from your profile page anytime.

  • How to make a public profile on snapchat

    How to make a public profile on snapchat

    If you are looking to increase your visibility on the popular social media platform Snapchat, setting up a public profile is a great way to do so. Whether you’re a business looking to expand your reach or an individual looking to share content with a larger audience, a public profile is an effective tool for getting your message out there.

    Snapchat is a social media platform that allows users to interact and share photos and videos with their followers. One of the features on Snapchat is the ability to create a public profile.

    What is Snapchat public profile?

    Snapchat public profile is a great way to showcase your Snapchat content to the world. It is a way for users to share their stories, photos, and videos with people who are not in their friends list or followers list. It allows you to make your profile public and create a dedicated page for your Snaps and Stories.

    Once your profile is set to public, anyone can follow your profile and view all of your Snaps and Stories. You can also add links to your other social media profiles, as well as a bio that describes who you are and what you do. With a Public Profile, you can connect with new followers and grow your Snapchat audience.

    Is Snapchat public profile worth it?

    Creating a public profile on Snapchat can be a great way to increase your visibility and reach more potential customers. As one of the most popular social media platforms, Snapchat offers a powerful platform for promoting your brand and engaging with your target audience.

    A public profile on Snapchat allows you to share content publicly, making it easier for potential customers to find and engage with you. Through a public profile, you can create engaging posts, such as stories and images, as well as interact with followers by responding to comments. Additionally, you can use the platform’s ads feature to reach even more people.

    Snapchat also offers several tools that can help businesses track performance and insights. Through the app’s analytics tool, you can measure the reach of your content, engagement rate, and more. This information can help you understand how well your content is performing and where to focus your efforts.

    Overall, creating a public profile on Snapchat can be an effective way to build your brand and reach more potential customers. By taking advantage of the platform’s features, you can create content that resonates with your target audience and track performance to maximize your results.

    How to make a public profile on Snapchat

    1. Start the Snapchat app and tap your account icon at the top left.
    2. In the Public Profile section, tap Create Public Profile.
    3. You’ll see a page describing public profiles. Tap Continue (or swipe to the next page), then Get Started.
    4. In the pop-up, tap Create.
    5. That’s it. You now have a public profile.

    How to edit a public profile on Snapchat

    After you create a public profile, you can add or modify your bio, set a location, and show or hide your subscriber account. You can also save stories to your profile and more. Here is how to do that:

    1. In the Snapchat app, tap your account icon at the top left.
    2. In the Public Profile section, tap My Public Profile.
    3. Tap the Settings icon (shaped like a gear) at the top right.
    4. On the Manage Public Profile page, you can edit your profile, save stories to your profile and delete your profile.

    Edit your profile

    Tap Edit Profile to change your profile picture, add or edit a bio, and set your location. If you want to make your subscriber count public, swipe the button to the right.

    Save stories to your profile

    You can save Snaps to your public profile so anyone will be able to find them. Tap Save a Story to your Profile and select the Snaps you want to make public.

    Share your profile

    Tap Share Profile and then, in the pop-up, tap Share Profile URL to copy the Snapcode to the clipboard. You can then share that code in other apps or services.

    Delete your public profile

    You can stop using a public profile at any time. Tap Delete Public Profile at the bottom of the screen. This will not affect your usual Snapchat account.

    Conclusion

    Creating a public profile on Snapchat is easy, and it can be a great way to connect with more people. All you need to do is follow the steps outlined above, and you’ll be able to make your profile visible to others. It’s a great way to expand your network and open up more opportunities for yourself. You should also take some time to make sure your profile is interesting, so that people will want to follow you.

  • How to remove drywall anchors

    How to remove drywall anchors

    Drywall anchors provide a strong and stable hold that can be used for hanging anything from heavy shelving units to wall art. Drywall anchors are relatively easy to install, but it is important to know how to remove them properly.

    If you have ever tried to hang something on a wall and had it come crashing down, you know how annoying it can be. One way to avoid this is to use drywall anchors to hold the item securely in place. But when you’re ready to remove the anchor, it’s important to do it the right way to avoid damaging the wall.

    What are drywall anchors?

    Drywall anchors are an essential tool for securing items to a drywall surface. They come in a variety of shapes and sizes, but all provide a secure fit in the drywall, allowing you to hang heavier objects without damaging the wall. Drywall anchors are typically made of plastic, nylon, or metal and require a screw to be inserted into them to secure the object.

    Removing drywall anchors is a common task when carrying out home repair and renovation projects. Whether you need to remove an old anchor that is no longer being used or are simply replacing it with a new one, knowing how to safely and effectively remove a drywall anchor can save you time and energy.

    Some tips for removing drywall anchors

    Removing drywall anchors is a common task when carrying out home repair and renovation projects. Whether you need to remove an old anchor that is no longer being used or are simply replacing it with a new one, knowing how to safely and effectively remove a drywall anchor can save you time and energy. Here are some tips for removing drywall anchors:

    1. Start by using a utility knife or other sharp object to cut the drywall anchor’s head away from the wall. This will help ensure that you don’t damage the drywall while removing the anchor.
    2. Use a pair of pliers to grip the anchor’s body and twist it back and forth until it comes out of the wall. Be sure to wear protective gloves when doing this as the edges of the anchor can be sharp.
    3. Once the anchor is free from the wall, use a putty knife or other flat tool to scrape away any remaining adhesive or residue left behind.
    4. Finally, inspect the area around the removed anchor for any damage that may have occurred during the removal process. If needed, fill in any holes or dents with joint compound or spackling before painting over them.

    How to remove a drywall anchor

    Removing drywall anchors can seem like an intimidating task, but it doesn’t have to be. With the right tools and a little patience, you can easily remove drywall anchors from your walls. First, you’ll need to get the right tools for the job. You’ll need a drill, screwdriver, hammer, and pry bar. Once you have these tools ready, you can begin the process of removing your drywall anchors.

    Gather the right tools

    Before you start to remove a drywall anchor, make sure you have the right tools for the job. You’ll need a small flat-head screwdriver, a drill with a Phillips-head bit, and a pair of needle-nose pliers.

    Locate the anchor

    Once you’ve gathered your tools, locate the anchor in the wall. The anchor will be hidden under the drywall and is typically about an inch in diameter.

    Remove the anchor

    With your flat-head screwdriver, pry up the anchor from the drywall. If the anchor doesn’t come out easily, you may need to use your drill to remove it. Drill into the center of the anchor and then use your needle-nose pliers to pull it out.

    Clean up

    Once the anchor has been removed, use a putty knife or other tool to smooth out any remaining debris in the hole. Then, fill in the hole with spackle or joint compound, sand it down when it’s dry, and repaint the area to match the rest of the wall.

    NB: By following these steps, you can easily and safely remove drywall anchors with minimal effort and stress. With the right tools and a little bit of patience, you’ll be able to successfully remove drywall anchors from your wall in no time.

    How to repair drywalls

    1. Once the anchor has been removed, inspect the area and make sure there is no further damage to the wall.
    2. Use a utility knife to cut away any jagged edges or pieces of drywall that may remain from the anchor.
    3. Take a piece of drywall patching compound and spread it over the damaged area with a putty knife. Make sure to spread it evenly and press down firmly.
    4. Let the patch dry for about 24 hours before painting or wallpapering over it.

    NB: By following these steps, you can easily repair drywall after removing drywall anchors. With some patience and the right tools, you can get the job done quickly and efficiently.

    Conclusion

    Removing drywall anchors can seem like a daunting task, but it is a fairly straightforward process. You will need the right tools, like a drill and screwdriver, and a little patience. Depending on the type of anchor, you may need to use a putty knife or pliers to loosen it before attempting to unscrew it. Once you have the anchor out, you can patch up the hole with some spackle or a special wall repair compound.

    Once you’ve successfully removed the drywall anchors, make sure to use new ones when you hang something in your wall. This will help ensure that your picture frames or other items don’t come crashing down in the future. We hope this guide has been helpful and you were able to get those anchors out without too much trouble.

  • How to reset Samsung tablet

    How to reset Samsung tablet

    A factory reset is a simple process of restoring your device to its original settings. This procedure can be used to fix various technical issues with your device and can be a useful troubleshooting tool for any problems you are experiencing. Resetting your Samsung tablet can be a quick and easy process that helps you restore your device to its original factory settings. Whether you’re dealing with persistent software issues or simply want to start fresh, it’s important to know the steps for properly resetting your Samsung tablet.

    In this guide, we’ll walk you through the steps of performing a factory reset on your Samsung tablet. This will erase all data, settings, and apps from your device, so it is important to back up any important files before performing the reset.

    What you should know before resetting a Samsung tablet

    When you reset a Samsung tablet, it will be restored to its factory state. All your data and linked accounts will be removed, and you will have to set up the device like new.

    1. A factory reset will not downgrade your Samsung device to an older build. It will remain on the last installed firmware.
    2. A factory reset will not void the warranty of your device.
    3. A factory reset will not resolve any hardware issues that you are facing.

    How to factory reset a Samsung tablet

    Backing up your files should be the first thing to do when you want to reset your Samsung tablet. You can back up your device using a cloud storage service such as Google Drive, or take advantage of other backup solutions. If you’re having trouble with your Samsung tablet, resetting it may help.

    Factory reset your Samsung tablet using the reset settings

    You can use your tablet’s settings to perform a factory reset. Here’s how to do this:

    1. On your Samsung tablet, go to Settings
    2. Locate General Management
    3. Hit on Reset.
    4. Tap Factory data reset. You’ll see a list of apps and accounts installed on your device that would be deleted during the reset process.
    5. Scroll down and tap Reset. If prompted, enter your lock screen pattern or code.
    6. Tap Delete all.
    7. Your device will shut down. The reset procedure will take a few minutes, after which your device will reboot automatically.
    8. Once done, you can set up your tablet from scratch once again.

    Factory reset your Samsung tablet using recovery mode

    Recovery mode is just a simple way of accessing some settings on your Samsung phone without needing to locate settingused. s and getting confused. Depending on your device model, you will need to use the correct combination of keys or buttons when performing a factory reset. To use this method, follow the steps listed below:

    1. Switch off your device using the Power button.
    2. Once it has shut down, press and hold the Volume Up button and the Power button at the same time for a few seconds. The Samsung logo screen will come up, and your device will enter into recovery mode.
    3. You can now view a list of shortcuts in recovery mode. Press the Volume down button to highlight the option Wipe data/factory reset.
    4. You will also see a warning prompt to save your Google account credentials before attempting a hard reset.
    5. Make sure you have saved your Google account details, and then press the Power key to select the highlighted option.
    6. On the confirmation screen, tap Yes to wipe all user data.
    7. Wait a few seconds for the reset process to complete. On the recovery page, tap Reboot system now.
    8. Once the process is completed, press the Power key to reboot it.
    9. After the reset, you might need to provide your Google account credentials to set it up again. If you’ve forgotten your password, visit the Google account recovery website to reset it.
    10. Once done, you can set up your tablet from scratch once again.

    How to backup your files before resetting your Samsung tablet

    Unless you don’t need the files on the Samsung tablet before resetting, backup is very important in a reset process. With backup, you are assure to recover back everything on the phone before resetting. Your photos,, your emails, your files, your musics and alot. If you will be needing all these things again after resetting your phone, then it is advisable to backup before resetting.

    1. Backup using Samsung cloud

    Samsung cloud might not be your first backup choice but as a Samsung user, it is also your closest choice. In using a Samsung device, you have a Samsung cloud space where you can register and get yourself a Samsung account login. With the cloud assessable, you can backup your files right away before resetting your tablet.

    You can backup things such as important device settings, home screen pages, apps, and calendar entries on the tablet, files, folders, pictures, browser history, etc After resetting, you just login back to your Samsung cloud and you recover your backup data. To use the Samsung cloud,

    1. Locate Onedrive on your Samsung tablet and create and account.
    2. Open the Settings menu.
    3. Scroll down and select Accounts and backup.
    4. Under Samsung Cloud, select Back up data.
    5. Proceed to enable the toggles for all the items you’d like to back up.
    6. Tap the “Back up now” option to create a backup that’s automatically synced to the cloud.
    7. If you had previously set up Samsung Cloud, your device would be automatically backed up.
    8. A backup occurs when the device is on charge, connected to Wi-Fi, and the screen is off.
    9. Once backup is complete, you will be notified and can now proceed to resetting your device.

    2. Backup using Google drive

    Google drive is the most popular and used backup system among android or Gmail account users. Google drive is easy, safe and convenient toe as your backup friend. All you need is your email address and you can backup your files right before resetting your Samsung tablet. To backup using Google drive;

    1. Go to settings
    2. Scroll down and click on Account and backup
    3. Tap on Backup and restore
    4. In the next menu, select Google account.
    5. Click on account storage and select the email you want to backup on
    6. Toggle on backup with Google if it has been toggled off.
    7. Click backup now
    8. Wait for some minutes for your files and data to finish backing up.

    Conclusion

    Resetting your Samsung tablet has its good side and bad side. Before you will think of resetting your phone, then it means your device needs a fresh start but don’t forget to reset your tablet without thinking of backup. You can follow the steps below to reset your phone and to backup your files before resetting in order to be on the safer side of not loosing your important files.

  • How to delete pins on Pinterest

    How to delete pins on Pinterest

    If you’re an avid Pinterest user, you know how easy it is to accumulate pins over time. However, if you find that you have pins that are outdated or no longer relevant, you may want to learn how to delete them. Deleting pins on Pinterest is a straightforward process that can help you keep your profile neat and organized.

    This article will provide a step-by-step guide on how to delete pins on Pinterest. We’ll discuss why you might want to delete a pin, as well as the various ways to remove them from your account.

    What is Pinterest

    Pinterest is an online platform that allows users to virtually “pin” images and videos onto digital boards. Users are able to browse through the millions of pins available on the platform and find creative ideas and inspiration for projects, activities, and more.

    With Pinterest, you can create your own boards, follow others’ boards, and even use the search function to find content related to a specific topic or keyword. Pinterest is a great way to find new recipes, craft ideas, DIY projects, fashion inspiration, and much more.

    What are pins on Pinterest

    Pins on Pinterest are like bookmarks. They can be shared with others, used to store information, and even bought or sold. Pins on Pinterest can also be used to display your own creative work, promote products, or share interesting content with others.

    Why you might want to remove Pinterest pins from your profile

    If you’re a Pinterest user, you know the potential power that a well-curated pinboard can have. By carefully choosing images and content to feature on your profile, you can communicate your interests and values in an attractive and visually appealing way.

    However, as time passes, you may find yourself wanting to remove some pins from your profile. Perhaps you posted something inappropriate or outdated. Maybe the content doesn’t fit in with the rest of your boards. Or maybe you just want to refresh your look. Regardless of the reason, deleting pins from Pinterest is a straightforward process.

    How to remove pins on Pinterest on a browser

    1. Sign in to your Pinterest account.
    2. Click your profile picture located in the upper right corner of your screen.
    3. Find the board you saved the pin to and click it.
    4. Open the pin you wish to delete.
    5. Click the three-dot icon next to the pin.
    6. Select “Delete” at the bottom left corner, then “Delete Pin.”

    Delete remove pins on Pinterest on an iPhone app

    1. Launch Pinterest on your iPhone and tap your profile picture.
    2. Locate the board holding the pin you wish to delete and tap it.
    3. Long-press on the pin.
    4. Select the pencil icon to see additional options.
    5. Tap on “Delete” to remove the pin.
    6. Delete Pinterest on an Android app
    7. Launch the Pinterest mobile app.
    8. Select the board containing the pin you wish to delete.
    9. Tap and hold the pin.
    10. Go to the pencil icon to see more options.
    11. Select “Delete.”

    Delete remove pins om Pinterest on an Android app

    1. Launch the Pinterest mobile app on your android device.
    2. Select the board containing the pin you wish to delete.
    3. Tap and hold the pin.
    4. Go to the pencil icon to see more options.
    5. Select “Delete.”

    How to bulk delete multiple pins at once

    1. Launch the Pinterest app and tap your profile picture at the bottom right corner to access your boards.
    2. Open the board containing the pins you wish to delete.
    3. Tap “Organize”.
    4. Select a the pins you wish to delete. A checkmark and a black frame will appear around the selected pins.
    5. Tap the trash bin icon located at the bottom of your screen.
    6. A pop up will appear asking if you are sure to delete. Confirm by tapping “Delete.”

    Conclusion

    I’m sure you now know how to delete pins on Pinterest. Deleting a pin is a great way to clean up your boards and keep them organized. Remember to take time to review and delete pins that are no longer relevant to you or that you don’t want to show up on your boards.

    It’s also important to review the content that is being pinned and remove anything that could be seen as offensive, inappropriate, or inaccurate. By following these steps, you can keep your boards looking neat and organized, and make sure that everything you pin is appropriate and accurate.

  • How to exit full-screen mode

    How to exit full-screen mode

    Many of us use our computers for a variety of activities, such as streaming movies or playing games. Sometimes, we end up in full-screen mode without knowing how to get out of it. Fortunately, exiting full-screen mode is actually quite simple and can be done in just a few steps.

    What is a full-screen mode?

    Full-screen mode is a feature in many modern computer programs that allows the user to maximize the viewing area of their window. When a program is in full-screen mode, it takes up the entire computer screen and can be used without any other windows or programs being visible. This makes the program easier to view and can be helpful for tasks such as watching movies or playing video games.

    Why you may want to exit full-screen mode

    Full-screen mode is useful for viewing content without distractions, but it can also be inconvenient when you need to access other windows or applications. It’s common to enter full-screen mode when watching a video or streaming a movie, but sometimes you might want to adjust the volume, change the brightness, or even close the program or website. Exiting full-screen mode is simple and can be done on any device by pressing a few keys on your keyboard or tapping an icon on the display.

    How to exit full-screen mode

    On Windows

    Using the F11 key

    Press the F11 key on your computer’s keyboard to exit full-screen mode. Note that pressing the key again will toggle you back to full-screen mode.

    Using the Exit button

    While in full-screen mode, swipe your mouse to the top of your screen until a small circle with an “X” appears in the top-left of your window. Click the “X” to exit full-screen mode.

    Using the Escape key

    In certain apps, pressing the “ESC” key on your keyboard can take you out of full-screen mode. 

    On macOS

    Using the green button

    While using any application in full-screen mode, move your pointer to the upper-left corner of your screen. This will activate macOS commands for controlling open windows. Click on the green button to exit the full screen.

    Combining shortcut keys

    If you like to use keyboard shortcuts, you can press Command+Control+F. That same keyboard shortcut is used to go in and out of full-screen mode.

    Using the macOS menu bar

    And finally, you can do things the traditional way. Once again, hover with your pointer over the top portion of your screen until you see the macOS menu bar. Then, navigate to View, and then Exit Full Screen. That’s it!

    On a mobile device

    By default, users exit activities by swiping from left to right. If the app contains horizontally scrollable content, users first have to navigate to the edge of the content and then swipe again from left to right to exit the app. You can also exit full screen by location of the exit tab mostly at the top right corner of your phone screen. You can also press the back button on your mobile device to exit the full screen.

    Conclusion

    Exiting full-screen mode is a simple process that can be done in just a few steps. Whether you’re using a laptop, desktop, or smartphone, it’s easy to go back to the original window size. Whether you’re watching a movie or playing a game, make sure to follow the steps outlined above for exiting full-screen mode so you can go about your day without hassle.

  • How to restart a Nintendo switch

    How to restart a Nintendo switch

    Restarting a Nintendo Switch is a fairly simple process, but it can be difficult to figure out if you don’t know how. If your Nintendo Switch is having trouble, restarting it can often be a quick and easy fix. In this blog post, we’ll cover how to restart your Nintendo Switch so that you can get back to gaming in no time.

    What is a Nintendo Switch

    The Nintendo Switch is an incredibly popular gaming console, capable of providing hours of entertainment and fun. Whether you’re playing in handheld mode or with the included Joy-Cons, the Switch offers something for everyone.

    The Nintendo Switch is a gaming console that was released around 2017. It is a hybrid console that can be used both at home and on the go, making it one of the most versatile consoles on the market today. The Nintendo Switch has quickly become one of the most popular gaming systems for both adults and children.

    The Nintendo Switch comes with a variety of games, including some of Nintendo’s most beloved franchises such as Mario and Zelda. This makes it an excellent choice for anyone looking to get into gaming or just wanting to enjoy some of their favorite classic titles.

    Whether you’re playing your favorite game or streaming something from the internet, sometimes you may need to restart your Nintendo Switch. Restarting your system can help to fix any technical issues and ensure your console is running optimally.

    Why is it necessary to restart your Nintendo switch?

    Restarting your Nintendo Switch is an important part of keeping your console in top condition. Not only does it help reduce the risk of technical issues, but it can also help you enjoy your gaming experience more. There are a few reasons why it’s important to restart your Nintendo Switch on a regular basis.

    1. It helps clear out any memory or data that has been stored in the console’s RAM, which can improve performance and help prevent technical issues.
    2. Restarting your Switch will also help reduce the amount of battery power used while gaming, as it allows the console to enter into a low-power state.
    3. Restarting your Switch can help with game compatibility, as some games may require a restart before they’ll run properly.

    How to restart the Nintendo Switch

    In restarting a Nintendo Switch, the best way is to properly shut it down and after shutting it down, you then switch it on again. To properly turn off your Nintendo and switch it back again,

    1. Press and hold the power button on the top of the device until the power menu appears.
    2. Now, disconnect your Nintendo from any external power source. The Nintendo Switch can be restarted even when it is not connected to a power source, but disconnecting it will ensure that the device is completely powered off.
    3. Wait a few seconds after disconnecting the Nintendo Switch from all power sources to allow the device to fully shut down.
    4. After the Nintendo Switch has to been powered off and disconnected from all power sources, you can now press and hold the power button again to restart the device.
    5. Wait for the Nintendo Switch to boot up after pressing the power button.
    6. It will take a few moments for the Nintendo Switch to boot up and be ready to use again.

    Conclusion

    Restarting a Nintendo Switch is a simple process and should be done periodically to help keep your system running smoothly. All you need to do is hold down the power button on the top of the console for 12 seconds or until it shuts down. Then, press the power button again and wait for the console to boot up. This will ensure that any programs or processes that are running are closed properly. Restarting your Nintendo Switch regularly can help resolve any technical issues you may be having with the console.

  • How to check blocked numbers on iPhone

    How to check blocked numbers on iPhone

    Many people are looking for a way to view the list of blocked numbers. Fortunately, it’s easy to check which numbers are blocked on an iPhone. This article will take a look at how to check blocked numbers on an iPhone. With just a few taps, you’ll be able to view the list of numbers you’ve blocked and manage them if necessary.

    What does it mean to block a phone number on an iPhone

    When it comes to controlling who can and cannot contact you on your iPhone, blocking certain phone numbers is a great way to do that. Blocking a number prevents that person from calling or messaging you on your iPhone. But what does it mean to block a phone number on an iPhone, and how can you check which numbers are blocked?

    Blocking numbers is an important way to protect yourself and your privacy. Knowing how to check which numbers are currently blocked on your iPhone can help you keep track of who can and cannot contact you.

    Why will someone want to block a number on his iPhone?

    For many iPhone users, blocking a number is a way of protecting themselves from unwanted or malicious callers. Whether it be someone who is constantly trying to call you or someone who sends you inappropriate texts, blocking the number can provide a sense of relief and security. Blocking numbers is also useful for preventing telemarketers and other automated calls from reaching your device.

    When a number is blocked, calls from that number will no longer ring on your device, and any text messages sent from that number will be blocked. Additionally, if the caller leaves a voicemail, the voicemail will not show up in your voicemail box. This makes it easier to avoid the person and prevents them from being able to contact you in any way.

    Blocking numbers on an iPhone can be beneficial for many reasons, but it’s important to remember that once a number has been blocked, it can be difficult to determine if it was actually blocked. Fortunately, there are ways to check which numbers have been blocked on an iPhone.

    Methods for checking blocked numbers on an iPhone depending on iOS version

    Checking which numbers have been blocked on an iPhone can be a tricky process, as the steps depend on the iOS version of your device. If you are using an older version of iOS, the process may be slightly different than what is described below.

    Here are the methods for checking blocked numbers on an iPhone depending on the iOS version:

    Check blocked numbers on an iPhone running iOS 14 or later

    1. Open the settings app on your iPhone.
    2. Scroll down and tap on the “Phone” option.
    3. Tap on the “Blocked Contacts” option to view a list of all the numbers you have blocked on your iPhone.

    Check blocked numbers on an iPhone running iOS 13 or earlier

    1. Open the Settings app on your iPhone.
    2. Scroll down and tap on the “Phone” option.
    3. Tap on the “Call Blocking and Identification” option to view a list of all the numbers you have blocked on your iPhone.

    NB: Once you have followed these steps, you will be able to see all the numbers that have been blocked on your device. This can be a useful way to keep track of which numbers have been blocked, so that you don’t accidentally call someone that has been blocked.

    Conclusion

    At this point, you should have a better understanding of how to check blocked numbers on your iPhone. While it may seem like a difficult process at first, all of the steps involved are relatively straightforward and should take only a few minutes to complete.

    With this knowledge in hand, you can now easily determine which numbers have been blocked and which ones haven’t, giving you control over who is able to contact you.

  • How to remove password from Excel spreadsheet

    How to remove password from Excel spreadsheet

    If you have ever had an Excel spreadsheet that was password-protected, you know how frustrating it can be trying to access the data. It’s even more frustrating when you can’t remember the password or don’t know who set the password. In this article, we’ll show you how to remove the password from an Excel spreadsheet quickly and easily.

    What is a password protected spreadsheet

    A password protected Excel spreadsheet is a document that has been secured with a password so that only those who know the correct password can access the information stored in it. This type of security measure is often used to protect sensitive information such as financial data, personnel records, and confidential business documents.

    In order to ensure the security of your data, it’s important to protect your Excel spreadsheets with a strong password. However, if you find yourself needing to open a spreadsheet that’s been protected with a password, you may be wondering how to remove the password from the file.

    Why will someone want to remove password from spreadsheet?

    Removing a password from an Excel spreadsheet can be a helpful tool for many different purposes.

    It can be used to allow others to view or edit the contents of a spreadsheet without having to enter a password. It can also be used to remove any restrictions that have been placed on the spreadsheet, such as preventing data from being changed or deleted.

    One common reasons why someone would want to remove a password from a spreadsheet is because it has been forgotten. This can happen when passwords are changed frequently, or if the user is not familiar with the application. In these cases, it can be very difficult to figure out the correct password and thus accessing the spreadsheet may not be possible.

    Another reason why someone might want to remove a password from a spreadsheet is if they want to share the spreadsheet with others but don’t want them to have access to certain information. Removing the password will make it easier to share the spreadsheet while still protecting certain elements of the data.

    Lastly, removing a password from an Excel spreadsheet can also make it easier to troubleshoot issues that may arise. If there is an issue with formatting or incorrect data, then it will be easier to debug the issue without having to remember the password first.

    What is the risk and drawbacks in removing a password from an Excel spreadsheet

    Removing a password from an Excel spreadsheet can provide an increased level of convenience for the user, but it is important to recognize the risks and drawbacks associated with this action.

    First and foremost, removing a password from an Excel spreadsheet can make it much easier for unauthorized users to gain access to your data. While the use of strong passwords is recommended for protecting confidential information, without a password in place, any user can open the spreadsheet without authentication. This could lead to malicious individuals making unwanted changes to your data or stealing sensitive information.

    Another risk is that, removing the password can expose your data to errors or corruption. If the spreadsheet contains formulas or macros, they could be corrupted if a user makes changes or edits them without authorization. Similarly, if the spreadsheet is edited by multiple users, removing the password means there is no way to prevent data entry errors, which can also cause problems.

    Lastly, if you need to share the spreadsheet with other users, they will not be able to access it unless they know the file name and where it is located. Without a password, anyone with access to the file can easily view or modify its contents.

    NB: Removing a password from an Excel spreadsheet can be convenient, but it is important to recognize the risks and drawbacks associated with this action. It’s best to use strong passwords to protect your data from unauthorized access and to ensure that changes are not made without authorization.

    How to remove a password from an Excel spreadsheet

    1. Using the built-in password removal feature

    Removing a password from an Excel spreadsheet can be a difficult task. Fortunately, there are several methods to do it, and some of them are surprisingly easy. In this article, we’ll look at how to use the built-in password removal feature in Excel to quickly and easily remove a password from a spreadsheet.

    1. Open the Excel spreadsheet in Microsoft Office Excel.
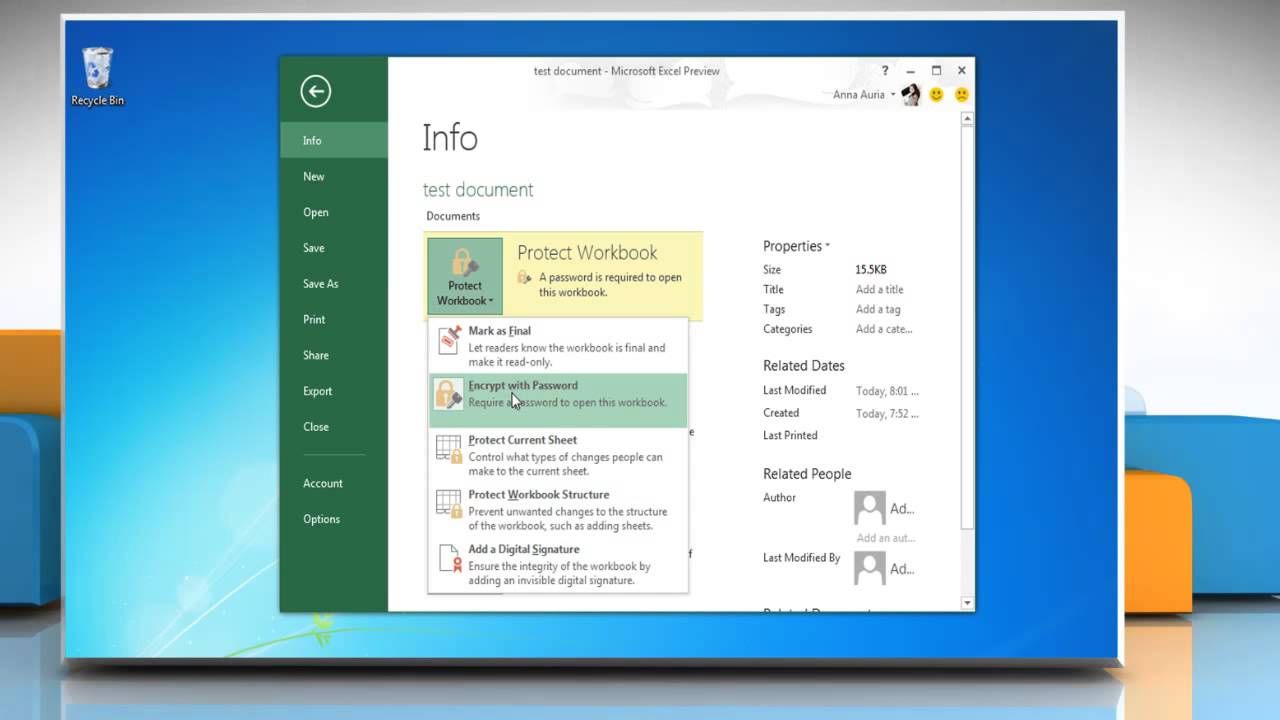
    2. Once the file is opened, select the “File tab” in the top left corner of the window and then select “Info” from the list of options that appears.
    3. On the Info page, click on the “Protect Workbook” button and then select “Encrypt with Password” from the menu that appears.
    4. In the Encrypt with Password window, enter the current password for the spreadsheet and then click OK.
    5. Next, a new window will appear with a message saying that you can now remove the password.
    6. Click on the Remove Password button and then enter the same password again. Finally, click OK to remove the password from the spreadsheet.
    7. That’s it! You have now successfully removed the password from the Excel spreadsheet.

    NB: It’s important to remember that this method only works if you know the current password of the spreadsheet. If you don’t know the password, you will need to use one other methods.

    2. Using a third party tool such as password cracking software to remove password from spreadsheet

    Have you ever had a problem where you needed to remove the password from an Excel spreadsheet but couldn’t figure out how to do it? We will show you how to use a third-party tool such as password cracking software to easily remove the password from your Excel spreadsheet.

    1. First, you will need to find a reliable password cracking software that can help you remove the password from your Excel spreadsheet.
    2. There are many password cracking software options out there, so you should take some time to research the different options and pick one that meets your needs.
    3. Once you’ve chosen a software solution, download and install it on your computer.
    4. Once you’ve installed the password cracking software, open the Excel spreadsheet that contains the password and select Open with Password Cracking Software from the File menu.
    5. Enter your desired username and password, then click OK.
    6. The software will attempt to crack the password and if it is successful, it will display the unlocked Excel file on your computer.
    7. Once you have successfully removed the password from your Excel spreadsheet, you can now make any changes or edits to it without having to worry about it being locked again.
    8. Remember to always keep a backup of your original spreadsheet so you don’t accidentally make changes to it that you didn’t intend to.
    9. Some recommended spreadsheet password software are; Passper for Excel, Excel Password Recovery Master, Straxx Excel Password Remover, Password-find.

    3. Remove a password from spreadsheet by modifying the file

    By modifying the underlying code of the spreadsheet, you can remove the password from your Excel document and regain full access to the contents. This method is relatively easy, and only requires a few simple steps.

    1. Open up your spreadsheet in Microsoft Excel.
    2. Once it’s open, click on File in the top left corner and then select Save As.
    3. Choose the Save As Type dropdown and select Excel 97-2003 Workbook (.xls) and hit save.
    4. Next, right-click on the newly saved file and select Open with….
    5. From the list that appears, select Notepad or any other text editor.
    6. This will open up the spreadsheet in raw code format.
    7. Scroll down to the bottom of the sheet until you find the words Password= followed by a string of letters and numbers. This is the code for your password.
    8. Delete it and save your file.
    9. Finally, open up your Excel spreadsheet again and the password will be gone!
    10. You now have access to all of your data in the spreadsheet without having to reset or enter a new password.

    Conclusion

    Removing a password from an Excel spreadsheet can be done quickly and easily. All you need to do is open the spreadsheet, click the Review tab at the top of the Excel window, and select Unprotect Sheet. You may be asked to enter the current password in order to complete the process, so make sure you have it available.

    Once this is done, the password will be removed and you can start making changes to your spreadsheet as you please. If you are ever in need of setting a password for your spreadsheet again, you can simply go back through the same steps to add one.

  • How to print text messages from an Android device

    How to print text messages from an Android device

    Text messages are an important part of our lives, but it can be hard to keep track of them all. If you have an Android device, you can easily print out your text messages so that you can save them for future reference.

    Sometimes you might need to print out your text messages. You can save them to your phone or back them up to Google Drive. However, there may be a time when you need a hard copy. you might need a printed copy of text messages for legal or medical reasons. Whether you have a wireless printer that connects to your Wi-Fi network, or an older printer attached by a cable, you can print out texts.

    This article will guide you through the process of printing text messages from your Android device.

    What is a text message?

    A text message is an electronic communication sent between two or more devices. It is typically done using cellular networks and can be sent from any smartphone or tablet running the Android operating system. The messages can be composed of text, images, video, and audio files.

    Importance of text message

    In the modern world, text messages have become a powerful and important way of communicating with friends, family, coworkers, and customers. They are often used for business communication and customer service, as well as for personal conversations.

    Why is it important to print out text messages?

    Printing text messages from your Android device is important for many reasons. For example, if you need to prove that a conversation took place, or show a business partner or customer what was discussed in a meeting, printing your text messages is the best way to do so. Furthermore, if you need to archive text conversations for legal reasons, or just keep them for sentimental value, printing them is a must. Additionally, if you’re having trouble with your phone or the texting app, printing your messages can be a good backup plan in case they are lost.

    In short, printing text messages from an Android device can be an invaluable tool for keeping track of your conversations and archiving important documents. With the right software and a few simple steps, you can easily print any text messages you need to preserve.

    How to print text messages from an Android device

    There are some apps that can also help you print out text message conversations from Android. All you have to do is to visit Playstore and search them out.

    SMS Backup+

    SMS Backup+allows you to back up SMS, MMS, and call history using separate tags in Gmail and Google Calendar. So you can use it to transfer messages from Android to Gmail, then download the files from Gmail and print them. Besides, the software is free, so you can complete the process at no cost.

    SMS to Text

    SMS to Text is an SMS backup and recovery application that allows you to export SMS messages and convert them to Plain Text and CSV file formats. Except for the free version, SMS to Text also allows you to export SMS messages, convert them to Excel and HTML file formats, and send them to your email as attachments! After that, you can download the files and print them with ease.

    Text to Email

    Text to Email is a backup tool for converting text/messages to Text/PDF/CSV and/or as email body for later use. After you used this app to have your Android messages on email, you can download their files or copy the files to word for printing with ease.

    Steps to print out your SMS using any of the apps above

    1. Visit the google play store on your android device
    2. In the search bar, type in SMS Backup+ and hit search
    3. When the app pops up, download the app and register using your email address and other required credentials.
    4. Enter your dashboard and setup a backup
    5. You will be asked to allow permission for the app to access your SMS. Click allow to all.
    6. Now, back up all SMS you want to print.
    7. After a successful backup, you can save the backup as a PDF on your phone or tablet.
    8. Open the PDF file on your phone and connect your printer to the WIFI
    9. Click on share and click on PRINT on your device
    10. Initiate printing and allow all backup SMS to print out.

    How to print out your SMS using screenshot

    Open the Messages app on your Android phone, and open a conversation that you want to print. Then you might start to take a screenshot of the message conversation one by one for printing. To capture a screenshot on your device in most android devices, press the down volume and the switch all at the same time and your screen will be captured. After taking your screenshot,

    1. Connect your device to your printer and open the image from the gallery
    2. Click on the three dots mostly at the top right corner of your device
    3. Click share and hit on PRINT
    4. Your screenshot image will b printed out to be used.

    Conclusion

    Printing text messages from your Android device can be a great way to save important conversations or print off funny texts for memories. It is a fairly simple process, though it does require a few steps to get the job done.

    The first step is to back up your text messages. This will allow you to access them on another device, like a computer. Once you’ve backed up your text messages, you can then access them from the computer and use a program or website to print them out.

    Lastly, you can choose to save the printed text messages in either physical or digital form. If you want to save them physically, you can take them to a store that offers printing services and have them printed out for you. If you prefer digital storage, you can save the printed messages on a USB drive or other external storage device.

    No matter how you decide to print your text messages, you now have a way to keep the conversations that are important to you close at hand. With these steps, printing text messages from an Android device is quick and easy.